June 11, 2025
Tired of tangled AI integrations that feel like a maze? Discover how the Model Context Protocol (MCP) is revolutionizing AI connectivity, making it as simple as plugging in a USB-C cable! Dive into our latest article to explore how MCP transforms chaotic integration into seamless harmony.
MCP provides a standardized way for AI models to communicate with tools, simplifying integration and enabling AI systems to perform tasks autonomously. This protocol transforms complex AI development into streamlined application building.

5tgb6. 898
MCP: Building AI Integrations with the Model Context Protocol
Imagine trying to charge your smartphone with a dozen different cables scattered across your desk—each device requiring its unique connector, none compatible with the others. Frustrating, right? This exact scenario has been playing out in AI development. Connecting AI models to external tools and data sources has been a tangled mess of custom integrations, incompatible APIs, and endless workarounds.
Enter the Model Context Protocol (MCP), the “USB-C for AI” revolutionizing how we build intelligent applications. As USB-C simplified device connectivity, MCP provides a standardized way for AI models to communicate with external services, databases, and tools. This comprehensive guide explores MCP’s architecture, builds a practical server using FastMCP, and integrates it with Claude Desktop, LangChain, DSPy, and LiteLLM—transforming how you approach AI development.
The Rise of Agentic AI: From Chatbots to Action-Oriented Systems
Before diving into MCP’s technical details, it’s crucial to understand the paradigm shift happening in AI: the evolution from simple chatbots to agentic systems that can take real-world actions.
What is Agentic Tooling?
Agentic tooling refers to AI systems that can autonomously use external tools and services to accomplish tasks. Rather than just generating text responses, these AI “agents” can:
- Query databases to retrieve specific information
- Call APIs to book appointments or make purchases
- Execute code to perform calculations or data analysis
- Control software to automate complex workflows
- Interact with multiple systems to complete multi-step tasks
Consider it the difference between asking a librarian for information versus having a research assistant who can gather documents, make phone calls, and compile a comprehensive report.
How Modern LLMs Enable Tool Use
Leading AI models like Claude and GPT-4 have built-in capabilities for tool interaction through a process called function calling or tool calling:
The Tool Calling Process
- Tool Discovery: The AI model receives descriptions of available tools and their parameters
- Intent Recognition: Based on user input, the model determines which tools are needed
- Parameter Extraction: The model extracts the necessary parameters from the conversation context
- Tool Invocation: The model generates a structured request to call the appropriate tool
- Result Integration: The tool’s output is incorporated back into the conversation flow
Here’s a simplified example of how this works:
User: "What's the weather like in New York?"

Model thinks:
- User wants weather information
- I have access to a weather tool
- Need to call get_weather(location="New York")

Model generates tool call:
{
  "tool": "get_weather",
  "parameters": {"location": "New York"}
}

Tool returns: {"temperature": 72, "conditions": "sunny"}

Model responds: "It's currently 72°F and sunny in New York!"
Why Agentic Tooling Matters for Integration
Agentic tooling represents a fundamental shift in how we think about AI capabilities:
1. Breaking the Information Silo
Traditional AI models are limited to their training data. Agentic systems can access real-time information, current databases, and live APIs, making them more useful for practical applications.
2. Enabling Complex Workflows
Instead of requiring humans to manually coordinate AI output and system actions, agentic AI can handle multi-step processes autonomously—like analyzing data, generating reports, and then emailing them to stakeholders.
3. Reducing Integration Complexity
Without agentic tooling, integrating AI into business processes requires complex custom code to bridge AI outputs with system actions. Tool-enabled AI can directly interact with existing systems through their APIs.
4. Scaling Human Capabilities
Agentic AI doesn’t replace human decision-making but amplifies it. A human can direct high-level goals while the AI handles the mechanical steps of data gathering, processing, and action execution.
The Integration Challenge That MCP Solves
Here’s where the problem becomes clear: while modern LLMs support tool calling, each AI platform implements it differently:
- OpenAI uses function calling with specific JSON schemas
- Anthropic’s Claude uses tool use blocks with different formatting
- Google’s Gemini has its function-calling approach
- Local models through Ollama or LM Studio have varying support levels
If you build a tool for one AI platform, you must rebuild it with different formatting, authentication, and protocols for each additional platform you want to support. The M × N problem strikes again!
MCP solves this by providing a universal standard for AI tool integration. Build your tools once using the MCP protocol, and they automatically work with any MCP-compatible AI system. Whether using Claude, GPT-4, or a local model, your tools remain the same—only the client changes.
This standardization makes MCP revolutionary: transforming agentic AI from a platform-specific capability into a universal, interoperable ecosystem where tools, data sources, and AI models can mix and match freely.
The Integration Nightmare That MCP Solves
Before diving into the technical details, let’s understand why MCP matters. In the pre-MCP world, connecting AI models to external resources was plagued by what developers call the “M × N problem.”
Picture this: You have 3 AI models that need to connect to 5 different data sources. Without a standard protocol, you’d need to build 15 custom integrations (3 × 5 = 15). Scale this to enterprise levels—dozens of models connecting to hundreds of data sources—and you’re looking at thousands of custom integrations to build and maintain.
MCP (Model Context Protocol) is an open-source standard developed by Anthropic that defines how AI applications communicate with external resources and tools. Think of it as a universal translator that allows any MCP-compatible AI model to work with any MCP-compatible service, eliminating the need for custom integrations.
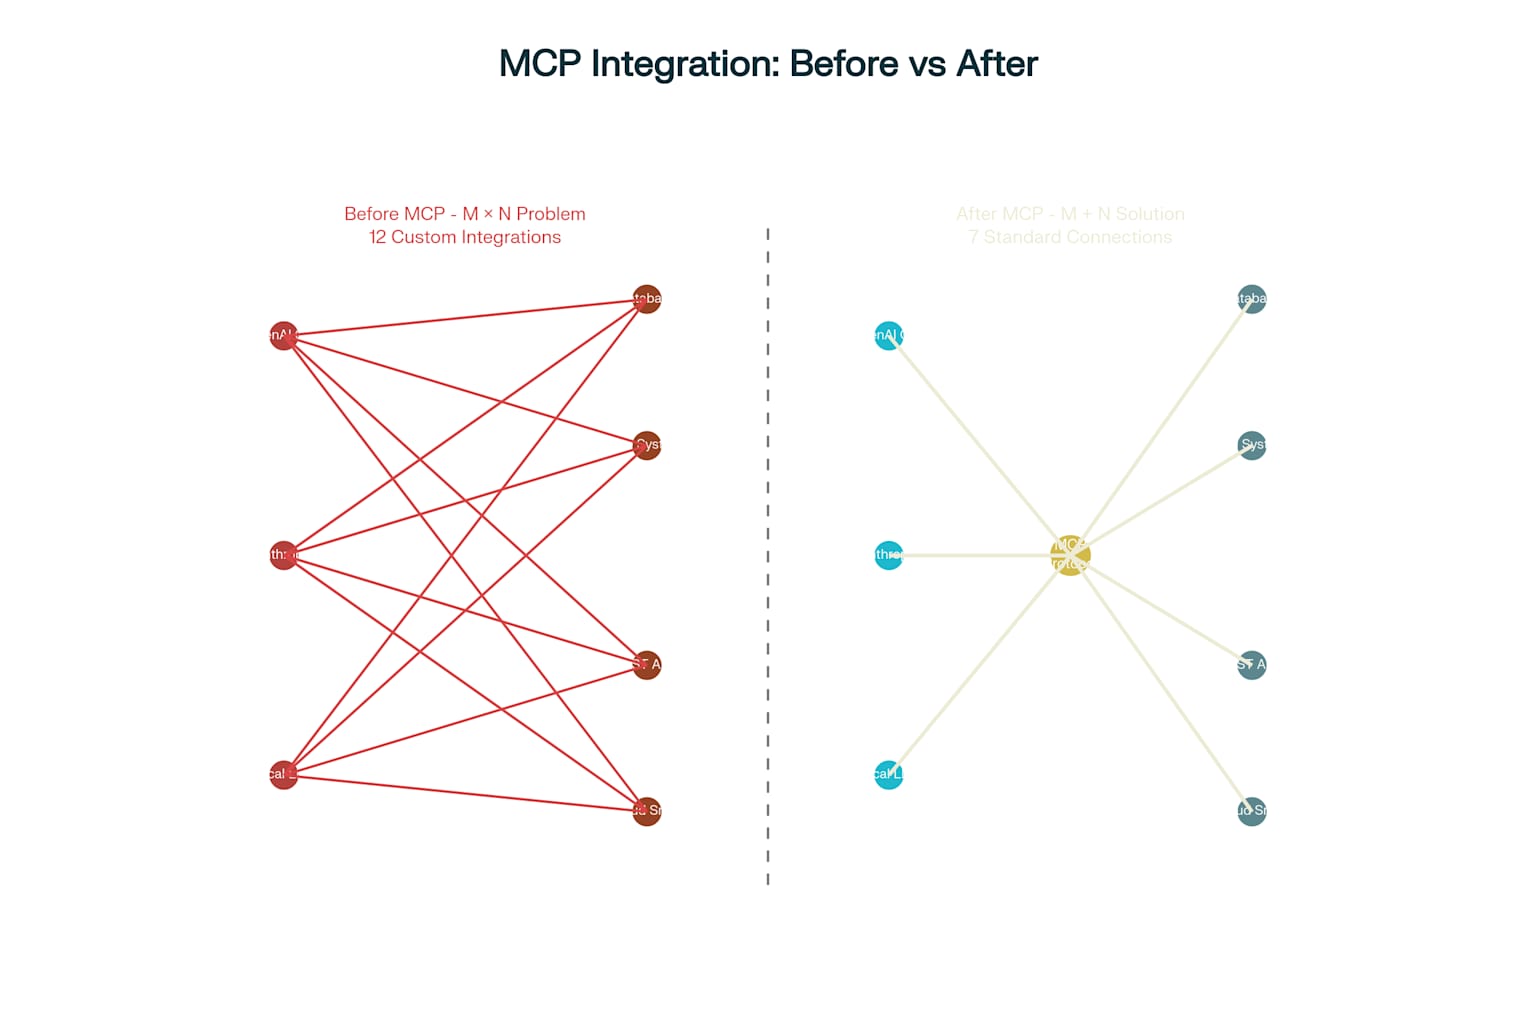
MCP Integration
Understanding MCP Architecture: The Three-Layer System
MCP operates on a three-layer architecture that creates a clean separation of concerns:
1. Hosts: The AI Application Layer
The host is your AI application—think Claude Desktop, ChatGPT, or your custom AI assistant. This intelligent system needs access to external data and tools to provide meaningful responses. The host doesn’t need to understand the specifics of every external system; it just needs to speak the MCP protocol.
2. Clients: The Translation Layer
Clients are the communication bridge between hosts and servers. They handle the MCP protocol details, manage connections, and translate requests between the AI application and external services. Clients are typically embedded within host applications or as separate libraries facilitating communication.
3. Servers: The Service Provider Layer
Servers expose external resources and tools through the MCP protocol. These could be databases, APIs, file systems, or any service you want your AI to interact with. Servers standardize access to these resources, making them easily consumable by any MCP-compatible host.
This architecture creates a hub-and-spoke model where:
- One host can connect to multiple servers through clients
- Multiple hosts can share the same servers
- Adding new capabilities means building one server instead of N integrations
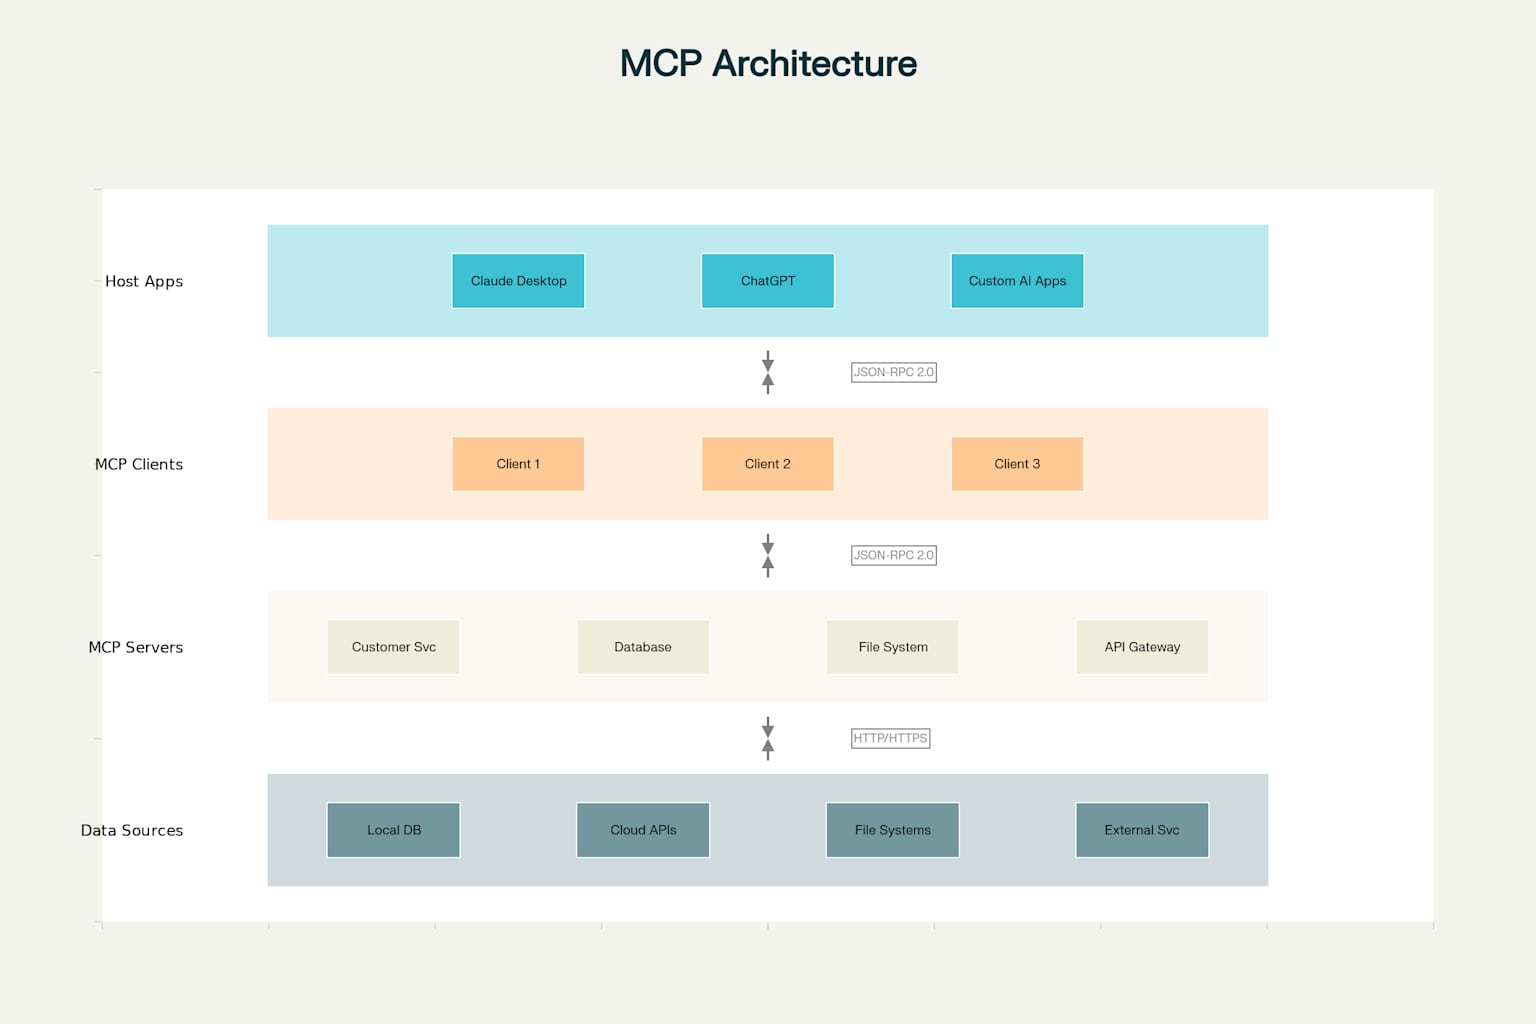
MCP Architecture
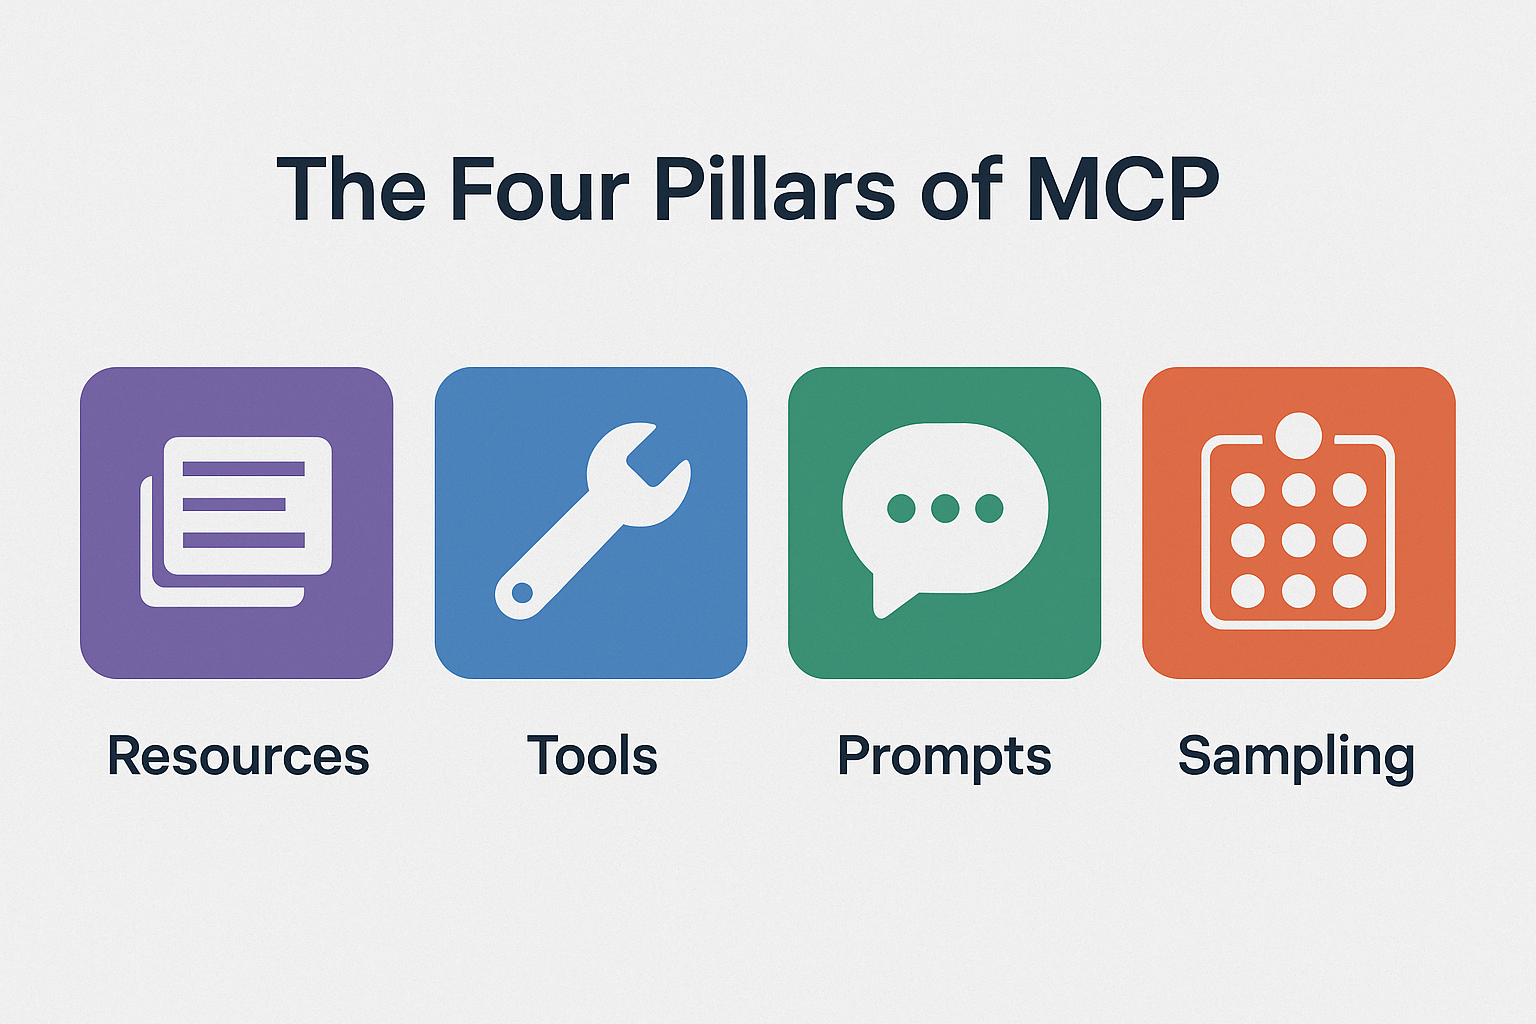
The Four Pillars of MCP
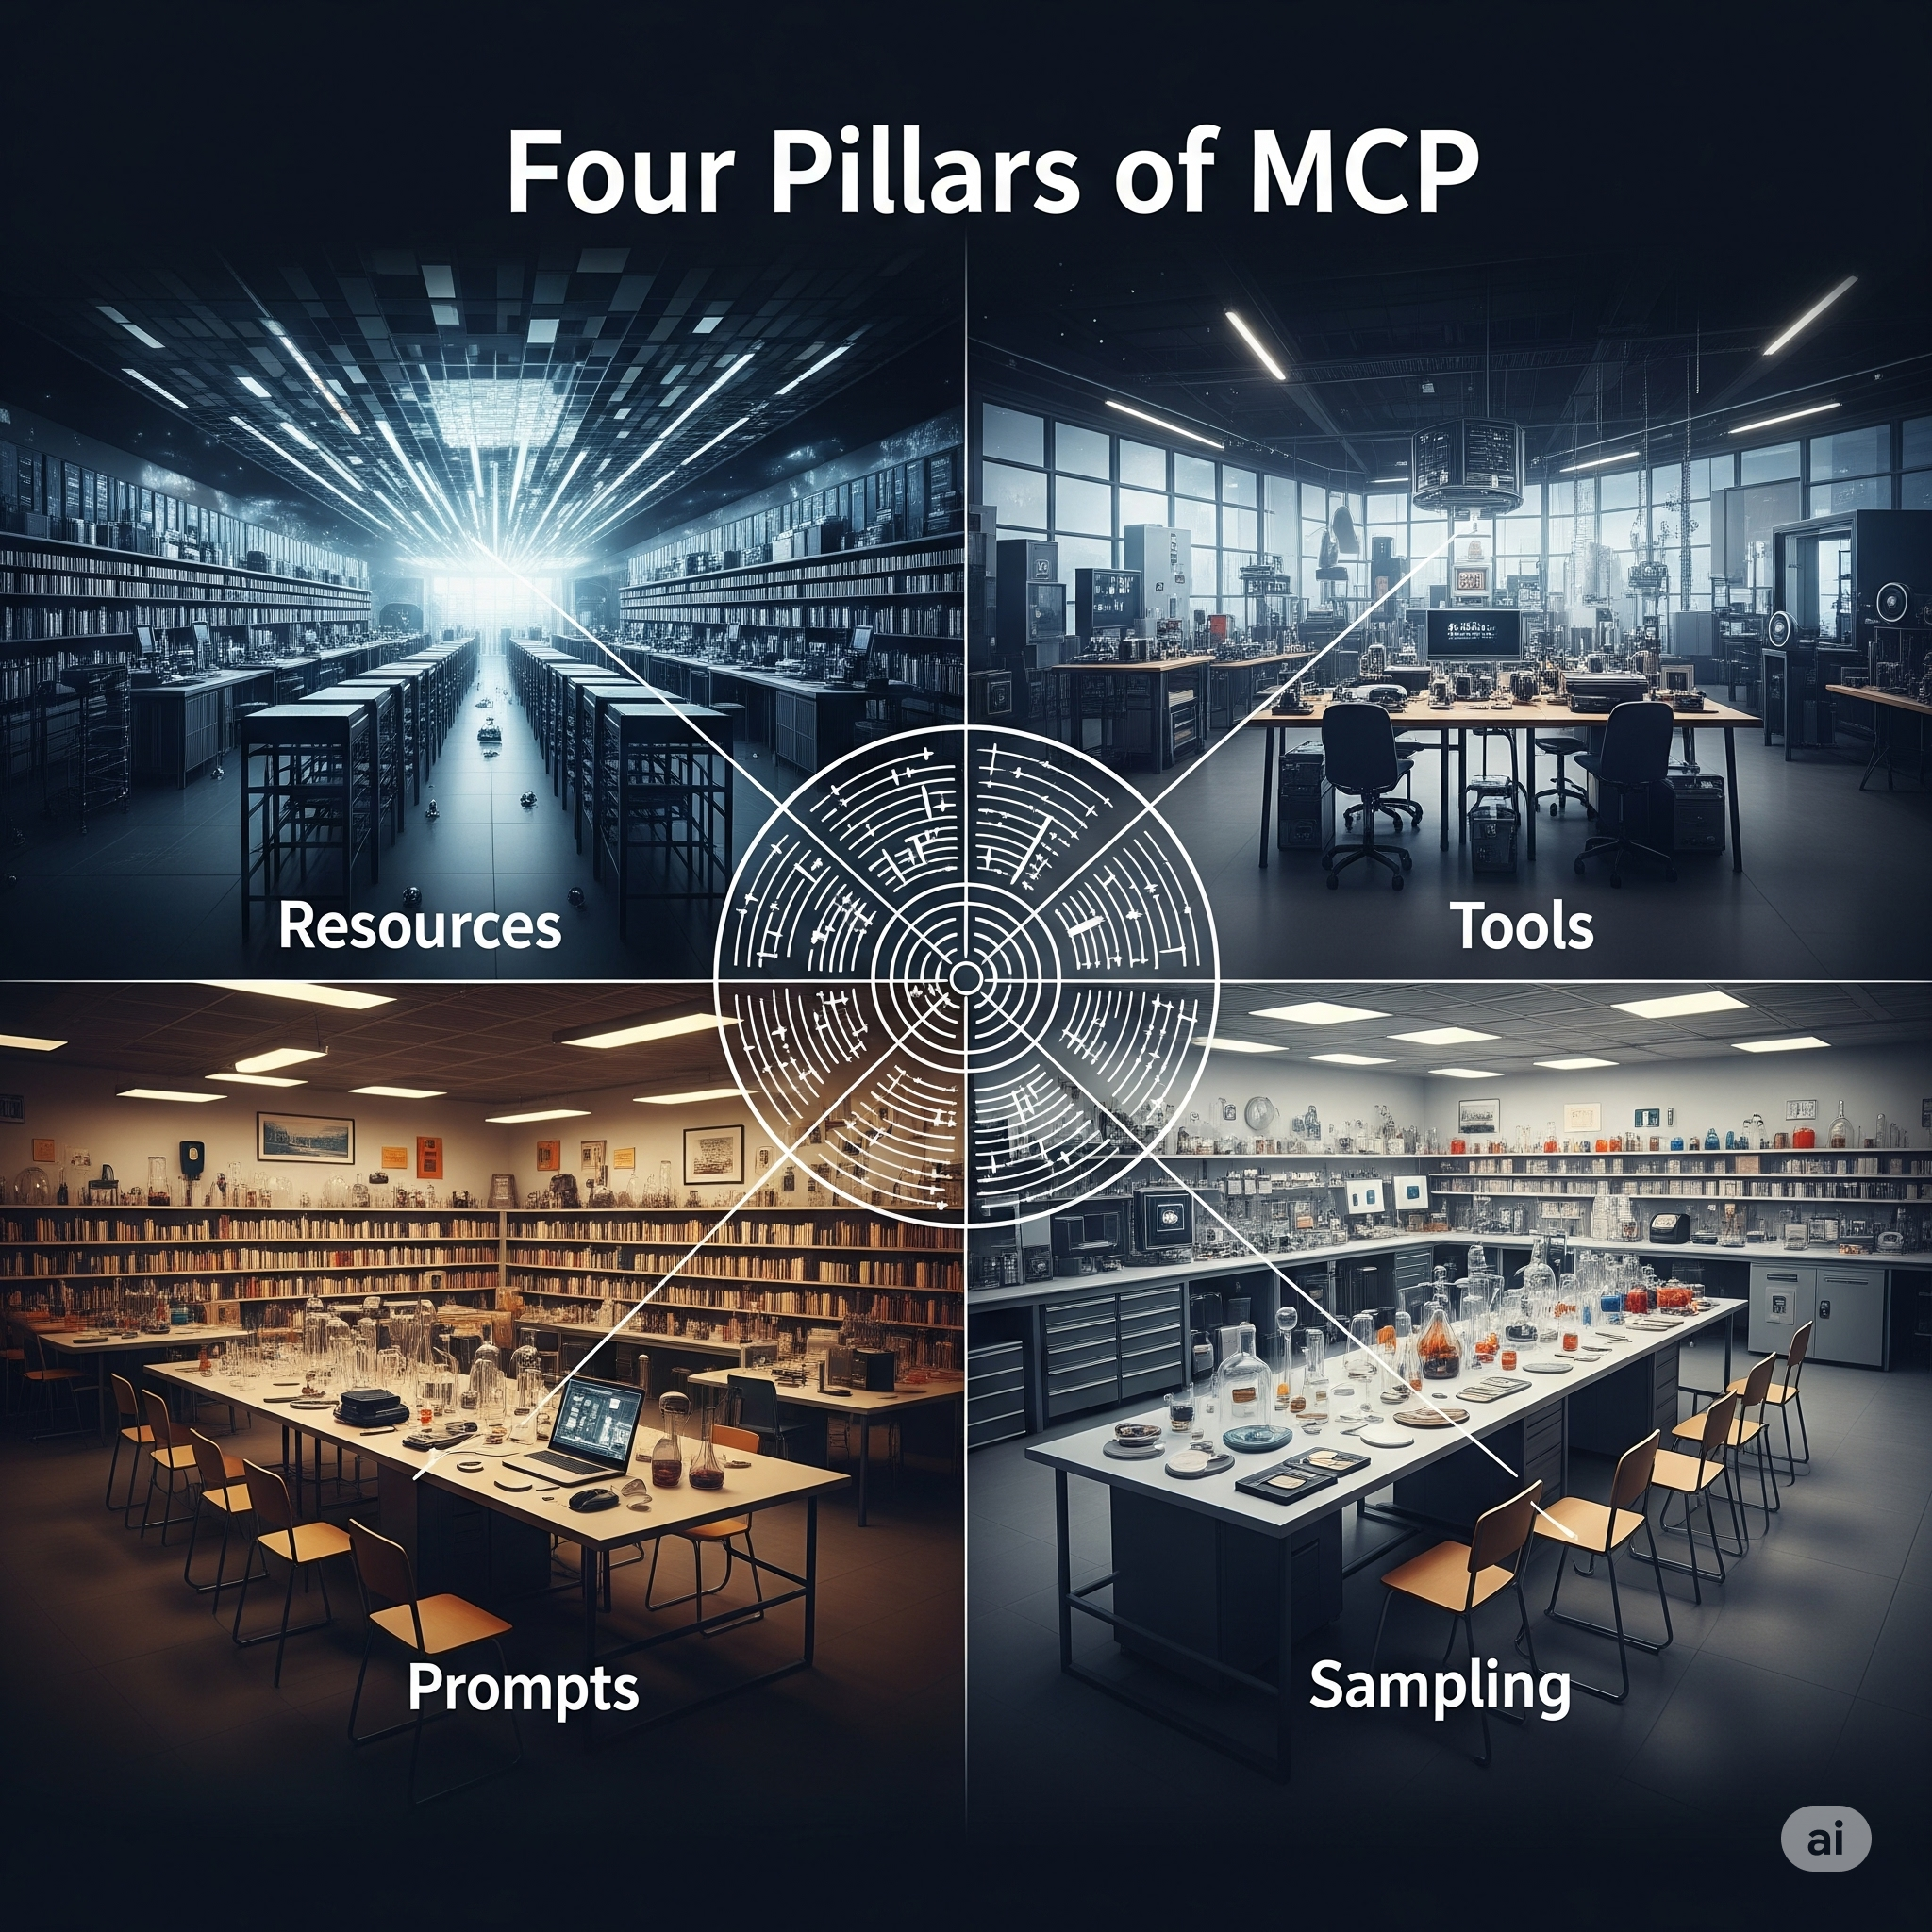
Within this architecture, MCP defines four core concepts that enable rich AI interactions:
- Resources
- Tools
- Prompts
- Sampling
Let’s examine each of these pillars in detail to understand how they work together to create powerful AI interactions.
Resources: Your AI’s Information LibraryResourcesare standardized gateways to data sources. Resources provide a consistent interface, whether you’re accessing customer information from a CRM system, financial data from a database, or documents from a file system.
Think of resources as librarians who know precisely where to find any book you need, regardless of how they structure the library internally. A resource might look like:
customer://crm-server/customer/12345
file://documents/contracts/latest.pdf
database://analytics/sales-report?quarter=Q3
Tools: Your AI’s Tool Shed
While resources provide information,toolsenable action. Tools are functions that your AI can execute to perform tasks—from simple calculations to complex workflows.
Tools transform AI from passive information consumers into active problem-solvers that can:
- Calculate mortgage payments
- Send emails
- Update database records
- Generate reports
- Analyze sentiment in text
Prompts: Your AI’s Instruction ManualPromptsin MCP go beyond simple text instructions. They’re structured templates that guide AI behavior and extract specific information. A well-crafted prompt acts like a detailed recipe, ensuring consistent and accurate AI responses.
Sampling: Your AI’s Learning MechanismSamplingenables AI systems to request content generation and collect feedback for continuous improvement. This creates learning loops that help AI systems get better over time.
Enter FastMCP: Rapid Server Development Made Simple
Building MCP servers traditionally required extensive boilerplate code and deep understanding of the underlying protocols.FastMCPchanges this entirely by providing a simplified framework built on top ofFastAPI, Python’s high-performance web framework.FastAPIis a modern, fast (high-performance) web framework for building APIs with Python 3.7+ based on standard Python type hints. It automatically validates data, generates documentation, and provides excellent performance.
FastMCP offers several compelling advantages:
-Decorator-based syntaxthat makes defining resources and tools intuitive -Automatic data validationusing Python type hints -Built-in error handlingand logging -Asynchronous supportfor high-performance operations -Automatic documentation generationfor easy testing and exploration
Note: All working source code examples are available on github. I encourage you to follow my github account and try out the examples—I’ve carefully tested each one to ensure they run properly.
Building Your First MCP Server: A Customer Service Assistant
Let’s create an MCP server that could power a customer service AI assistant. Our server will expose customer data resources and provide tools for common service tasks.
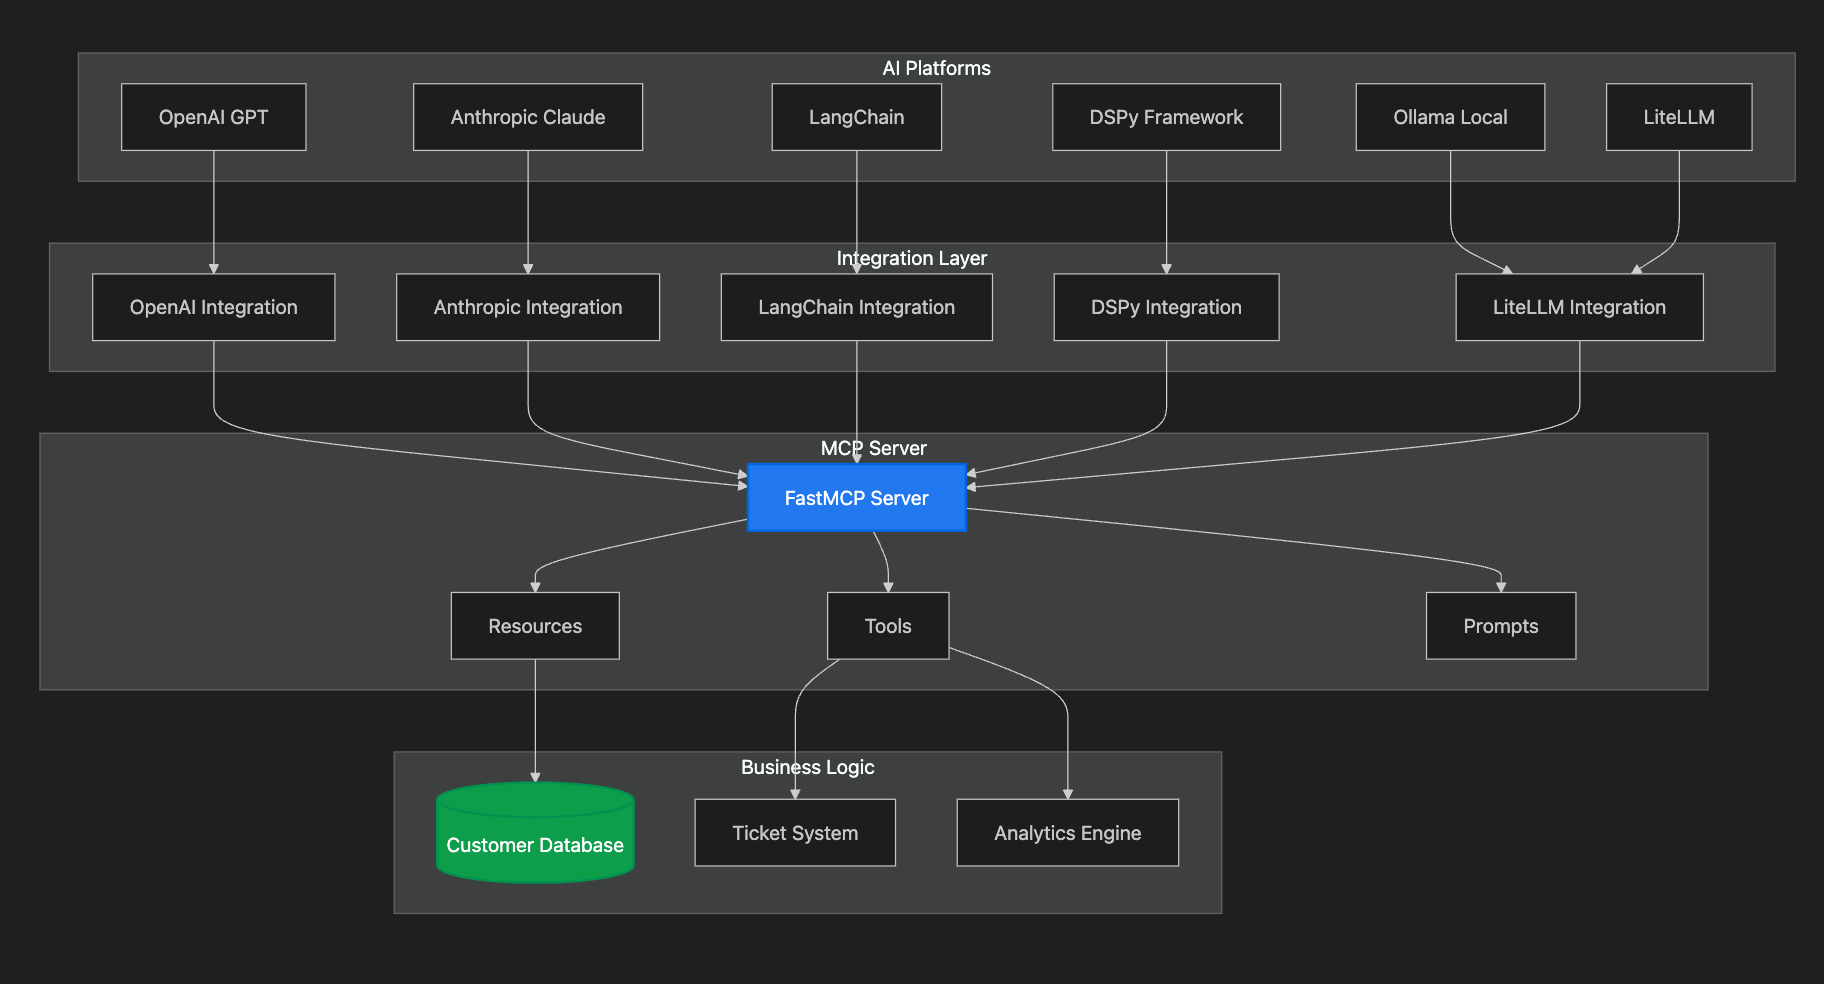
This is what we are building in this article
The server is FastMCP server-based. We can connect to it with many different frameworks.
Here’s how the application flows:
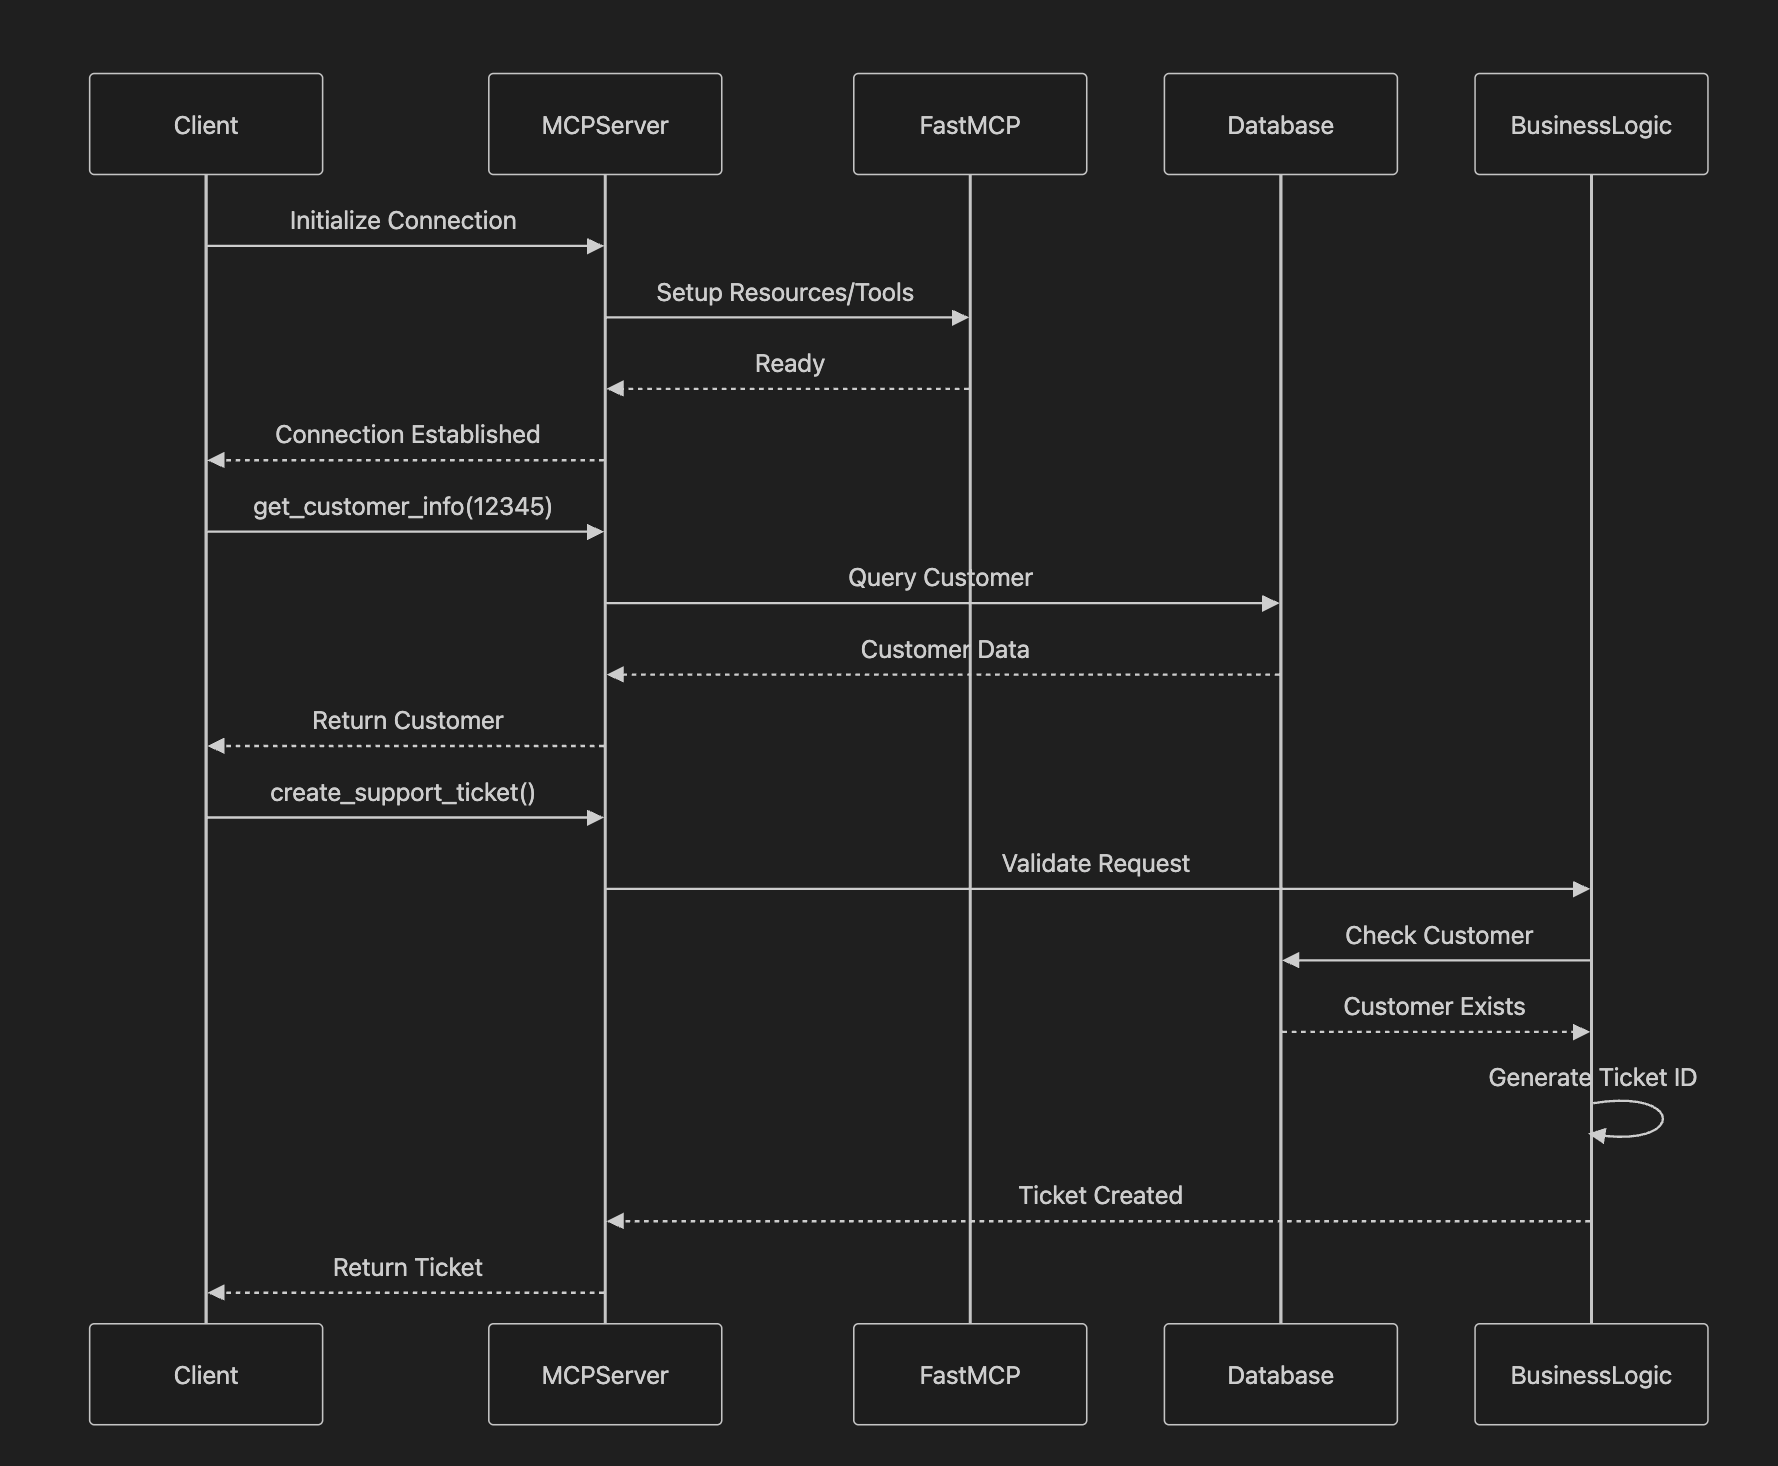
MCPServer Sequence Diagram
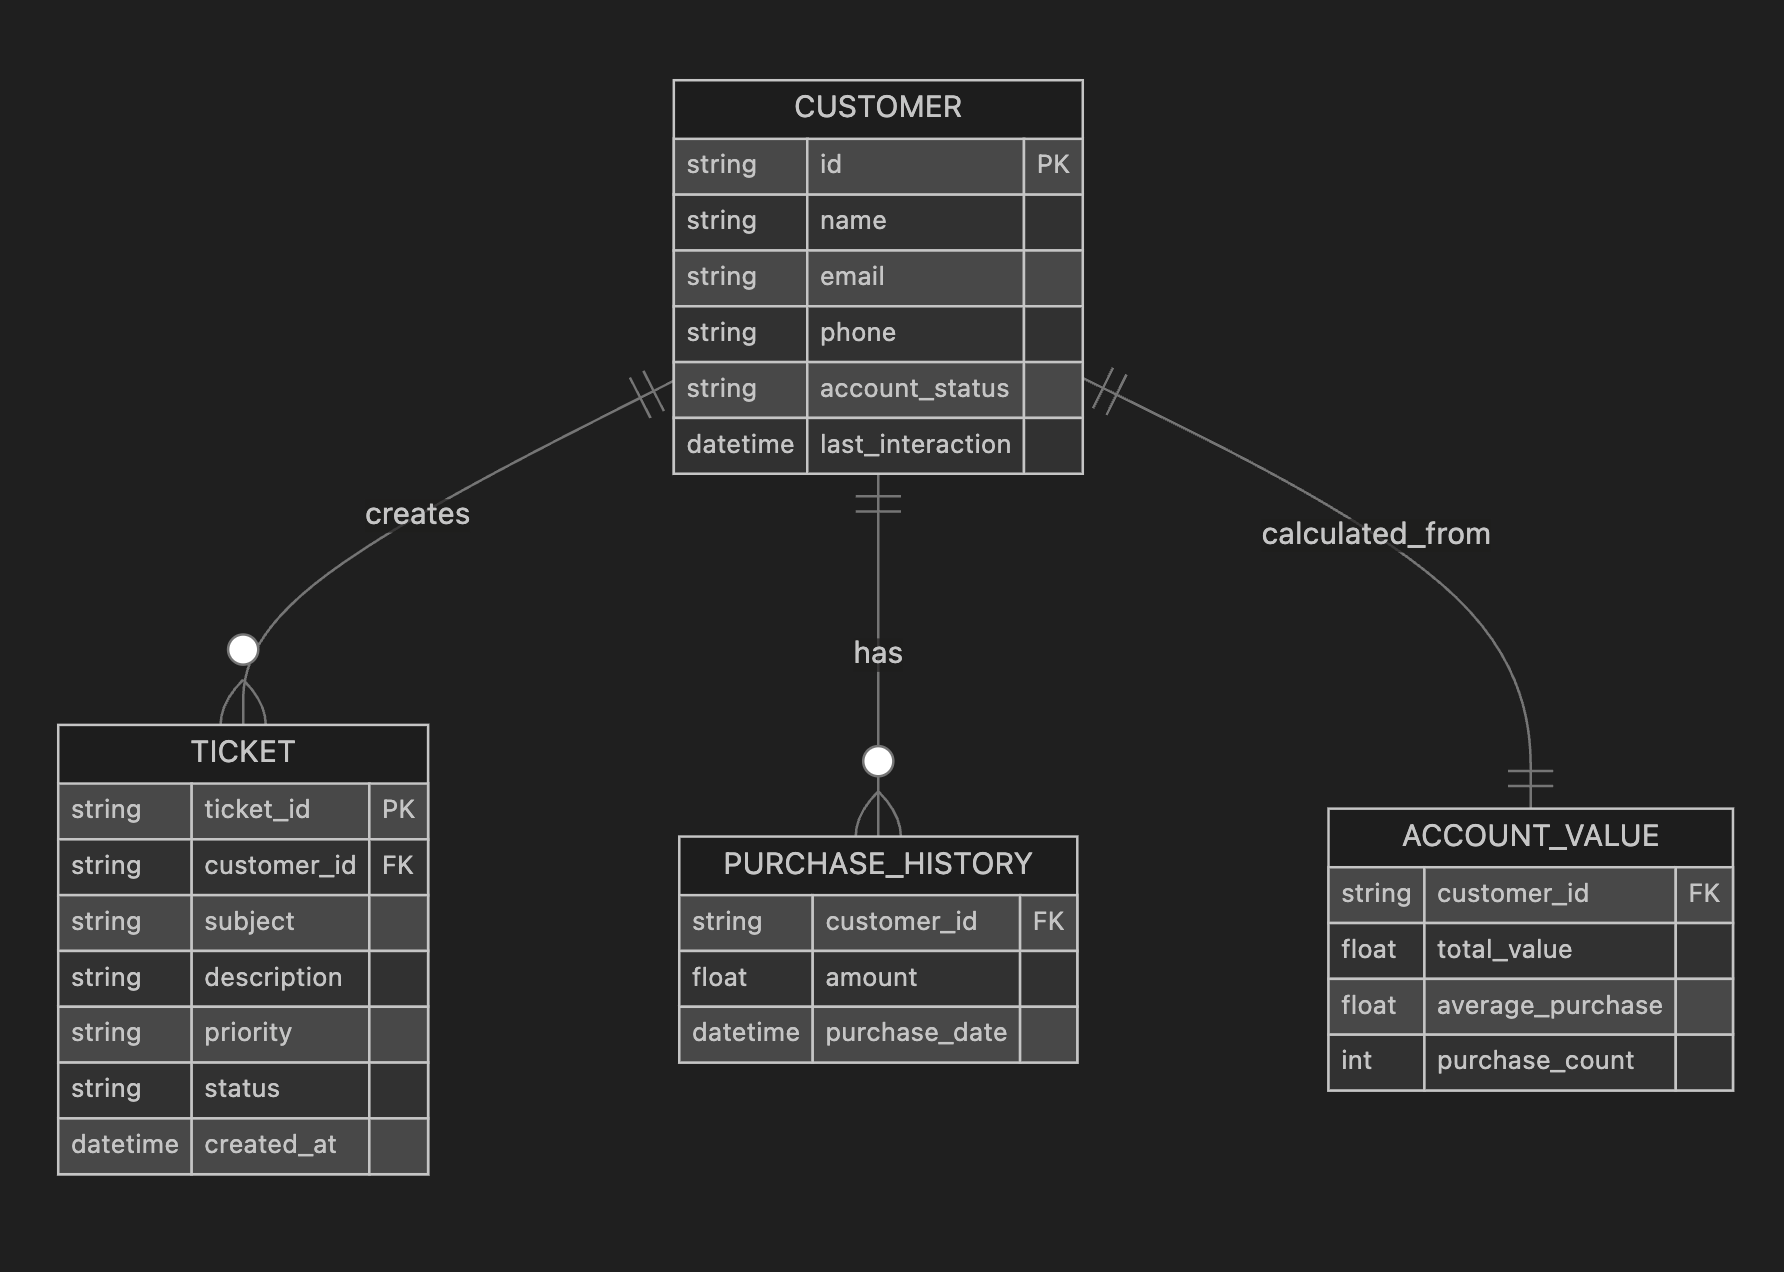
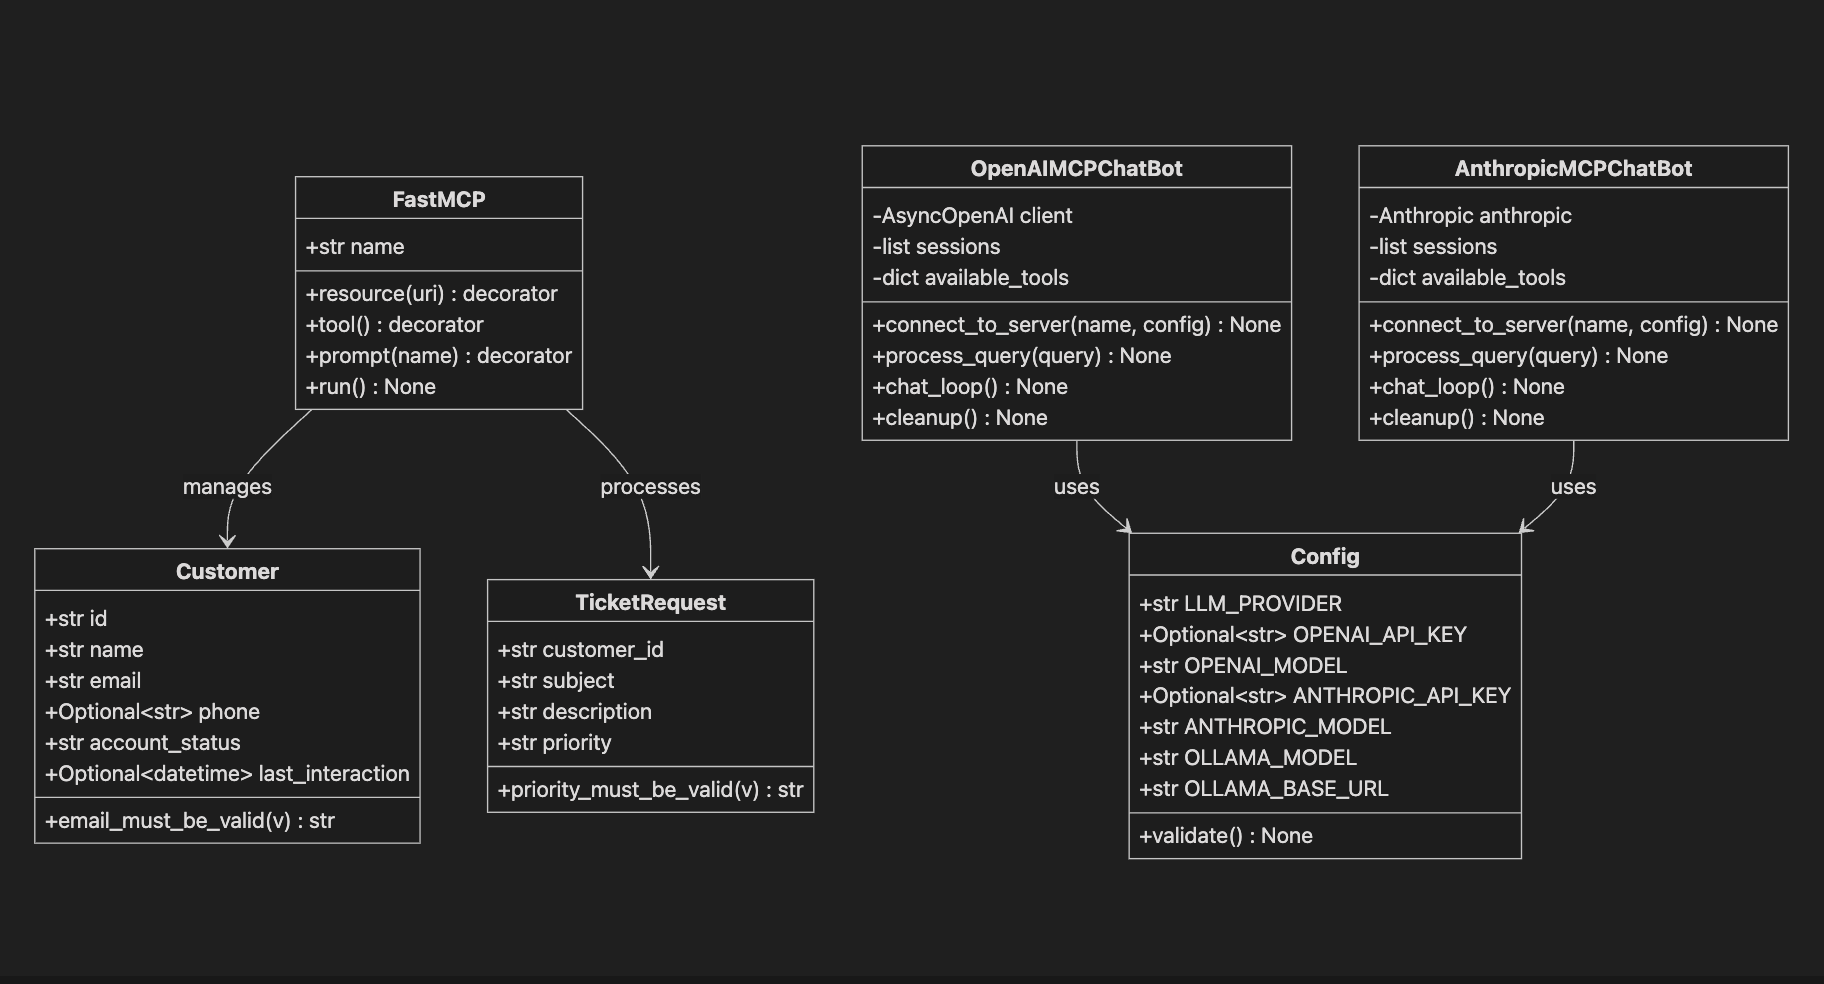
Mock Data Model for Customer MCP Server (Hypothetical)

MCP Server Example Use Case
Setting Up the Development Environment
First, let’s establish our development environment using modern Python tooling. Create a new project directory and set up the following Taskfile.yml:
version: '3'
tasks:
  default:
    desc: "Default task - runs all tasks"
    cmds:
      - task: all

  setup:
    desc: "Set up the Python environment"
    cmds:
      - pyenv install -s 3.12.9
      - pyenv local 3.12.9
      - poetry install
      - poetry config virtualenvs.in-project true
      - chmod +x .venv/bin/activate
      - source .venv/bin/activate

  run:
    desc: "Run the main example"
    cmds:
      - poetry run python src/main.py
    env:
      LLM_PROVIDER: ollama
      OLLAMA_MODEL: gemma3:27b
This setup uses:
-pyenvfor Python version management (ensuring Python 3.12.9) -Poetryfor dependency management and virtual environments -Go Taskfor automation and consistent commands across development teams
Initialize your project with Poetry:
poetry init --name mcp-customer-service --version 0.1.0
poetry add fastmcp pydantic
poetry add --group dev pytest black isort
If you like this article, follow Rick on LinkedIn or on Medium. You can get the complete running source code examples on github. Follow me on github too.
The Complete MCP Server Implementation
Here’s our full customer service MCP server implementation:
import asyncio
import logging
from datetime import datetime
from typing import List, Optional

from fastmcp import FastMCP
from pydantic import BaseModel, field_validator
from pydantic_core import PydanticCustomError


# Configure logging for better debugging
logging.basicConfig(level=logging.INFO)
logger = logging.getLogger(__name__)


# Initialize FastMCP server
mcp = FastMCP("Customer Service Assistant")


# Data models for type safety and validation
class Customer(BaseModel):
    id: str
    name: str
    email: str
    phone: Optional[str] = None
    account_status: str = "active"
    last_interaction: Optional[datetime] = None

    @field_validator("email", mode="after")  # noqa
    @classmethod
    def email_must_be_valid(cls, v: str) -> str:
        if "@" not in v:
            raise PydanticCustomError(
                "invalid_email",
                "Invalid email format: {email} must contain @",
                {"email": v},
            )
        return v

class TicketRequest(BaseModel):
    customer_id: str
    subject: str
    description: str
    priority: str = "normal"

    @field_validator("priority", mode="after")  # noqa
    @classmethod
    def priority_must_be_valid(cls, v: str) -> str:
        valid_priorities = ["low", "normal", "high", "urgent"]
        if v not in valid_priorities:
            raise PydanticCustomError(
                "invalid_priority",
                "Priority must be one of: {valid_priorities}, got {priority}",
                {"valid_priorities": ", ".join(valid_priorities), "priority": v},
            )
        return v


# Simulated customer database
CUSTOMERS_DB = {
    "12345": Customer(
        id="12345",
        name="Alice Johnson",
        email="alice@example.com",
        phone="+1-555-0123",
        account_status="active",
        last_interaction=datetime.now(),
    ),
    "67890": Customer(
        id="67890",
        name="Bob Smith",
        email="bob@example.com",
        account_status="suspended",
    ),
}


# MCP Resource: Customer Data Access
@mcp.resource("customer://{customer_id}")
async def get_customer_info(customer_id: str) -> Customer:
    """Retrieve customer information by ID."""
    logger.info(f"Retrieving customer info for ID: {customer_id}")

    if customer_id not in CUSTOMERS_DB:
        raise ValueError(f"Customer {customer_id} not found")

    # Simulate database delay
    await asyncio.sleep(0.1)
    return CUSTOMERS_DB[customer_id]

@mcp.tool()
async def get_recent_customers(limit: int = 10) -> List[Customer]:
    """Retrieve recently active customers."""
    logger.info(f"Retrieving {limit} recent customers")

    # Sort by last interaction, return most recent
    sorted_customers = sorted(
        CUSTOMERS_DB.values(),
        key=lambda c: c.last_interaction or datetime.min,
        reverse=True,
    )

    return sorted_customers[:limit]


# MCP Tool: Create Support Ticket
@mcp.tool()
async def create_support_ticket(request: TicketRequest) -> dict:
    """Create a new customer support ticket."""
    logger.info(f"Creating ticket for customer {request.customer_id}")

    # Validate customer exists
    if request.customer_id not in CUSTOMERS_DB:
        raise ValueError(f"Customer {request.customer_id} not found")

    # Simulate ticket creation
    ticket_id = f"TICKET-{datetime.now().strftime('%Y%m%d%H%M%S')}"

    ticket = {
        "ticket_id": ticket_id,
        "customer_id": request.customer_id,
        "subject": request.subject,
        "description": request.description,
        "priority": request.priority,
        "status": "open",
        "created_at": datetime.now().isoformat(),
    }

    return ticket


# MCP Tool: Calculate Account Value
@mcp.tool()
async def calculate_account_value(
    customer_id: str, purchase_history: List[float]
) -> dict:
    """Calculate total account value and average purchase."""
    logger.info(f"Calculating account value for {customer_id}")

    if not purchase_history:
        return {
            "customer_id": customer_id,
            "total_value": 0.0,
            "average_purchase": 0.0,
            "purchase_count": 0,
        }

    total = sum(purchase_history)
    average = total / len(purchase_history)

    return {
        "customer_id": customer_id,
        "total_value": round(total, 2),
        "average_purchase": round(average, 2),
        "purchase_count": len(purchase_history),
    }


# MCP Prompt: Customer Service Response Template
@mcp.prompt("customer_service_response")
async def generate_service_response_prompt(
    customer_name: str, issue_type: str, resolution_steps: List[str]
) -> str:
    """Generate a professional customer service response."""

    steps_text = "\n".join(
        [f"{i+1}. {step}" for i, step in enumerate(resolution_steps)]
    )

    return f"""
You are a professional customer service representative.
Generate a helpful and empathetic response for the customer.

Customer: {customer_name}
Issue Type: {issue_type}

Resolution Steps:
{steps_text}

Guidelines:
- Be professional but warm
- Acknowledge the customer's concern
- Provide clear, actionable steps
- End with an offer for further assistance
- Keep the tone positive and solution-focused

Generate a complete customer service response
following these guidelines.
"""

def main():
    """Main entry point for the MCP server."""
    print("🚀 Starting Customer Service MCP Server...")
    print("📋 Available Resources:")
    print("   - customer://{customer_id} - Get customer info")
    print("🔧 Available Tools:")
    print("   - get_recent_customers - Get recent customers")
    print("   - create_support_ticket - Create support ticket")
    print("   - calculate_account_value - Calculate account value")
    print("📝 Available Prompts:")
    print("   - customer_service_response - Generate responses")
    print("\n✅ Server ready for connections!")

    # Run the server
    mcp.run()

if __name__ == "__main__":
    main()
Now let’s break this code down into digestible pieces to understand how each part works.
Breaking Down the MCP Server Code
1. Initial Setup and Dependencies
import asyncio
import logging
from typing import List, Optional
from datetime import datetime
from fastmcp import FastMCP
from pydantic import BaseModel, validator


# Configure logging for better debugging
logging.basicConfig(level=logging.INFO)
logger = logging.getLogger(__name__)


# Initialize FastMCP server
mcp = FastMCP("Customer Service Assistant")
This section imports the necessary libraries and sets up our FastMCP server instance.FastMCPis our main framework,Pydanticprovides data validation, andasyncioenables asynchronous operations for better performance. The logging configuration helps us track what’s happening in our server.
2. Data Models with Pydantic
class Customer(BaseModel):
    id: str
    name: str
    email: str
    phone: Optional[str] = None
    account_status: str = "active"
    last_interaction: Optional[datetime] = None

    @validator('email')
    def email_must_be_valid(cls, v):
        if '@' not in v:
            raise ValueError('Invalid email format')
        return v

```**Pydantic models**define the structure of our data and provide automatic validation. Pydantic supports**JSON Schema**generation and**JSON serialization**, making it perfect for API development. The `@validator` decorator adds custom validation rules—here ensuring emails contain an '@' symbol. The `Optional` type hint indicates fields that can be `None`.


### 3. Simulated Database

```python
CUSTOMERS_DB = {
    "12345": Customer(
        id="12345",
        name="Alice Johnson",
        email="alice@example.com",
        phone="+1-555-0123",
        account_status="active",
        last_interaction=datetime.now()
    ),
    "67890": Customer(
        id="67890",
        name="Bob Smith",
        email="bob@example.com",
        account_status="suspended"
    )
}
This dictionary simulates a customer database. In production, you’d replace this with actual database connections using libraries likeSQLAlchemyfor SQL databases orPyMongofor MongoDB.
4. MCP Resources - Data Access Points
@mcp.resource("customer://{customer_id}")
async def get_customer_info(customer_id: str) -> Customer:
    """Retrieve customer information by ID."""
    logger.info(f"Retrieving customer info for ID: {customer_id}")

    if customer_id not in CUSTOMERS_DB:
        raise ValueError(f"Customer {customer_id} not found")

    await asyncio.sleep(0.1)  # Simulate database delay
    return CUSTOMERS_DB[customer_id]
The**`@mcp.resource**decorator defines a resource that AI clients can access. The URL pattern “customer://{customer_id}"creates a parameterized endpoint where{customer_id}is a placeholder. When a client requestscustomer://12345, FastMCP calls this function with customer_id=“12345”. The async/await` pattern enables non-blocking operations.
5. MCP Tools - Action Executors
@mcp.tool()
async def create_support_ticket(request: TicketRequest) -> dict:
    """Create a new customer support ticket."""
    logger.info(f"Creating ticket for customer {request.customer_id}")

    if request.customer_id not in CUSTOMERS_DB:
        raise ValueError(f"Customer {request.customer_id} not found")

    ticket_id = f"TICKET-{datetime.now().strftime('%Y%m%d%H%M%S')}"
    # ... create ticket logic
    return ticket
The**`@mcp.tool**decorator exposes functions as tools that AI models can execute. Tools perform actions rather than just retrieving data. This tool creates support tickets and returns structured data about the created ticket. The function accepts a TicketRequest` object, which Pydantic validates automatically.
6. MCP Prompts - AI Instruction Templates
@mcp.prompt("customer_service_response")
async def generate_service_response_prompt(
    customer_name: str,
    issue_type: str,
    resolution_steps: List[str]
) -> str:
    """Generate a professional customer service response."""

    steps_text = "\n".join([f"{i+1}. {step}"
                           for i, step in enumerate(resolution_steps)])

    return f"""
You are a professional customer service representative...
Customer: {customer_name}
Issue Type: {issue_type}
Resolution Steps:
{steps_text}
..."""
The**`@mcp.prompt`**decorator creates reusable prompt templates. This function generates structured prompts for AI models, ensuring consistent formatting and including all necessary context. The template uses f-string formatting to inject dynamic content.
7. Server Startup and Execution
async def main():
    """Main entry point for the MCP server."""
    print("🚀 Starting Customer Service MCP Server...")
    # ... status messages
    await mcp.run()

if __name__ == "__main__":
    asyncio.run(main())
The main function starts our MCP server and displays available resources and tools. asyncio.run() is the entry point for running asynchronous code. This pattern ensures the server runs properly in an async environment.
Running Your Server
Execute your server using the task runner:
task setup  # Set up the environment
task run    # Start the server
Your MCP server will start and listen for connections, ready to serve AI applications with customer service capabilities.
The server gets a lot more interesting when you use it with a client.
Connecting Your MCP Server to Multiple AI Platforms
We’ll explore how to integrate our MCP server with various AI platforms and frameworks, demonstrating the protocol’s versatility and standardization benefits.
Integration Options
Here are the key ways to integrate MCP into your AI system:
1. Claude Desktop Integration
Claude Desktop offers the simplest testing environment with automatic tool discovery and seamless conversation flow.
2. OpenAI Integration
Two powerful options are available:
- Agent SDK for rapid development with built-in MCP support
- Native Chat Completion API for custom implementations with greater control
3. Anthropic’s Native API
Direct integration with Claude models enables:
- Setting up the Anthropic client with MCP tools
- Managing tool execution and response handling
- Implementing conversation flows with tool use
4. LangChain Integration
The agent framework supports:
- Tool registration through LangChain’s agent protocol
- Integration with multiple model providers
- Complex chains combining MCP tools with other components
5. DSPy Integration
Leverage MCP tools through:
- Custom modules for MCP tool execution
- Integration with DSPy’s signature-based programming model
- Compiler optimizations for efficient tool use
Let’s explore each integration method in detail, starting with the OpenAI implementations we began discussing.
Integrating with Claude DesktopClaude Desktopis Anthropic’s desktop application that provides excellent MCP support, allowing you to connect your custom server directly to Claude’s interface.
The Role of Claude Desktop as an MCP Host
Claude Desktop acts as anMCP Host—the AI application layer that consumes MCP servers. It manages the connection to your server, translates user requests into MCP protocol calls, and presents the results in a conversational interface. Claude Desktop handles:
-Connection managementto MCP servers -Tool discoveryand presentation to users -Request routingbetween user queries and appropriate MCP resources/tools -Response formattingfor user-friendly display
Configuring Claude Desktop
Add your MCP server to Claude’s configuration file. On macOS, edit ~/Library/Application Support/Claude/claude_desktop_config.json:
{
  "mcpServers": {
    "customer-service": {
      "command": "/Users/richardhightower/src/mcp_article1/run-mcp-server.sh"
    }
  }
}
Restart Claude Desktop and you should see your server listed in the MCP section. You can now ask Claude questions like:
- “Calculate the account value for a customer ID 12345 with purchases of $100, $250, and $75”
Claude will automatically use your MCP server’s resources and tools to provide accurate, data-driven responses.
Check out these screenshots of the Claude Desktop.
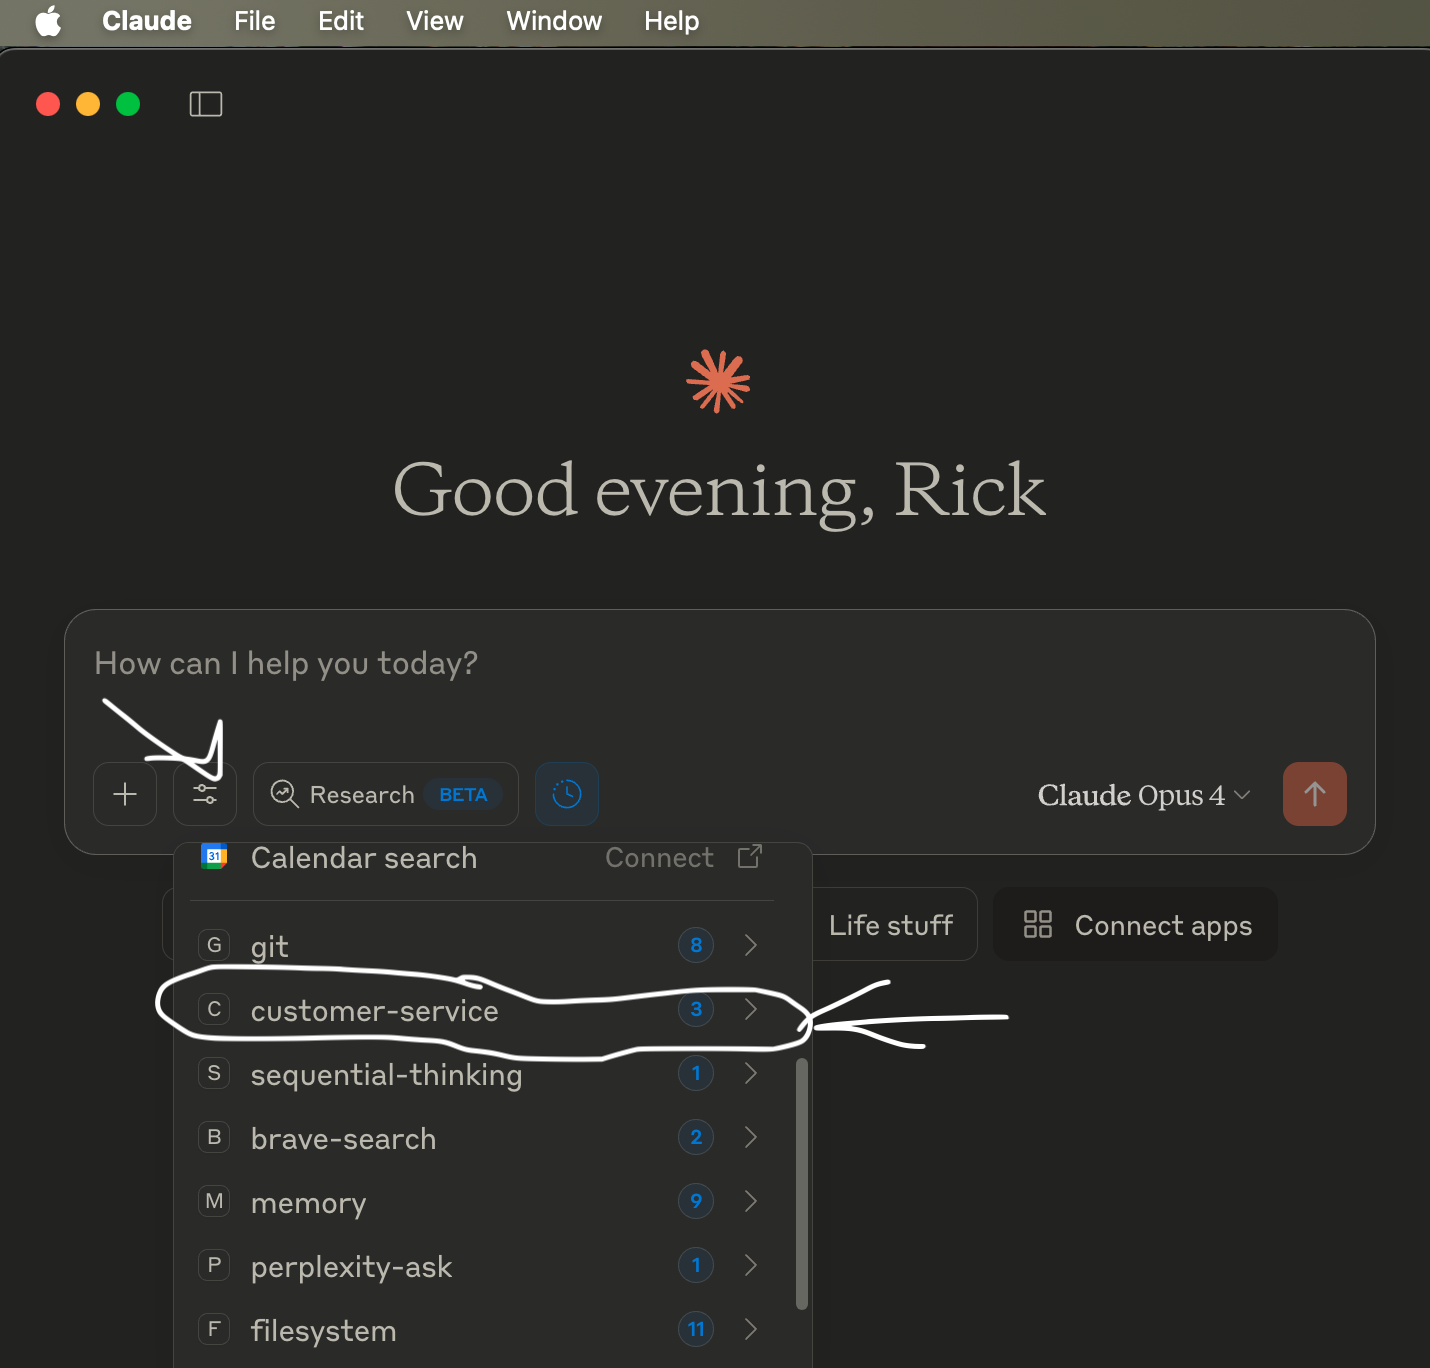
Check to see if the customer MCP server is installed
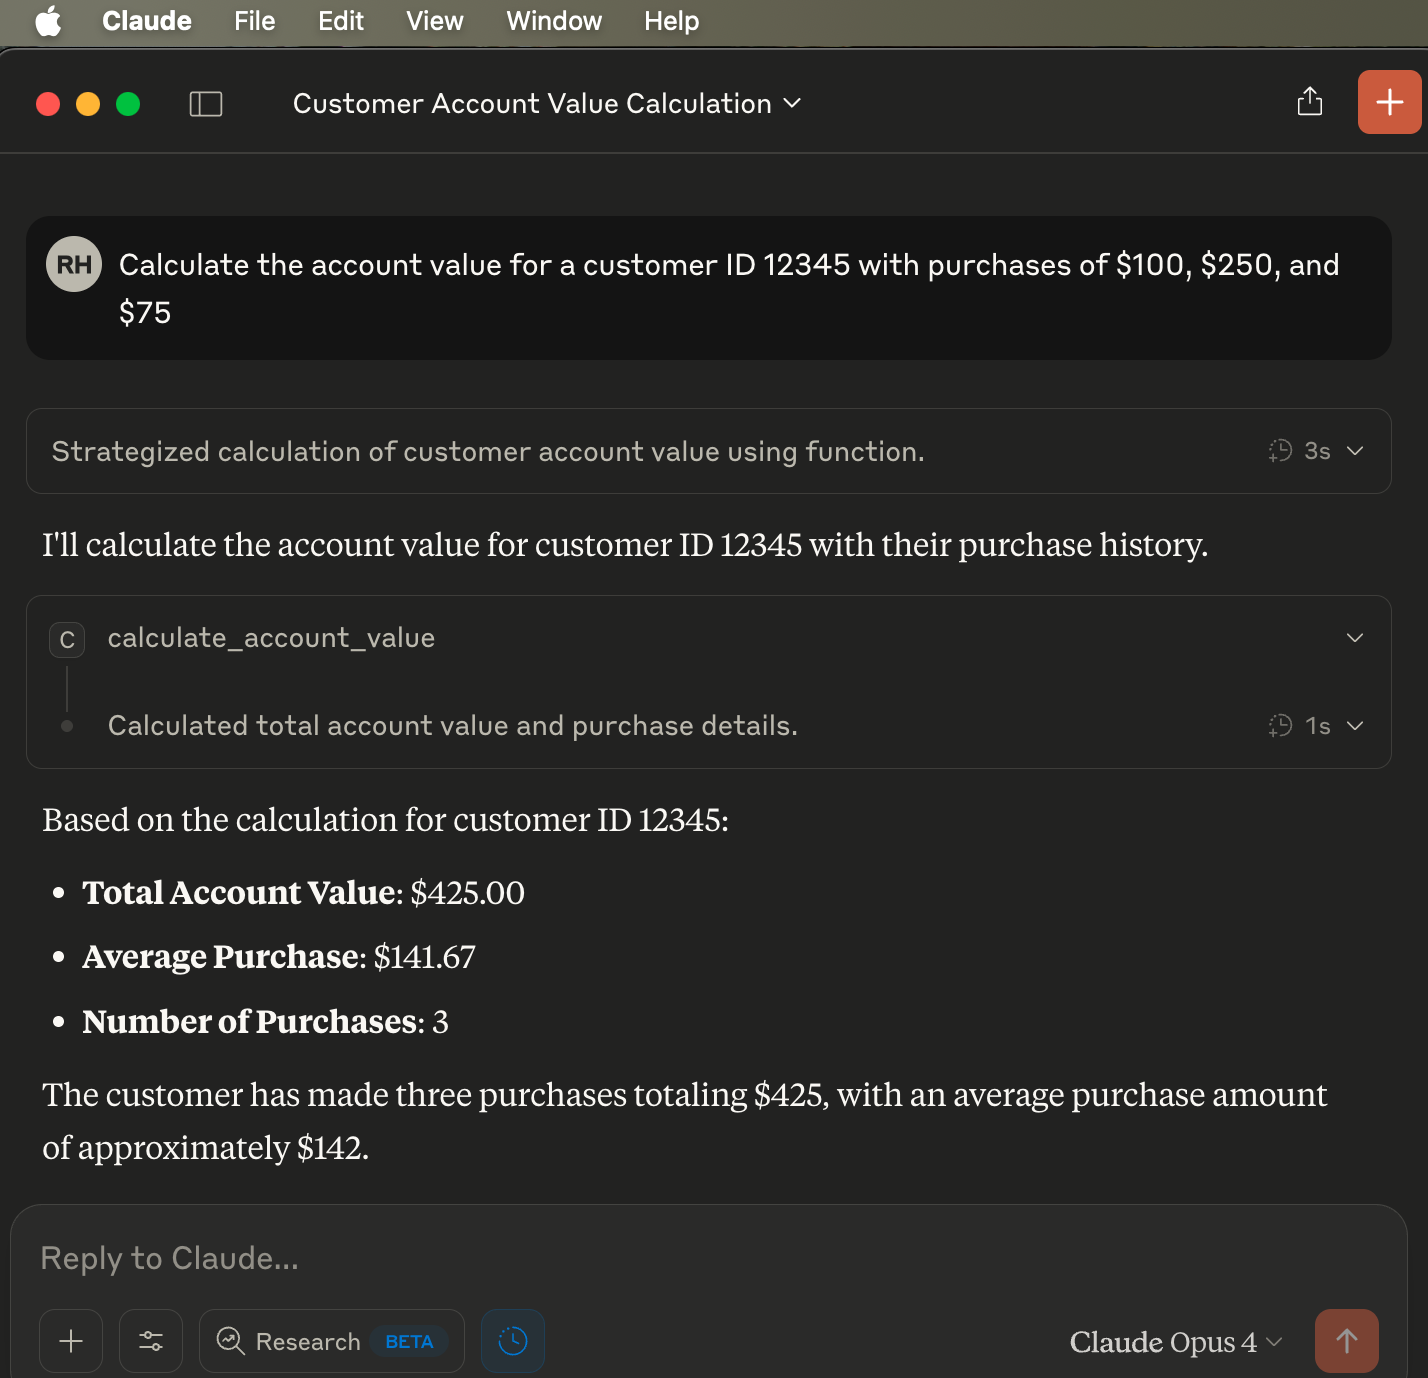
Use the customer MCP server
Now that we’ve explored configuring our server in the Claude Desktop application, let’s examine how to access it from our own clients and integrate it with various LLMs. But first, let’s understand the MCP client library.
Understanding MCP Core Components
mcp.ClientSession
mcp.ClientSession is a fundamental class that manages the communication session between an AI application and MCP tools. It handles:
-**Session Initialization:**Establishes and maintains the connection with MCP servers -**Tool Discovery:**Queries available tools and their capabilities from the connected server -**Tool Execution:**Manages the invocation of tools and handles their responses -**State Management:**Maintains the session state and handles connection lifecycle
mcp.StdioServerParameters
mcp.StdioServerParameters is a configuration class that defines how to connect to an MCP server using standard input/output (stdio). It includes:
-**Command Configuration:**Specifies the command to launch the MCP server (e.g., “poetry”, “python”) -**Arguments:**Defines command-line arguments needed to start the server -**Environment Setup:**Manages environment variables and execution context -**I/O Management:**Configures how stdin/stdout should be handled for server communication
Together, these components form the foundation of MCP’s client-side infrastructure, enabling standardized communication between AI models and external tools through a robust, stdio-based protocol.
Alternative MCP Connection Methods
While stdio is a common connection method for MCP, and the only one we cover in this article, there are several other ways to establish connections between MCP clients and servers:
1. HTTP/REST Transport
HTTP transport enables RESTful communication between MCP clients and servers. This method is particularly useful for:
-Web-based applicationsthat need to interact with MCP servers -Cloud-hosted serviceswhere direct stdio connections aren’t practical -Microservice architectureswhere HTTP is the primary communication protocol
2. WebSocket Transport
WebSocket connections provide real-time, bidirectional communication channels, offering:
-Lower latencycompared to HTTP for frequent interactions -Persistent connectionsfor long-running AI sessions -Event-driven updatesfrom both client and server
3. gRPC Transport
gRPC transport leverages protocol buffers for efficient communication:
-High performancewith binary protocol support -Strong typingand contract-first development -Built-in streamingcapabilities for complex AI interactions
4. Unix Domain Sockets
For local communication between processes on Unix-like systems:
-Enhanced securitythrough file system permissions -Better performancethan TCP for local communication -Simplified configurationfor local development
Each transport method has its own advantages and use cases. Choose the appropriate transport based on your application’s requirements for security, performance, and deployment environment.
If you like this article, follow Rick on LinkedIn or on Medium.
Connecting with OpenAI: Agents SDK and Direct API IntegrationOpenAIprovides MCP support through both their Agents SDK and direct API integration. The OpenAI Agents SDK includes built-in MCP capabilities, while the direct API approach allows you to use MCP tools with any OpenAI model. We will show both ways.
The Role of OpenAI in the MCP Ecosystem
OpenAI Agent SDK acts as anMCP Hostin multiple ways:
-Agents SDK integrationwith automatic tool discovery and execution -Direct API supportfor custom MCP tool integration -Automatic tracingof MCP operations for debugging -Multiple transport types(stdio, HTTP, WebSocket)
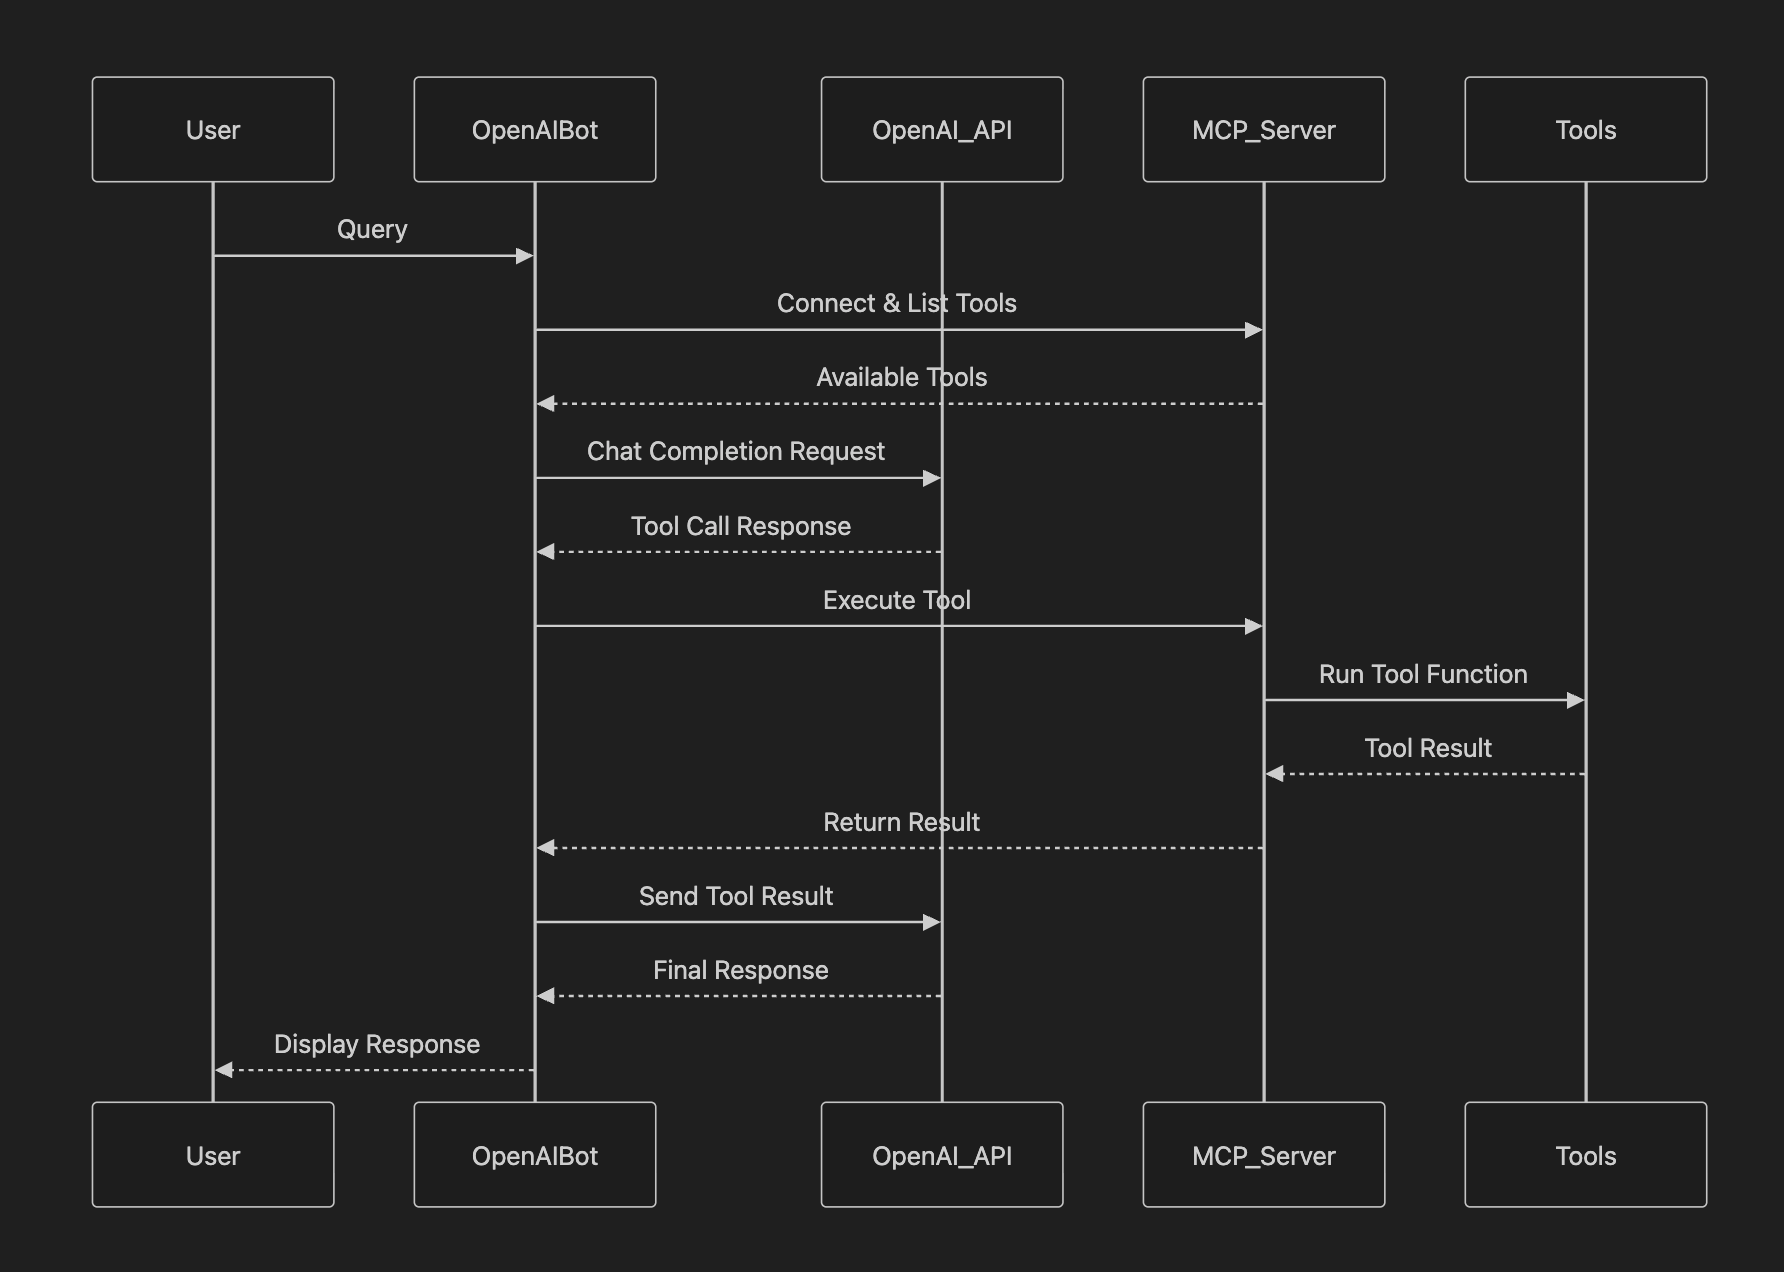
Flow with Open AI API
OpenAI Agents SDK Integration
The OpenAI Agents SDK provides native MCP support with automatic tool discovery:
"""OpenAI Agents SDK integration with MCP server."""

import asyncio
from agents import Agent, Runner
from agents.mcp import MCPServerStdio

from config import Config

async def run_customer_service_scenarios():
    """Demonstrate OpenAI Agents + MCP integration."""
    print("🤖 Setting up OpenAI Agents + MCP integration...")

    # Create MCP server connection with proper
    # async context manager
    mcp_server = MCPServerStdio(
        params={
            "command": "poetry",
            "args": ["run", "python", "src/main.py"]
        },
        cache_tools_list=True,
        name="Customer Service Server",
        client_session_timeout_seconds=30  # Increase timeout for startup
    )

    # Use the MCP server within an async context manager
    async with mcp_server as server:
        # Create agent with the connected MCP server
        agent = Agent(
            name="Customer Service Agent",
            instructions="""You are a helpful customer service
            assistant.
            Use the available tools to help customers with
            their requests.
            Always be professional and empathetic.

            Available tools:
            - get_recent_customers: Get a list of recent
              customers
            - create_support_ticket: Create support tickets
              for customers
            - calculate_account_value: Calculate customer
              account values

            When helping customers:
            1. Look up their information first when possible
            2. Create tickets for issues that need follow-up
            3. Calculate account values when discussing
               billing or purchases
            4. Always provide clear, helpful responses""",
            mcp_servers=[server]
        )

        # Example customer service scenarios
        scenarios = [
            "Get a list of recent customers and summarize "
            "their status",
            "Create a high-priority support ticket for "
            "customer 67890 about billing issues",
            "Calculate the account value for customer 12345 "
            "with purchases: $150, $300, $89"
        ]

        for i, scenario in enumerate(scenarios, 1):
            print(f"\n📞 Scenario {i}: {scenario}")
            try:
                # Run the agent with the scenario
                result = await Runner.run(agent, scenario)
                print(f"🤖 Agent Response: {result.final_output}")
            except Exception as e:
                print(f"❌ Error: {e}")

            print("-" * 60)

async def main():
    """Main entry point."""
    Config.validate()
    if Config.LLM_PROVIDER != "openai":
        print("OpenAI Agents example requires OpenAI."
        " Set LLM_PROVIDER=openai in .env")
        return

    await run_customer_service_scenarios()

if __name__ == "__main__":
    asyncio.run(main())
This code demonstrates how to set up and use OpenAI’s Agents SDK with MCP integration. Let’s break down the key components:
-**Import statements:**The code imports necessary modules including AsyncOpenAI for API access, Agent for creating AI agents, and MCPServerStdio for MCP server communication. -**MCP Server Connection:**Creates an MCP server connection using MCPServerStdio, configured to run a Python script using Poetry as the package manager. -**Agent Creation:**Sets up an AI agent with: - A descriptive name - Specific instructions for customer service behavior - Connection to the MCP server for tool access -**Test Execution:**Runs a test query to demonstrate the agent’s ability to: - Look up customer information - Create support tickets - Handle customer service requests
This integration showcases how OpenAI’s Agents SDK simplifies the process of connecting AI models with MCP-enabled tools and services.
Direct OpenAI API Integration
The last code listing was short as the Agent API from Open AI hides a lot of hte complexity. Let’s look at using the AsyncOpenAI and chat.completions while using mcp.ClientSession, and mcp.StdioServerParameters directly. This is as low level as you can get with Open AI short of just sending JSON over HTTP. This code listing is long, but later we break it up and explain it; then we use MCP with the native Anthropic support.
For more control, you can integrate MCP tools directly with OpenAI’s API:
"""OpenAI integration with MCP server."""

import asyncio
import json
from contextlib import AsyncExitStack

from mcp import ClientSession, StdioServerParameters
from mcp.client.stdio import stdio_client
from openai import AsyncOpenAI

from config import Config

class OpenAIMCPChatBot:
    def __init__(self, api_key: str):
        self.client = AsyncOpenAI(api_key=api_key)
        self.sessions = []
        self.exit_stack = AsyncExitStack()
        self.available_tools = []
        self.tool_to_session = {}

    async def connect_to_server(self, server_name: str, server_config: dict) :
        """Connect to a single MCP server."""
        try:
            server_params = StdioServerParameters(**server_config)
            stdio_transport = await self.exit_stack.enter_async_context(
                stdio_client(server_params)
            )
            read, write = stdio_transport
            session = await self.exit_stack.enter_async_context(
                ClientSession(read, write)
            )
            await session.initialize()
            self.sessions.append(session)

            # List available tools for this session
            response = await session.list_tools()
            tools = response.tools
            print(f"Connected to {server_name} with tools:",
                                             [t.name for t in tools])

            for tool in tools:
                self.tool_to_session[tool.name] = session
                # Convert MCP tool to OpenAI tool format
                openai_tool = {
                    "type": "function",
                    "function": {
                        "name": tool.name,
                        "description": tool.description,
                        "parameters": tool.inputSchema,
                    },
                }
                self.available_tools.append(openai_tool)
        except Exception as e:
            print(f"Failed to connect to {server_name}: {e}")

    async def connect_to_servers(self):
        """Connect to all configured MCP servers."""
        try:
            with open("server_config.json", "r") as file:
                data = json.load(file)

            servers = data.get("mcpServers", {})
            for server_name, server_config in servers.items():
                await self.connect_to_server(server_name, server_config)
        except Exception as e:
            print(f"Error loading server configuration: {e}")
            raise

    async def process_query(self, query: str):
        """Process a query using OpenAI with MCP tools."""
        messages = [{"role": "user", "content": query}]

        response = await self.client.chat.completions.create(
            model=Config.OPENAI_MODEL,
            messages=messages,
            tools=self.available_tools if self.available_tools else None,
        )

        process_query = True
        while process_query:
            message = response.choices[0].message

            if message.content:
                print(message.content)

            # Handle tool calls
            if message.tool_calls:
                messages.append(
                    {
                        "role": "assistant",
                        "content": message.content,
                        "tool_calls": message.tool_calls,
                    }
                )

                for tool_call in message.tool_calls:
                    tool_name = tool_call.function.name
                    tool_args = json.loads(tool_call.function.arguments)

                    print(f"Calling tool {tool_name} with args {tool_args}")

                    # Use the correct session for this tool
                    session = self.tool_to_session[tool_name]
                    result = await session.call_tool(tool_name,
                                                            arguments=tool_args)

                    messages.append(
                        {
                            "role": "tool",
                            "tool_call_id": tool_call.id,
                            "content": str(result.content),
                        }
                    )

                # Get the next response
                response = await self.client.chat.completions.create(
                    model=Config.OPENAI_MODEL,
                    messages=messages,
                    tools=self.available_tools if self.available_tools else None,
                )
            else:
                process_query = False

    async def chat_loop(self):
        """Run an interactive chat loop"""
        print("\nOpenAI MCP Chatbot Started!")
        print("Type your queries or 'quit' to exit.")

        while True:
            try:
                query = input("\nQuery: ").strip()
                if query.lower() == "quit":
                    break
                await self.process_query(query)
            except Exception as e:
                print(f"\nError: {str(e)}")

    async def cleanup(self):
        """Cleanly close all resources."""
        await self.exit_stack.aclose()


# Usage example
async def main():
    Config.LLM_PROVIDER = "openai"
    Config.validate()
    chatbot = OpenAIMCPChatBot(api_key=Config.OPENAI_API_KEY)
    try:
        await chatbot.connect_to_servers()
        await chatbot.chat_loop()
    finally:
        await chatbot.cleanup()

if __name__ == "__main__":
    asyncio.run(main())
Let’s break down this OpenAI MCP integration code into logical chunks and explain how each part works:
1. Open AI Client Class Setup and Initialization
class OpenAIMCPChatBot:
    def __init__(self, api_key: str):
        self.client = AsyncOpenAI(api_key=api_key)
        self.sessions = []
        self.exit_stack = AsyncExitStack()
        self.available_tools = []
        self.tool_to_session = {}
This initial chunk sets up the core class structure. The AsyncExitStack manages async resources, while tool_to_session maps tool names to their respective MCP sessions.
2. Open AI to MCP Server Connection Logic
async def connect_to_server(self, server_name: str, server_config: dict):
    server_params = StdioServerParameters(**server_config)
    stdio_transport = await self.exit_stack.enter_async_context(
        stdio_client(server_params)
    )
    read, write = stdio_transport
    session = await self.exit_stack.enter_async_context(
        ClientSession(read, write)
    )
    await session.initialize()
This section handles connecting to individual MCP servers using stdio transport. It establishes bidirectional communication channels and initializes the session.
3. Open AI Tool Discovery and Conversion
 # List available tools for this session
    response = await session.list_tools()
    tools = response.tools

    for tool in tools:
        self.tool_to_session[tool.name] = session
        # Convert MCP tool to OpenAI tool format
        openai_tool = {
            "type": "function",
            "function": {
                "name": tool.name,
                "description": tool.description,
                "parameters": tool.inputSchema,
            },
        }
        self.available_tools.append(openai_tool)
This crucial section discovers available tools and converts MCP tool definitions into OpenAI’s function calling format. This translation layer enables OpenAI models to understand and use MCP tools.
4. Open AI Query Processing and Tool Execution
 async def process_query(self, query: str):
        messages = [{"role": "user", "content": query}]
        response = await self.client.chat.completions.create(
            model=Config.OPENAI_MODEL,
            messages=messages,
            tools=self.available_tools if self.available_tools else None,
        )

        while process_query:
            message = response.choices[0].message
            if message.tool_calls:
                # Handle tool execution here
                for tool_call in message.tool_calls:
                    tool_name = tool_call.function.name
                    tool_args = json.loads(tool_call.function.arguments)
                    session = self.tool_to_session[tool_name]
                    result = await session.call_tool(tool_name, arguments=tool_args)
This section handles the core interaction loop. It processes user queries, manages tool calls from OpenAI, and executes them through the appropriate MCP session. The tool results are then fed back to OpenAI for continued conversation.
5. Open AI Interactive Chat Loop and Resource Management
 async def chat_loop(self):
        while True:
            try:
                query = input("\nQuery: ").strip()
                if query.lower() == "quit":
                    break
                await self.process_query(query)
            except Exception as e:
                print(f"\nError: {str(e)}")

    async def cleanup(self):
        await self.exit_stack.aclose()
The final section provides the interactive interface and ensures proper resource cleanup. The cleanup method is particularly important for closing all async resources properly.
This integration demonstrates how MCP bridges the gap between OpenAI’s function calling interface and external tools, providing a standardized way to extend AI capabilities with custom functionality.
Get the complete running source code examples on github. I’d love it if you’d follow me there too!
Anthropic Claude Integration
This code demonstrates an integration between Anthropic’s Claude AI model and MCP tools using mcp.ClientSession and mcp.StdioServerParameters. The flow is similar to the previous OpenAI example, but instead uses Anthropic’s native API to interact with Claude. This implementation allows Claude to discover and utilize MCP tools while maintaining a conversational interface with users.***It is a long listing but we break down step by step after.***Here’s the enhanced Anthropic integration example:
"""Anthropic integration with MCP server."""

import asyncio
import json
from contextlib import AsyncExitStack

from anthropic import Anthropic
from mcp import ClientSession, StdioServerParameters
from mcp.client.stdio import stdio_client

from config import Config

class AnthropicMCPChatBot:
    def __init__(self, api_key: str):
        self.anthropic = Anthropic(api_key=api_key)
        self.sessions = []
        self.exit_stack = AsyncExitStack()
        self.available_tools = []
        self.tool_to_session = {}

    async def connect_to_server(self, server_name: str, server_config: dict) :
        """Connect to a single MCP server."""
        try:
            server_params = StdioServerParameters(**server_config)
            stdio_transport = await self.exit_stack.enter_async_context(
                stdio_client(server_params)
            )
            read, write = stdio_transport
            session = await self.exit_stack.enter_async_context(
                ClientSession(read, write)
            )
            await session.initialize()
            self.sessions.append(session)

            # List available tools for this session
            response = await session.list_tools()
            tools = response.tools
            print(f"Connected to {server_name} with tools:",
			            [t.name for t in tools])

            for tool in tools:
                self.tool_to_session[tool.name] = session
                self.available_tools.append(
                    {
                        "name": tool.name,
                        "description": tool.description,
                        "input_schema": tool.inputSchema,
                    }
                )
        except Exception as e:
            print(f"Failed to connect to {server_name}: {e}")

    async def connect_to_servers(self):
        """Connect to all configured MCP servers."""
        try:
            with open("server_config.json", "r") as file:
                data = json.load(file)

            servers = data.get("mcpServers", {})
            for server_name, server_config in servers.items():
                await self.connect_to_server(server_name, server_config)
        except Exception as e:
            print(f"Error loading server configuration: {e}")
            raise

    async def process_query(self, query: str):
        """Process a query using Claude with MCP tools."""
        messages = [{"role": "user", "content": query}]

        response = self.anthropic.messages.create(
            max_tokens=2024,
            model=Config.ANTHROPIC_MODEL,
            tools=self.available_tools,
            messages=messages,
        )

        process_query = True
        while process_query:
            assistant_content = []
            for content in response.content:
                if content.type == "text":
                    print(content.text)
                    assistant_content.append(content)
                    if len(response.content) == 1:
                        process_query = False

                elif content.type == "tool_use":
                    assistant_content.append(content)
                    messages.append({"role": "assistant",
                                     "content": assistant_content})

                    tool_id = content.id
                    tool_args = content.input
                    tool_name = content.name

                    print(f"Calling tool {tool_name} with args {tool_args}")

                    # Use the correct session for this tool
                    session = self.tool_to_session[tool_name]
                    result = await session.call_tool(tool_name,
                                                arguments=tool_args)

                    messages.append(
                        {
                            "role": "user",
                            "content": [
                                {
                                    "type": "tool_result",
                                    "tool_use_id": tool_id,
                                    "content": result.content,
                                }
                            ],
                        }
                    )

                    response = self.anthropic.messages.create(
                        max_tokens=2024,
                        model=Config.ANTHROPIC_MODEL,
                        tools=self.available_tools,
                        messages=messages,
                    )

                    if (
                        len(response.content) == 1
                        and response.content[0].type == "text"
                    ):
                        print(response.content[0].text)
                        process_query = False

    async def chat_loop(self):
        """Run an interactive chat loop"""
        print("\nAnthropic MCP Chatbot Started!")
        print("Type your queries or 'quit' to exit.")

        while True:
            try:
                query = input("\nQuery: ").strip()
                if query.lower() == "quit":
                    break
                await self.process_query(query)
            except Exception as e:
                print(f"\nError: {str(e)}")

    async def cleanup(self):
        """Cleanly close all resources."""
        await self.exit_stack.aclose()


# Usage example
async def main():
    Config.LLM_PROVIDER = "anthropic"
    Config.validate()

    chatbot = AnthropicMCPChatBot(api_key=Config.ANTHROPIC_API_KEY)
    try:
        await chatbot.connect_to_servers()
        await chatbot.chat_loop()
    finally:
        await chatbot.cleanup()

if __name__ == "__main__":
    asyncio.run(main())
Let’s break down the Anthropic MCP integration code into logical chunks:
1. Claude Class Setup and Initialization
class AnthropicMCPChatBot:
    def __init__(self, api_key: str):
        self.anthropic = Anthropic(api_key=api_key)
        self.sessions = []
        self.exit_stack = AsyncExitStack()
        self.available_tools = []
        self.tool_to_session = {}
This initialization chunk sets up the core class structure, managing Anthropic client, sessions, and tool mappings. The AsyncExitStack is crucial for managing async resources.
2. Claude to MCP Server Connection Management
async def connect_to_server(self, server_name: str, server_config: dict):
    server_params = StdioServerParameters(**server_config)
    stdio_transport = await self.exit_stack.enter_async_context(
        stdio_client(server_params)
    )
    read, write = stdio_transport
    session = await self.exit_stack.enter_async_context(
        ClientSession(read, write)
    )
    await session.initialize()
This section handles connecting to MCP servers using stdio transport, establishing bidirectional communication channels.
3. Claude Tool Discovery and Registration
 response = await session.list_tools()
    tools = response.tools
    print(f"Connected to {server_name} with tools:", [t.name for t in tools])

    for tool in tools:
        self.tool_to_session[tool.name] = session
        self.available_tools.append({
            "name": tool.name,
            "description": tool.description,
            "input_schema": tool.inputSchema,
        })
This crucial section discovers available tools and converts them into Anthropic’s expected format. Unlike OpenAI’s function format, Anthropic uses a simpler tool schema structure.
4. Claude Query Processing and Tool Execution
async def process_query(self, query: str):
    messages = [{"role": "user", "content": query}]
    response = self.anthropic.messages.create(
        max_tokens=2024,
        model=Config.ANTHROPIC_MODEL,
        tools=self.available_tools,
        messages=messages,
    )
This section handles the core interaction loop, managing message creation and tool execution through Anthropic’s API. The key difference from OpenAI is how tool calls are structured using Anthropic’s content-based approach.
5. Claude Tool Response Handling
 while process_query:
        assistant_content = []
        for content in response.content:
            if content.type == "tool_use":
                tool_id = content.id
                tool_args = content.input
                tool_name = content.name
                session = self.tool_to_session[tool_name]
                result = await session.call_tool(tool_name, arguments=tool_args)
This section demonstrates how Anthropic’s tool use.
Server Configuration
Both chatbots use the same server configuration file (server_config.json):
{
  "mcpServers": {
    "customer-service": {
      "command": "poetry",
      "args": ["run", "python", "src/main.py"]
    }
  }
}
Comparison: OpenAI vs Anthropic MCP Integration
| Feature | OpenAI | Anthropic |
|---|---|---|
| Tool Format | OpenAI function format | Direct MCP tool schema |
| Tool Calls | tool_calls array |
tool_use content blocks |
| Results | tool role messages |
tool_result content blocks |
| Agents SDK | Native MCP support | Manual integration |
| Async Support | Full async API | Sync API (manual async) |
Running the Examples
To run either chatbot:
# Install dependencies
poetry add openai anthropic python-mcp-sdk python-dotenv


# Set up environment variables
echo "OPENAI_API_KEY=your-key-here" >> .env
echo "ANTHROPIC_API_KEY=your-key-here" >> .env


# Run OpenAI version
python openai_mcp_chatbot.py


# Run Anthropic version
python anthropic_mcp_chatbot.py
Both examples demonstrate how different AI providers can consume the same MCP server, showcasing the protocol’s universal nature.
Connecting with LangChain: Enterprise AI Workflows
LangChain streamlines development of LLM applications by providing a unified interface and tools for sophisticated AI workflows. (New LangChain and want to learn more check out this getting started with LangChain guide).
Key features:
-**Unified API:**Consistent interface across LLM providers for easy model switching -**Chain Building:**Creates complex workflows by connecting LLM calls and tools -**Memory Management:**Maintains conversation history and context -**Tool Integration:**Connects LLMs with external tools and data sources -**Prompt Management:**Structures and optimizes prompts at scale
By abstracting away much of the complexity in LLM application development, LangChain allows developers to focus on building business logic rather than dealing with implementation details.LangChainis a framework for developing applications powered by language models. It supports MCP through the langchain-mcp-adapters library, enabling seamless integration of MCP tools into LangChain andLangGraphworkflows.
The Role of LangChain in the MCP Ecosystem
LangChain acts as both anMCP Hostand aworkflow orchestrator. It can:
- Connect to multiple MCP servers simultaneously
- Convert MCP tools into LangChain-compatible tools
- Orchestrate complex multi-step workflows using MCP resources and tools
- Provide memory and state management across MCP interactions
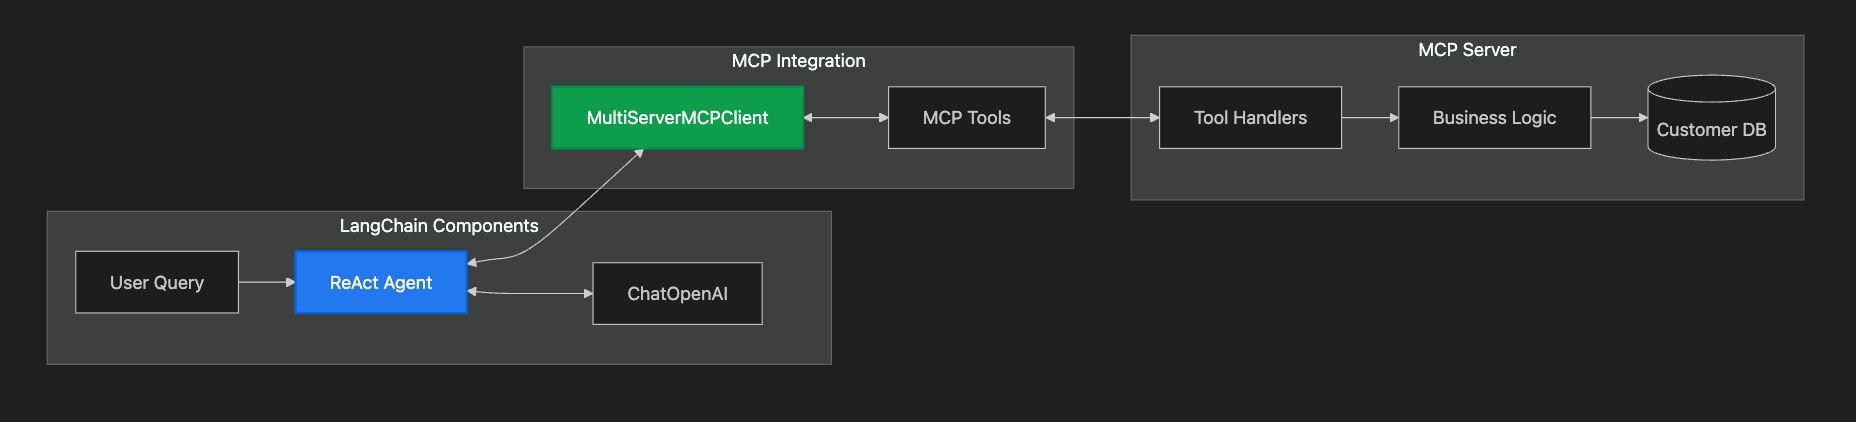
The LangChain component diagram looks like this.
Setting Up LangChain Integration
First, install the necessary dependencies:
poetry add langchain langchain-mcp-adapters langchain-openai
Create a LangChain integration script:
"""LangChain integration with MCP server."""

import asyncio

from langchain_mcp_adapters.client import MultiServerMCPClient
from langchain_openai import ChatOpenAI
from langgraph.prebuilt import create_react_agent

from config import Config

async def setup_langchain_mcp_agent():
    """Set up a LangChain agent with MCP tools."""

    # Initialize the language model
    llm = ChatOpenAI(
        model=Config.OPENAI_MODEL, temperature=0.1, api_key=Config.OPENAI_API_KEY
    )

    # Connect to our MCP server using MultiServerMCPClient
    client = MultiServerMCPClient(
        {
            "customer-service": {
                "command": "poetry",
                "args": ["run", "python", "src/main.py"],
                "transport": "stdio",
            }
        }
    )

    # Get all available tools from MCP servers
    tools = await client.get_tools()

    # Create a ReAct agent with the tools
    agent = create_react_agent(llm, tools)

    return agent, client

async def run_customer_service_scenarios():
    """Demonstrate LangChain + MCP integration."""
    print("🔗 Setting up LangChain + MCP integration...")

    agent, client = await setup_langchain_mcp_agent()

    # Example customer service scenarios
    scenarios = [
        "Look up customer 12345 and summarize their account status",
        "Create a high-priority support ticket for customer 67890 about billing",
        "Calculate account value for customer with purchases: $150, $300, $89",
    ]

    for scenario in scenarios:
        print(f"\n📞 Scenario: {scenario}")
        try:
            response = await agent.ainvoke(
                {"messages": [{"role": "user", "content": scenario}]}
            )

            # Extract the final AI response
            final_message = response["messages"][-1]
            if hasattr(final_message, "content"):
                print(f"🤖 Response: {final_message.content}")
            else:
                print(f"🤖 Response: {final_message}")

        except Exception as e:
            print(f"❌ Error: {e}")

        print("-" * 60)

async def main():
    """Main entry point."""
    Config.validate()

    await run_customer_service_scenarios()

if __name__ == "__main__":
    asyncio.run(main())
Now let’s break that down bit by bit and explain it.
LangChain Core Integration Code
# Imports and configuration
from langchain_mcp_adapters.client import MultiServerMCPClient
from langchain_openai import ChatOpenAI
from langgraph.prebuilt import create_react_agent
from config import Config

async def setup_langchain_mcp_agent():
    """Set up a LangChain agent with MCP tools."""
    # Initialize language model
    llm = ChatOpenAI(
        model=Config.OPENAI_MODEL,
        temperature=0.1,
        api_key=Config.OPENAI_API_KEY
    )
    return llm
This first shows code that handles the basic setup and configuration. It imports required dependencies and creates the language model instance that will be used for interactions.
LangChain MCP Client Setup
 # Connect to MCP server
    client = MultiServerMCPClient({
        "customer-service": {
            "command": "poetry",
            "args": ["run", "python", "src/main.py"],
            "transport": "stdio",
        }
    })

    # Get available tools
    tools = await client.get_tools()

    # Create ReAct agent
    agent = create_react_agent(llm, tools)
    return agent, client
This section establishes the connection to the MCP server and sets up the tools. The MultiServerMCPClient handles the communication protocol, while the ReAct agent combines the language model with the available tools.
LangChain Scenario Execution
async def run_customer_service_scenarios():
    """Demonstrate LangChain + MCP integration."""
    print("🔗 Setting up LangChain + MCP integration...")
    agent, client = await setup_langchain_mcp_agent()

    scenarios = [
        "Look up customer 12345 and summarize their account status",
        "Create a high-priority support ticket for customer 67890",
        "Calculate account value for purchases: $150, $300, $89",
    ]
This listing defines the test scenarios that will demonstrate the integration in action. It shows how real-world customer service tasks can be handled through the MCP tools.
LangChain Response Processing
 for scenario in scenarios:
        print(f"\n📞 Scenario: {scenario}")
        try:
            response = await agent.ainvoke({
                "messages": [{"role": "user", "content": scenario}]
            })

            # Extract response
            final_message = response["messages"][-1]
            if hasattr(final_message, "content"):
                print(f"🤖 Response: {final_message.content}")
            else:
                print(f"🤖 Response: {final_message}")
        except Exception as e:
            print(f"❌ Error: {e}")
        print("-" * 60)
The final part handles the execution of scenarios and processes the responses. It demonstrates how the LangChain agent handles the tool calls and returns results in a standardized format.
Each of these code segments plays a crucial role in the MCP integration:
- The first chunk sets up the foundation with necessary imports and LLM configuration
- The second chunk establishes the MCP connection and prepares tools for use
- The third chunk defines real-world scenarios to demonstrate the integration
- The fourth chunk shows how to process and handle responses from the integrated system
This integration demonstrates how LangChain can orchestrate complex workflows using your MCP server’s capabilities.
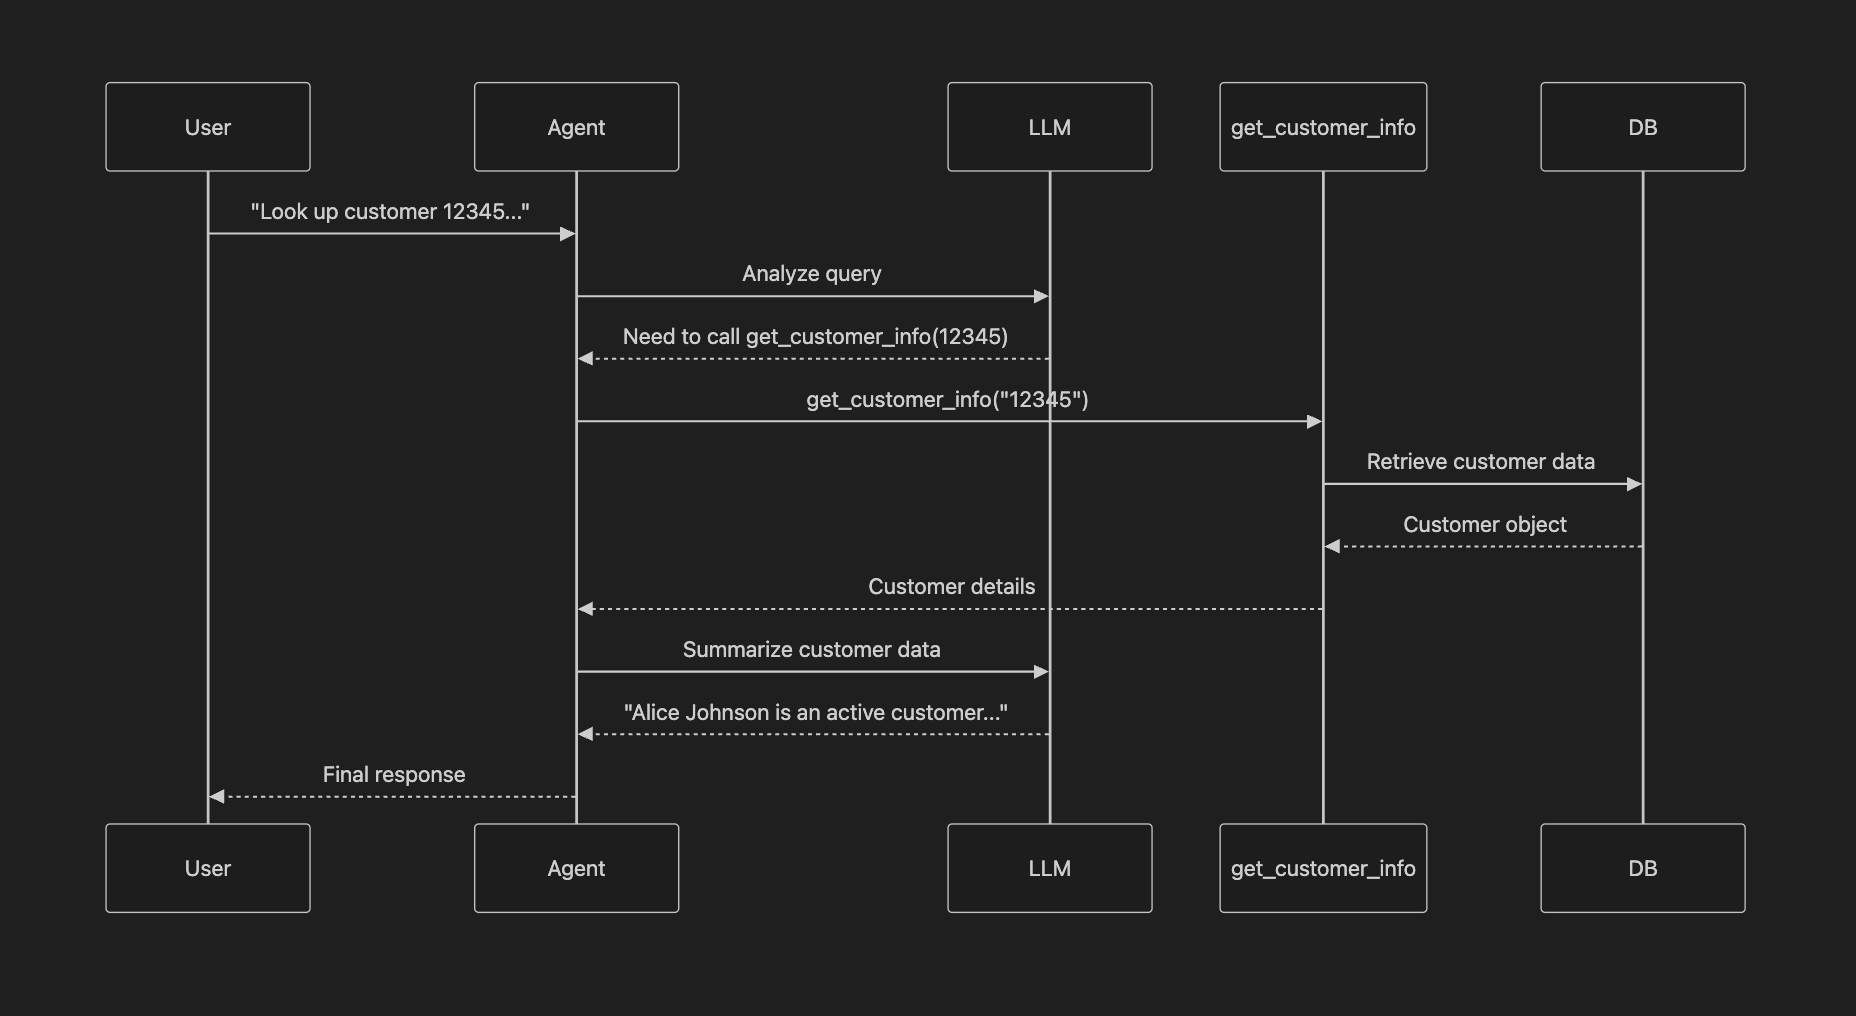
LangChain Sequence Diagram
This sequence diagram illustrates the flow of information when handling a customer lookup request:
- The user initiates by asking to look up customer information
- The Agent forwards this request to the Language Learning Model (LLM) for analysis
- The LLM determines that the get_customer_info tool needs to be used
- The Agent calls the tool with the customer ID
- The tool queries the database to retrieve customer information
- The database returns the customer object back through the chain
- The Agent sends the customer data to the LLM for summarization
- The LLM creates a human-readable summary
- Finally, the Agent delivers the summarized response to the user
This workflow demonstrates how MCP enables seamless interaction between different components - from user interface to LLM processing to database operations - all coordinated through a standardized protocol.
If you enjoyed this article, follow Rick on LinkedIn and Medium. Get the complete running source code examples on github and follow me there too.
Connecting with DSPy: Programming Language ModelsDSPyis a framework that focuses on programming language models rather than traditional prompting. It treats prompts and model parameters as learnable components that can be automatically optimized. This approach helps eliminate much of the guesswork from prompt engineering.
The Role of DSPy with MCP
DSPy acts as anMCP Hostwith unique capabilities:
-Systematic optimizationof prompts and model weights -Declarative programmingapproach to AI applications -Automatic compilationof AI programs into effective prompts -Integration with MCP toolsfor enhanced capabilities
DSPy is very compelling, if you want to learn more about DSPy checkout this getting started guide with DSPy.
Next up we will build the DSPy example.

This class diagram illustrates the relationships between key components in the DSPy-MCP integration:
- The
CustomerServiceSignatureextendsdspy.Signatureand contains input/output fields for request handling - The
dspy.ReActagent uses both the signature and tools to process requests - DSPy tools are converted from MCP tools and use the
ClientSessionfor execution - The
dspy.LMclass handles language model configuration and initialization
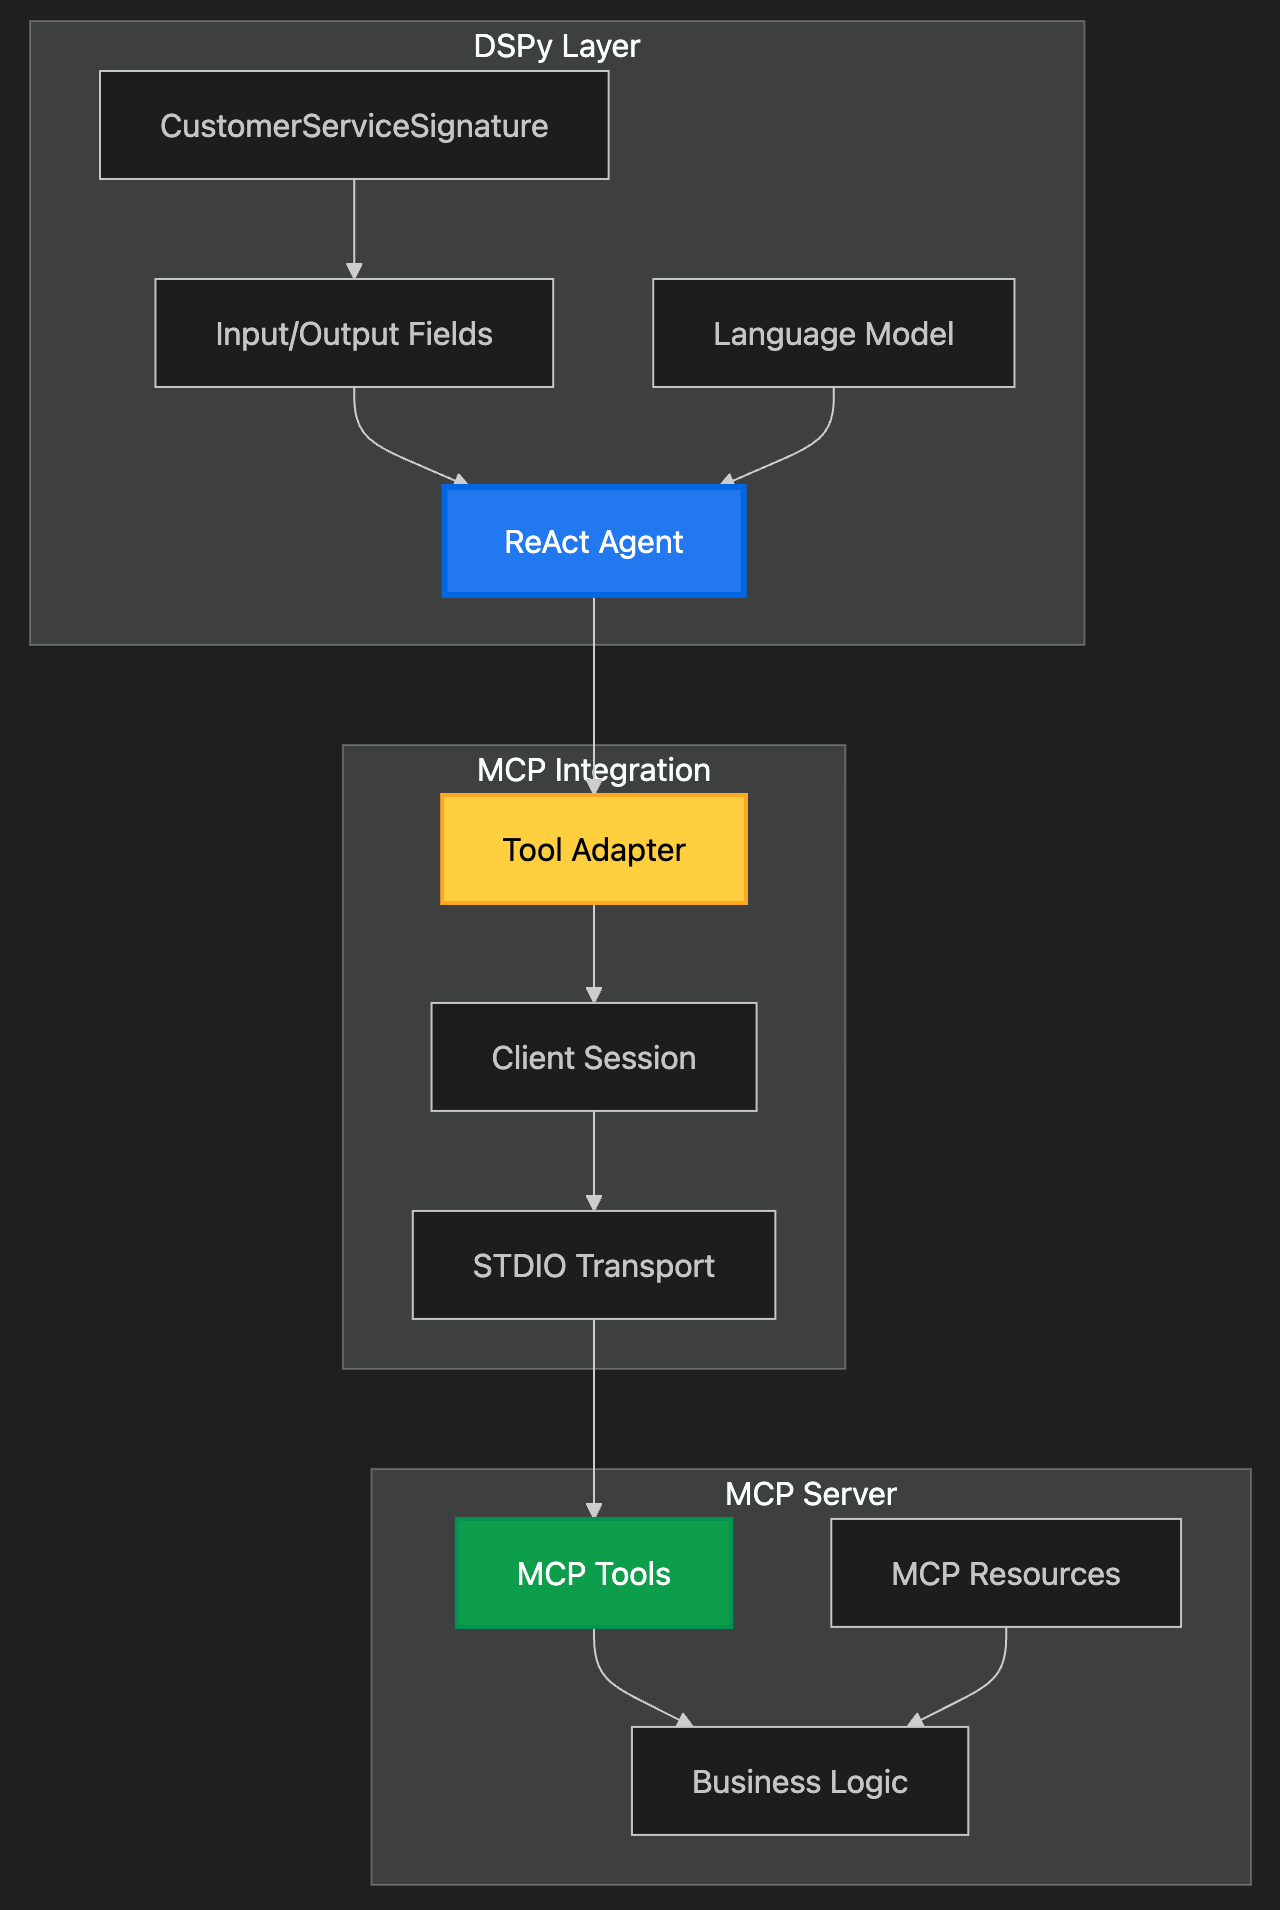
The diagram above illustrates the architecture of the DSPy-MCP integration with three main layers:
- TheDSPy Layerhandles the high-level programming interface, including the customer service signature definition, input/output fields, language model configuration, and the ReAct agent that coordinates operations
- TheMCP Integration Layermanages the communication between DSPy and MCP, using STDIO transport, maintaining client sessions, and adapting tools between the two systems
- TheMCP Server Layercontains the actual tools, resources, and business logic that perform the requested operations
Data flows from the DSPy Layer through the integration layer to the MCP Server, where operations are executed, and results are returned through the same path.
Setting Up DSPy Integration
Based on the official DSPy MCP tutorial, here’s how to integrate DSPy with our MCP server:
"""DSPy integration with MCP server."""

import asyncio

import dspy
from mcp import ClientSession, StdioServerParameters
from mcp.client.stdio import stdio_client

from config import Config


# Define a DSPy signature for our customer service tasks
class CustomerServiceSignature(dspy.Signature):
    """Handle customer service requests using available tools."""

    request: str = dspy.InputField(desc="Customer service request")
    response: str = dspy.OutputField(desc="Helpful customer service response")

async def setup_dspy_mcp_integration():
    """Set up DSPy with MCP tools."""

    # Configure DSPy with your preferred language model
    if Config.LLM_PROVIDER == "openai":
        llm = dspy.LM(f"openai/{Config.OPENAI_MODEL}",
                                          api_key=Config.OPENAI_API_KEY)
    elif Config.LLM_PROVIDER == "anthropic":
        llm = dspy.LM(
            f"anthropic/{Config.ANTHROPIC_MODEL}",
                                           api_key=Config.ANTHROPIC_API_KEY
        )
    else:
        print("DSPy requires OpenAI or Anthropic provider")
        return None

    dspy.configure(lm=llm)

    # Create MCP client connection
    server_params = StdioServerParameters(
        command="poetry", args=["run", "python", "src/main.py"]
    )

    async with stdio_client(server_params) as (read, write):
        async with ClientSession(read, write) as session:
            # Initialize the MCP connection
            await session.initialize()

            # List available tools
            tools = await session.list_tools()

            # Convert MCP tools to DSPy tools
            dspy_tools = []
            for tool in tools.tools:
                dspy_tools.append(dspy.Tool.from_mcp_tool(session, tool))

            # Create a ReAct agent with the tools
            react = dspy.ReAct(CustomerServiceSignature, tools=dspy_tools)

            # Test the integration
            result = await react.acall(
                request="Look up customer 12345 and create a support ticket"
                " as the bbq grill that she bought is defective."
            )

            print(f"DSPy Result: {result}")

async def main():
    """Main entry point."""
    Config.validate()
    await setup_dspy_mcp_integration()

if __name__ == "__main__":
    asyncio.run(main())
DSPy’s strength lies in its ability to optimize the AI program automatically, learning better prompts and strategies through data and feedback.
Breaking Down the DSPy Integration Code
Let’s examine the DSPy integration code in logical chunks to understand how it works with MCP:
1. DSPy Basic Setup and Imports
"""DSPy integration with MCP server."""

import asyncio
import dspy
from mcp import ClientSession, StdioServerParameters
from mcp.client.stdio import stdio_client
from config import Config
This section imports the necessary modules for DSPy integration, including the MCP client components and async support.
2. DSPy Customer Service Signature Definition
# Define a DSPy signature for our customer service tasks
class CustomerServiceSignature(dspy.Signature):
    """Handle customer service requests using available tools."""

    request: str = dspy.InputField(desc="Customer service request")
    response: str = dspy.OutputField(desc="Helpful customer service response")
This defines the interface for customer service tasks, specifying input and output fields that DSPy will use to structure interactions.
3. DSPy LLM Configuration
 # Configure DSPy with your preferred language model
    if Config.LLM_PROVIDER == "openai":
        llm = dspy.LM(f"openai/{Config.OPENAI_MODEL}", api_key=Config.OPENAI_API_KEY)
    elif Config.LLM_PROVIDER == "anthropic":
        llm = dspy.LM(
            f"anthropic/{Config.ANTHROPIC_MODEL}", api_key=Config.ANTHROPIC_API_KEY
        )
    else:
        print("DSPy requires OpenAI or Anthropic provider")
        return None

    dspy.configure(lm=llm)
This section handles the language model setup, supporting both OpenAI and Anthropic models through configuration.
4. DSPy MCP Server Connection
 # Create MCP client connection
    server_params = StdioServerParameters(
        command="poetry", args=["run", "python", "src/main.py"]
    )

    async with stdio_client(server_params) as (read, write):
        async with ClientSession(read, write) as session:
            # Initialize the MCP connection
            await session.initialize()
This establishes the connection to the MCP server using stdio transport, setting up the communication channel.
5. DSPy Tool Integration
# List available tools
 tools = await session.list_tools()

 # Convert MCP tools to DSPy tools
 dspy_tools = []
 for tool in tools.tools:
   dspy_tools.append(dspy.Tool.from_mcp_tool(session, tool))

 # Create a ReAct agent with the tools
 react = dspy.ReAct(CustomerServiceSignature, tools=dspy_tools)

 # Test the integration
 result = await react.acall(
                request="Look up customer 12345 and create a support ticket"
                " as the bbq grill that she bought is defective.")

 print(f"DSPy Result: {result}")
This crucial section handles the conversion of MCP tools into DSPy-compatible tools and creates a ReAct agent to use them.
6. DSPy Test Integration and Main Entry
async def main():
    """Main entry point."""
    Config.validate()
    await setup_dspy_mcp_integration()

if __name__ == "__main__":
    asyncio.run(main())
The final section demonstrates how to use the integrated tools with a test request and provides the main entry point for the application.
Each of these code segments plays a vital role in the DSPy-MCP integration:
- The setup code provides the foundation for tool integration
- The signature definition structures how requests and responses are handled
- The LLM configuration enables flexible model selection
- The MCP connection code establishes the communication channel
- The tool integration code converts MCP tools into DSPy-compatible format
- The test integration demonstrates practical usage of the system
If you want to stop wrestling with brittle prompts and transform your AI systems into reliable software, you should definitely check out DSPy.
Connecting with LiteLLM: Universal LLM GatewayLiteLLMis a universal interface for language models that supports 100+ LLM APIs with a standardized interface. It provides MCP integration to expose MCP tools across all supported models.
The Role of LiteLLM in the MCP Ecosystem
LiteLLM acts as both anMCP Hostand amodel proxy:
-Universal model access- Use MCP tools with any supported LLM -Load balancingacross multiple model providers -Cost trackingand usage analytics -Standardized interfacefor different model APIs
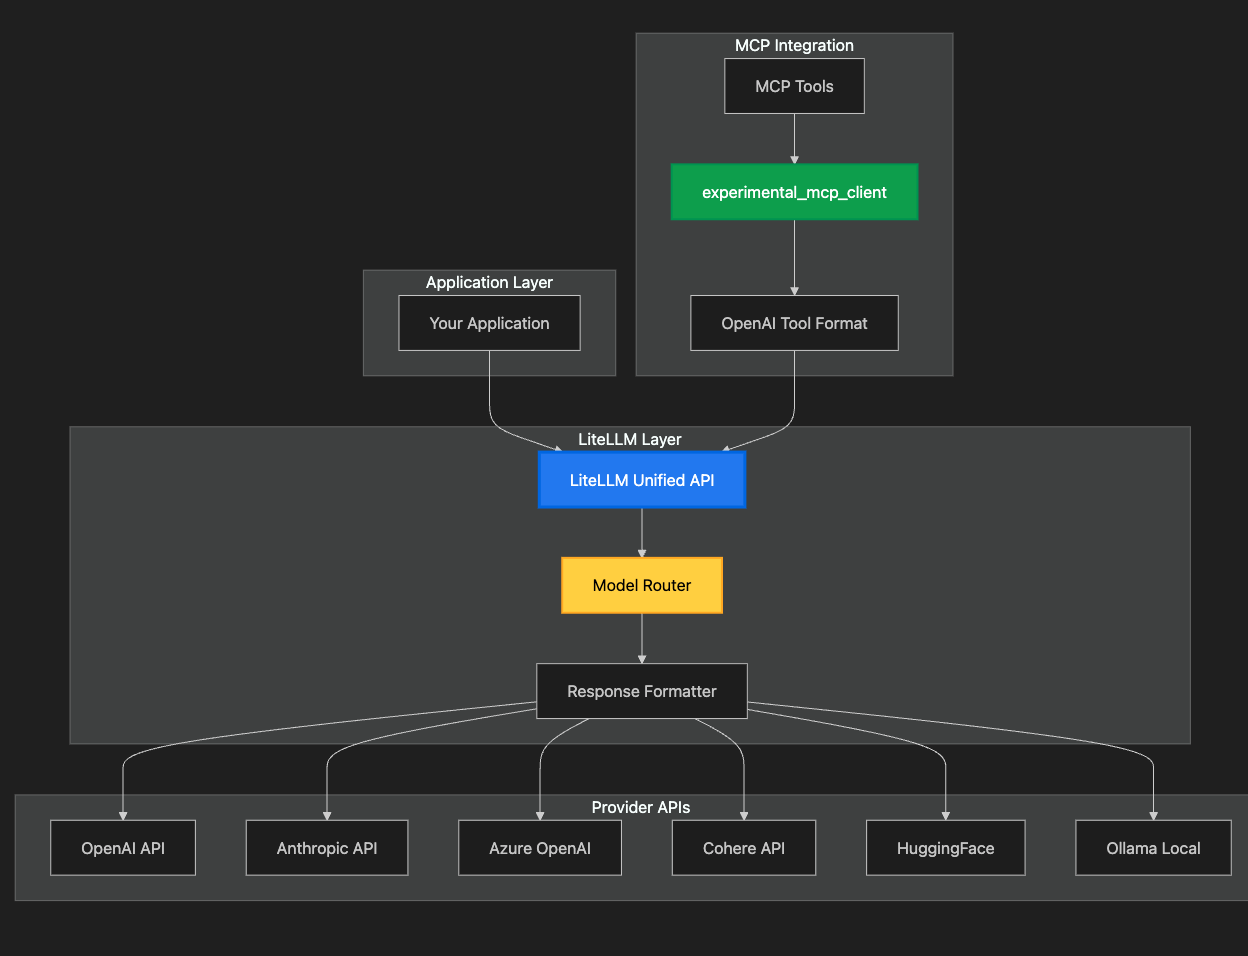
Architecture Diagram of using LiteLLM with MCP
Setting Up LiteLLM Integration
Install LiteLLM and set up the integration:
poetry add litellm
Here’s how to use LiteLLM with MCP:
"""LiteLLM integration with MCP server."""

import asyncio
import json

import litellm
from litellm import experimental_mcp_client
from mcp import ClientSession, StdioServerParameters
from mcp.client.stdio import stdio_client

from config import Config

async def setup_litellm_mcp():
    """Set up LiteLLM with MCP tools."""

    # Create MCP server connection
    server_params = StdioServerParameters(
        command="poetry", args=["run", "python", "src/main.py"]
    )

    async with stdio_client(server_params) as (read, write):
        async with ClientSession(read, write) as session:
            # Initialize the MCP connection
            await session.initialize()

            # Load MCP tools in OpenAI format
            tools = await experimental_mcp_client.load_mcp_tools(
                session=session, format="openai"
            )

            print(f"Loaded {len(tools)} MCP tools")

            # Use tools with different models
            models_to_test = []

            if Config.LLM_PROVIDER == "openai":
                models_to_test.append(Config.OPENAI_MODEL)
            elif Config.LLM_PROVIDER == "anthropic":
                models_to_test.append(Config.ANTHROPIC_MODEL)
            else:
                models_to_test = [Config.OPENAI_MODEL, Config.ANTHROPIC_MODEL]

            for model in models_to_test:
                try:
                    print(f"\nTesting with {model}...")

                    # Initial conversation
                    messages = [
                        {
                            "role": "user",
                            "content": "Customer 67890 recently purchases "
                            "were $150, $300, $13 and $89. "
                            "Calculate their total account value.",
                        }
                    ]

                    # First call to get tool requests
                    response = await litellm.acompletion(
                        model=model,
                        messages=messages,
                        tools=tools,
                    )

                    # Extract the response
                    message = response.choices[0].message

                    # Check if the model made tool calls
                    if hasattr(message, "tool_calls") and message.tool_calls:
                        print(f"🔧 Tool calls made: {len(message.tool_calls)}")

                        # Add assistant's message with tool calls to conversation
                        messages.append(
                            {
                                "role": "assistant",
                                "content": message.content,
                                "tool_calls": message.tool_calls,
                            }
                        )

                        # Execute each tool call
                        for call in message.tool_calls:
                            print(f"   - Executing {call.function.name}")

                            # Execute the tool through MCP
                            arguments = json.loads(call.function.arguments)
                            result = await session.call_tool(
                                call.function.name, arguments
                            )

                            # Add tool result to conversation
                            messages.append(
                                {
                                    "role": "tool",
                                    "content": str(result.content),
                                    "tool_call_id": call.id,
                                }
                            )

                        # Get final response from model with tool results
                        final_response = await litellm.acompletion(
                            model=model,
                            messages=messages,
                            tools=tools,
                        )

                        final_content = final_response.choices[0].message.content
                        print(f"🤖 Final Response: {final_content}")

                    else:
                        # Display content if available (no tools called)
                        if message.content:
                            print(f"🤖 Response: {message.content}")
                        else:
                            print("🤖 Response: (No response)")

                except Exception as e:
                    print(f"Error with {model}: {e}")

async def main():
    """Main entry point."""
    Config.validate()
    await setup_litellm_mcp()

if __name__ == "__main__":
    asyncio.run(main())
LiteLLM’s MCP integration allows you to use your MCP tools with any supported language model, providing incredible flexibility in model selection and deployment.
Let’s break it down step by step.
1. LiteLLM Setup and Imports
"""LiteLLM integration with MCP server."""
import asyncio
import json
import litellm
from litellm import experimental_mcp_client
from mcp import ClientSession, StdioServerParameters
from mcp.client.stdio import stdio_client
from config import Config
This initial chunk sets up the necessary imports for the LiteLLM integration with MCP. It includes async support, JSON handling, and the core LiteLLM and MCP client libraries.
2. LiteLLM to MCP Connection Setup
async def setup_litellm_mcp():
    """Set up LiteLLM with MCP tools."""

    # Initialize server parameters
    server_params = StdioServerParameters(
        command="poetry",
        args=["run", "python", "src/main.py"]
    )

    # Create client session
    async with stdio_client(server_params) as (read, write):
        async with ClientSession(read, write) as session:
            # Initialize MCP connection
            await session.initialize()

            # Load tools in OpenAI format
            tools = await experimental_mcp_client.load_mcp_tools(
                session=session,
                format="openai"
            )
            print(f"Loaded {len(tools)} MCP tools")
This section establishes the connection to the MCP server and loads the available tools in OpenAI format. The tools are converted to be compatible with LiteLLM’s expectations.
3. LiteLLM Model Selection Logic
						# Select model based on provider config
            if Config.LLM_PROVIDER == "openai":
                models_to_test.append(Config.OPENAI_MODEL)
            elif Config.LLM_PROVIDER == "anthropic":
                models_to_test.append(Config.ANTHROPIC_MODEL)
            else:
                models_to_test = [Config.OPENAI_MODEL, Config.ANTHROPIC_MODEL]

            # Test each configured model
            for model in models_to_test:
                try:
                    print(f"\nTesting with {model}...")

                    # Set up initial test message
                    messages = [{
                        "role": "user",
                        "content": (
                            "Customer 67890 recently purchases "
                            "were $150, $300, $13 and $89. "
                            "Calculate their total account value."
                        )
                    }]
This chunk handles model selection based on configuration and sets up the initial test message for the AI.
4. LiteLLM - Tool Execution Setup
response = await litellm.acompletion(
                        model=model,
                        messages=messages,
                        tools=tools,
                    )
 message = response.choices[0].message

 if hasattr(message, "tool_calls") and message.tool_calls:
     print(f"🔧 Tool calls made: {len(message.tool_calls)}")
     messages.append(
                     {
                         "role": "assistant",
                         "content": message.content,
                         "tool_calls": message.tool_calls,
                     }
     )
This section handles the initial AI response and checks for tool calls, preparing for tool execution if needed.
5. LiteLLM - Tool Execution and Response Handling
for call in message.tool_calls:
	  print(f"   - Executing {call.function.name}")
	  arguments = json.loads(call.function.arguments)
	  result = await session.call_tool(call.function.name, arguments)
	  messages.append(
      {
          "role": "tool",
          "content": str(result.content),
          "tool_call_id": call.id,
      }
	  )
   ...
	 final_response = await litellm.acompletion(
                            model=model,
                            messages=messages,
                            tools=tools,
                        )

	 final_content = final_response.choices[0].message.content
	 print(f"🤖 Final Response: {final_content}")
This crucial section handles the actual execution of tools and processes their results, showing how MCP tools are called and their results incorporated into the conversation.
6. Error Handling and Main Entry
async def main():
    """Main entry point."""
    Config.validate()
    await setup_litellm_mcp()

if __name__ == "__main__":
    asyncio.run(main())
The final chunk handles cases where no tools are called, provides error handling, and sets up the main entry point for the application.
Each of these code segments plays a vital role in demonstrating how LiteLLM integrates with MCP to provide tool access across different language models. The code showcases:
- Tool loading and format conversion for OpenAI compatibility
- Flexible model selection and configuration
- Proper handling of tool calls and responses
- Integration of tool results back into the conversation flow
- Error handling and response management
Let’s visualize the LiteLLM integration flow with a diagram showing how the test query moves through different models and processing steps:

This diagram illustrates how the test query flows through multiple models via LiteLLM, showing the processing steps from initial query to final response. Each model processes the query independently but follows the same pattern of analysis, tool usage, and response formatting.
For those interested in learning more about LiteLLM, I’ve written two articles on the subject:
- Multi-Provider Chat App: LiteLLM, Streamlit, Ollama, Gemini, Claude, Perplexity, and Modern LLM Integration
- Beyond Chat: Enhancing LiteLLM Multi-Provider App with RAG, Streaming, and AWS Bedrock
These articles detail my journey building a multi-LLM chat application and later enhancing it with RAG support. The application works with BedRock, OpenAI, Anthropic, Perplexity, and Ollama.
Let’s review what we covered so far after we wrote an MCP server with FastMCP.
Understanding the Client Libraries
Each integration we’ve shown demonstrates different client patterns:
Direct MCP Client (DSPy)
DSPy uses the official MCP Python SDK directly for maximum control and customization.
Adapter Pattern (LangChain)
LangChain uses specialized adapters that convert MCP tools into framework-native tools, enabling seamless integration with existing workflows.
Bridge Pattern (LiteLLM)
LiteLLM provides a bridge between MCP servers and multiple LLM providers, enabling universal tool access across different models.
Embedded Client (Claude Desktop)
Claude Desktop MCP client capabilities built directly into the application, providing native MCP support with zero additional setup.
The Future of AI Integration
MCP represents a fundamental shift in how we approach AI integration. By standardizing the communication layer between AI models and external resources, we’re moving from a world of fragmented, custom solutions to a unified, interoperable ecosystem.
Key benefits of this standardization include:
-Reduced Development Time: No more custom integrations for each AI model and data source combination -Improved Maintainability: Standard protocols mean easier debugging and updates -Enhanced Flexibility: Swap AI models or data sources without rewriting integration code -Accelerated Innovation: Developers can focus on AI capabilities rather than integration plumbing
As the MCP ecosystem grows, we can expect to see:
- More AI platforms adopting MCP support
- A marketplace of ready-to-use MCP servers for common services
- Advanced orchestration tools for complex AI workflows
- Industry-specific MCP standards and tools
Getting Started: Your Next Steps
Ready to dive into MCP development? Here’s your roadmap:
1.Set Up Your Environment: Use the project structure and tools demonstrated in this article and the github repo 2.Start Small: Build a simple MCP server with one resource and one tool 3.Experiment with Integration: Connect your server to Claude Desktop, LangChain, DSPy, or LiteLLM 4.Expand Gradually: Add more sophisticated features like authentication, databases, and external APIs 5.Join the Community: Engage with the MCP community for support and collaboration
Note: Advanced topics like security best practices, production deployment considerations, performance optimization, and monitoring will be covered in our upcoming follow-up article.
Conclusion
The Model Context Protocol isn’t just a technical standard—it’s a bridge to a future where AI integration is seamless, powerful, and accessible to developers at every level. By mastering MCP today, you’re positioning yourself at the forefront of the AI revolution.
Whether you’re building customer service assistants, data analysis tools, or complex enterprise workflows, MCP provides the foundation for creating AI applications that are both powerful and maintainable. The era of integration chaos is ending—welcome to the age of AI harmony.
Key Points Covered
-**MCP Introduction:**Explored how the Model Context Protocol standardizes AI integrations and enables seamless communication between models and external tools -**Integration Examples:**Detailed implementations with various frameworks including LiteLLM, DSPy, LangChain, and Claude Desktop -**Code Walkthrough:**In-depth analysis of LiteLLM integration, covering setup, tool execution, and response handling -**Client Patterns:**Examined different integration approaches including Direct MCP Client, Adapter Pattern, Bridge Pattern, and Embedded Client -**Future Impact:**Discussed how MCP is transforming AI development by reducing development time, improving maintainability, and enhancing flexibility -**Implementation Guide:**Provided practical steps for developers to get started with MCP, from environment setup to community engagement
The article demonstrated how MCP is evolving from a technical specification into a comprehensive solution for streamlined AI integration, promising a more organized and efficient future for AI development.
Check out our upcoming book on MCP.
Ready to build your first MCP server? Use the code examples from this article as your starting point and begin experimenting. The future of AI integration is in your hands.
Find the complete source code examples on GitHub. Follow me there for more projects. If you enjoyed this article, connect with Rick on LinkedIn or Medium.
About the Author
Rick Hightower brings extensive enterprise experience as a former executive and distinguished engineer at a Fortune 100 company, where he specialized in delivering Machine Learning and AI solutions to deliver intelligent customer experience. His expertise spans both the theoretical foundations and practical applications of AI technologies.
As a TensorFlow certified professional and graduate of Stanford University’s comprehensive Machine Learning Specialization, Rick combines academic rigor with real-world implementation experience. His training includes mastery of supervised learning techniques, neural networks, and advanced AI concepts, which he has successfully applied to enterprise-scale solutions.
With a deep understanding of both the business and technical aspects of AI implementation, Rick bridges the gap between theoretical machine learning concepts and practical business applications, helping organizations leverage AI to create tangible value.
If you like this article, follow Rick on LinkedIn or on Medium.
TweetApache Spark Training
Kafka Tutorial
Akka Consulting
Cassandra Training
AWS Cassandra Database Support
Kafka Support Pricing
Cassandra Database Support Pricing
Non-stop Cassandra
Watchdog
Advantages of using Cloudurable™
Cassandra Consulting
Cloudurable™| Guide to AWS Cassandra Deploy
Cloudurable™| AWS Cassandra Guidelines and Notes
Free guide to deploying Cassandra on AWS
Kafka Training
Kafka Consulting
DynamoDB Training
DynamoDB Consulting
Kinesis Training
Kinesis Consulting
Kafka Tutorial PDF
Kubernetes Security Training
Redis Consulting
Redis Training
ElasticSearch / ELK Consulting
ElasticSearch Training
InfluxDB/TICK Training TICK Consulting