May 18, 2025
Ever dreamed of chatting with multiple AI models seamlessly? Discover how to build your own multi-provider chat app that connects ChatGPT, Claude, Gemini, and more—all in one conversation! Dive into the world of LiteLLM and Streamlit for a user-friendly experience.
Create a multi-provider chat app using LiteLLM and Streamlit to seamlessly connect various AI models like ChatGPT, Claude, and Gemini, enabling users to manage conversations and settings with minimal code.
The app integrates local models through Ollama for enhanced privacy and performance. Future enhancements include RAG capabilities and file upload support.
Building a Multi-Provider Chat App: LiteLLM, Streamlit, and Modern LLM Integration
Have you ever wanted to create your own chat application that can use multiple language models from different providers? Imagine switching seamlessly between ChatGPT, Claude, Gemini, and even local models running on your own machine—all within the same conversation interface.
In this tutorial, we’ll explore how to build exactly that: a powerful, flexible chat application that supports multiple LLM providers through a clean, user-friendly interface. Best of all, we’ll do it with surprisingly little code thanks to the power of LiteLLM and Streamlit.
What We’re Building
We’re creating a multi-provider chat application that allows users to:
- Chat with various LLM providers including OpenAI, Anthropic, Google Gemini, Perplexity, and Ollama
- Select different models from each provider
- Maintain conversation history across provider switches
- Save, load, and manage conversations
- Configure provider-specific settings
Let’s dive into how this application works and explore the technologies that make it possible.
Streamlit: Rapid Application Development for AI
Streamlit is a revolutionary Python library that transforms the way developers build data and AI applications. Unlike traditional web frameworks that require HTML, CSS, and JavaScript knowledge, Streamlit lets you create interactive web applications using pure Python. This dramatically accelerates development time—what might take days or weeks with conventional frameworks can often be accomplished in hours with Streamlit.
I’ve explored Streamlit extensively in a series of articles, from basic concepts and implementations to more advanced techniques and real-world applications. For those wanting a comprehensive guide, check out our Streamlit Mastery book, which covers everything from fundamentals to deployment.
In our chat application, Streamlit powers the entire user interface—from the chat display to the sidebar controls—with just a few hundred lines of Python. This efficiency allows us to focus on integrating LLM providers rather than wrestling with frontend development.
Ollama: Bringing AI to Your Local Machine
Ollama represents a significant advancement in democratizing access to powerful language models. It allows you to run open-source large language models directly on your own hardware, eliminating API costs and addressing privacy concerns. In our application, we’ve integrated several cutting-edge models through Ollama, including:
- Gemma 3 (27B): Google’s powerful open-source model optimized for reasoning
- Qwen 3 (32B) and Qwen (72B): Alibaba’s multilingual models with impressive capabilities
- DeepSeek R1 (70B): A specialized reasoning model for complex problem-solving
- Llama 3.3 and Llama 4 Scout: Meta’s newest models offering strong performance even on consumer hardware
Our application dynamically adjusts settings based on the selected model’s requirements, optimizing for performance and memory usage while providing helpful guidance to users about resource needs for different models.
LiteLLM: One API to Rule Them All
LiteLLM serves as the unifying layer that enables our application to communicate seamlessly with multiple LLM providers through a consistent interface. It abstracts away the differences between API formats, authentication methods, and response structures, allowing us to switch between providers with minimal code changes.
This library handles everything from formatting messages correctly for each provider to managing API keys and handling streaming responses. Without LiteLLM, we would need to implement separate client code for each provider, significantly increasing the complexity of our application.
Provider Integration Challenges and Solutions
Integrating multiple LLM providers presented several interesting challenges, each requiring custom solutions:
OpenAI (GPT-4o, GPT-4.1) required handling specific response formats and settings like reasoning_effort. We implemented special handling for newer models like GPT-4o that have different temperature restrictions and token limits compared to older models.
Google Gemini models needed particular attention to message formatting and response parsing. We created a dedicated provider class that correctly handles Gemini’s API quirks while maintaining the same interface as other providers.
Anthropic Claude models (Claude 3 Opus, Sonnet, and Haiku) required adaptation to their specific message structure and system prompt positioning. Our implementation dynamically adjusts token limits based on the specific Claude model being used.
Perplexity presented unique challenges with its strict alternating message format requirements. We implemented special validation logic to ensure messages are always properly structured before sending requests.
Each provider integration required careful tuning and customization while maintaining a consistent interface for our application. This approach allows users to seamlessly switch between providers while experiencing the unique strengths of each model.
The Technology Stack
Our application uses several key technologies:
- Streamlit: A Python framework for rapidly building web applications
- LiteLLM: A unified API interface for working with multiple LLM providers
- Python: The core programming language (version 3.12+)
- Poetry: For dependency management
- Various LLM APIs: OpenAI, Anthropic, Google Gemini, Perplexity, and Ollama
LiteLLM is the secret sauce that allows us to create a unified interface for multiple AI model providers. Instead of handling different API formats and authentication methods for each provider, LiteLLM provides a consistent abstraction layer.
Streamlit gives us the ability to quickly build a responsive web interface without writing HTML, CSS, or JavaScript. It turns Python code into interactive web applications with minimal effort.
Project Structure
Before diving into the details, let’s get a high-level overview of our project structure:
chat/
│
├── ./
│   ├── pyproject.toml      # Project dependencies and metadata
│
├── test/                   # Test directory
│   └── chat/               # Test files for the chat application
│
├── docs/                   # Documentation
│   └── images/             # Images for documentation
│
└── src/                    # Source code
    └── chat/               # Main application code
        ├── __init__.py
        ├── app.py          # Main application entry point
        ├── ai/             # LLM provider integrations
        ├── ui/             # User interface components
        ├── conversation/   # Conversation models and storage
        └── util/           # Utility functions
Core Components
Let’s now look at the main components of our application:
1.LLM Provider Integration: Abstract base classes and concrete implementations for different LLM providers 2.Conversation Management: Models for storing and retrieving conversations 3.User Interface: Streamlit components for the chat interface and settings 4.Application Logic: Tying everything together in the main app
Getting Started with LiteLLM
LiteLLM is a powerful library that provides a unified interface to multiple LLM providers. Let’s see how we’ve implemented the provider integration.
The LLM Provider Abstract Base Class
At the core of our provider integration is an abstract base class that defines the interface for all LLM providers:
class LLMProvider(ABC):
    """Abstract base class for LLM providers."""

    @abstractmethod
    async def generate_completion(
            self,
            prompt: str,
            output_format: str = "text",
            options: Optional[Dict[str, Any]] = None,
            conversation: Optional[Conversation] = None
    ) -> str:
        """Generate a completion from the LLM for the given prompt."""
        pass

    async def generate_json(
            self,
            prompt: str,
            schema: Dict[str, Any],
            options: Optional[Dict[str, Any]] = None,
            conversation: Optional[Conversation] = None
    ) -> Dict[str, Any]:
        """Generate JSON output matching the schema."""
        # Implementation details...
This abstract class ensures that all providers implement the same interface, making them interchangeable in our application.
Provider Implementations
Let’s look at one of our provider implementations, the AnthropicProvider:
class AnthropicProvider(LLMProvider):
    """Integration with Anthropic Claude models using LiteLLM."""

    def __init__(
            self,
            api_key: Optional[str] = None,
            model: str = "claude-3-7-sonnet-latest"
    ):
        self.api_key = api_key or os.getenv("ANTHROPIC_API_KEY")
        if not self.api_key:
            raise ValueError(
                "Anthropic API key is required. "
                "Set it in .env or as an environment variable."
            )

        self.model = model
        self.original_model_name = model

        # Use LiteLLM's model naming convention for Anthropic
        if not self.model.startswith("anthropic/"):
            self.model = f"anthropic/{model}"

        os.environ["ANTHROPIC_API_KEY"] = self.api_key

        try:
            self.client = litellm
            logger.info(
                f"AnthropicProvider initialized with model: {self.model}"
            )
        except ImportError:
            logger.error(
                "litellm package not installed. "
                "Please install it (e.g., pip install litellm)"
            )
            raise

    async def generate_completion(
            self,
            prompt: str,
            output_format: str = "text",
            options: Optional[Dict[str, Any]] = None,
            conversation: Optional[Conversation] = None
    ) -> str:
        """Generate a completion from Claude using LiteLLM."""
        # Implementation details...
We’ve implemented similar classes for OpenAI, Google Gemini, Perplexity, and Ollama, each following the same pattern but with provider-specific configurations.
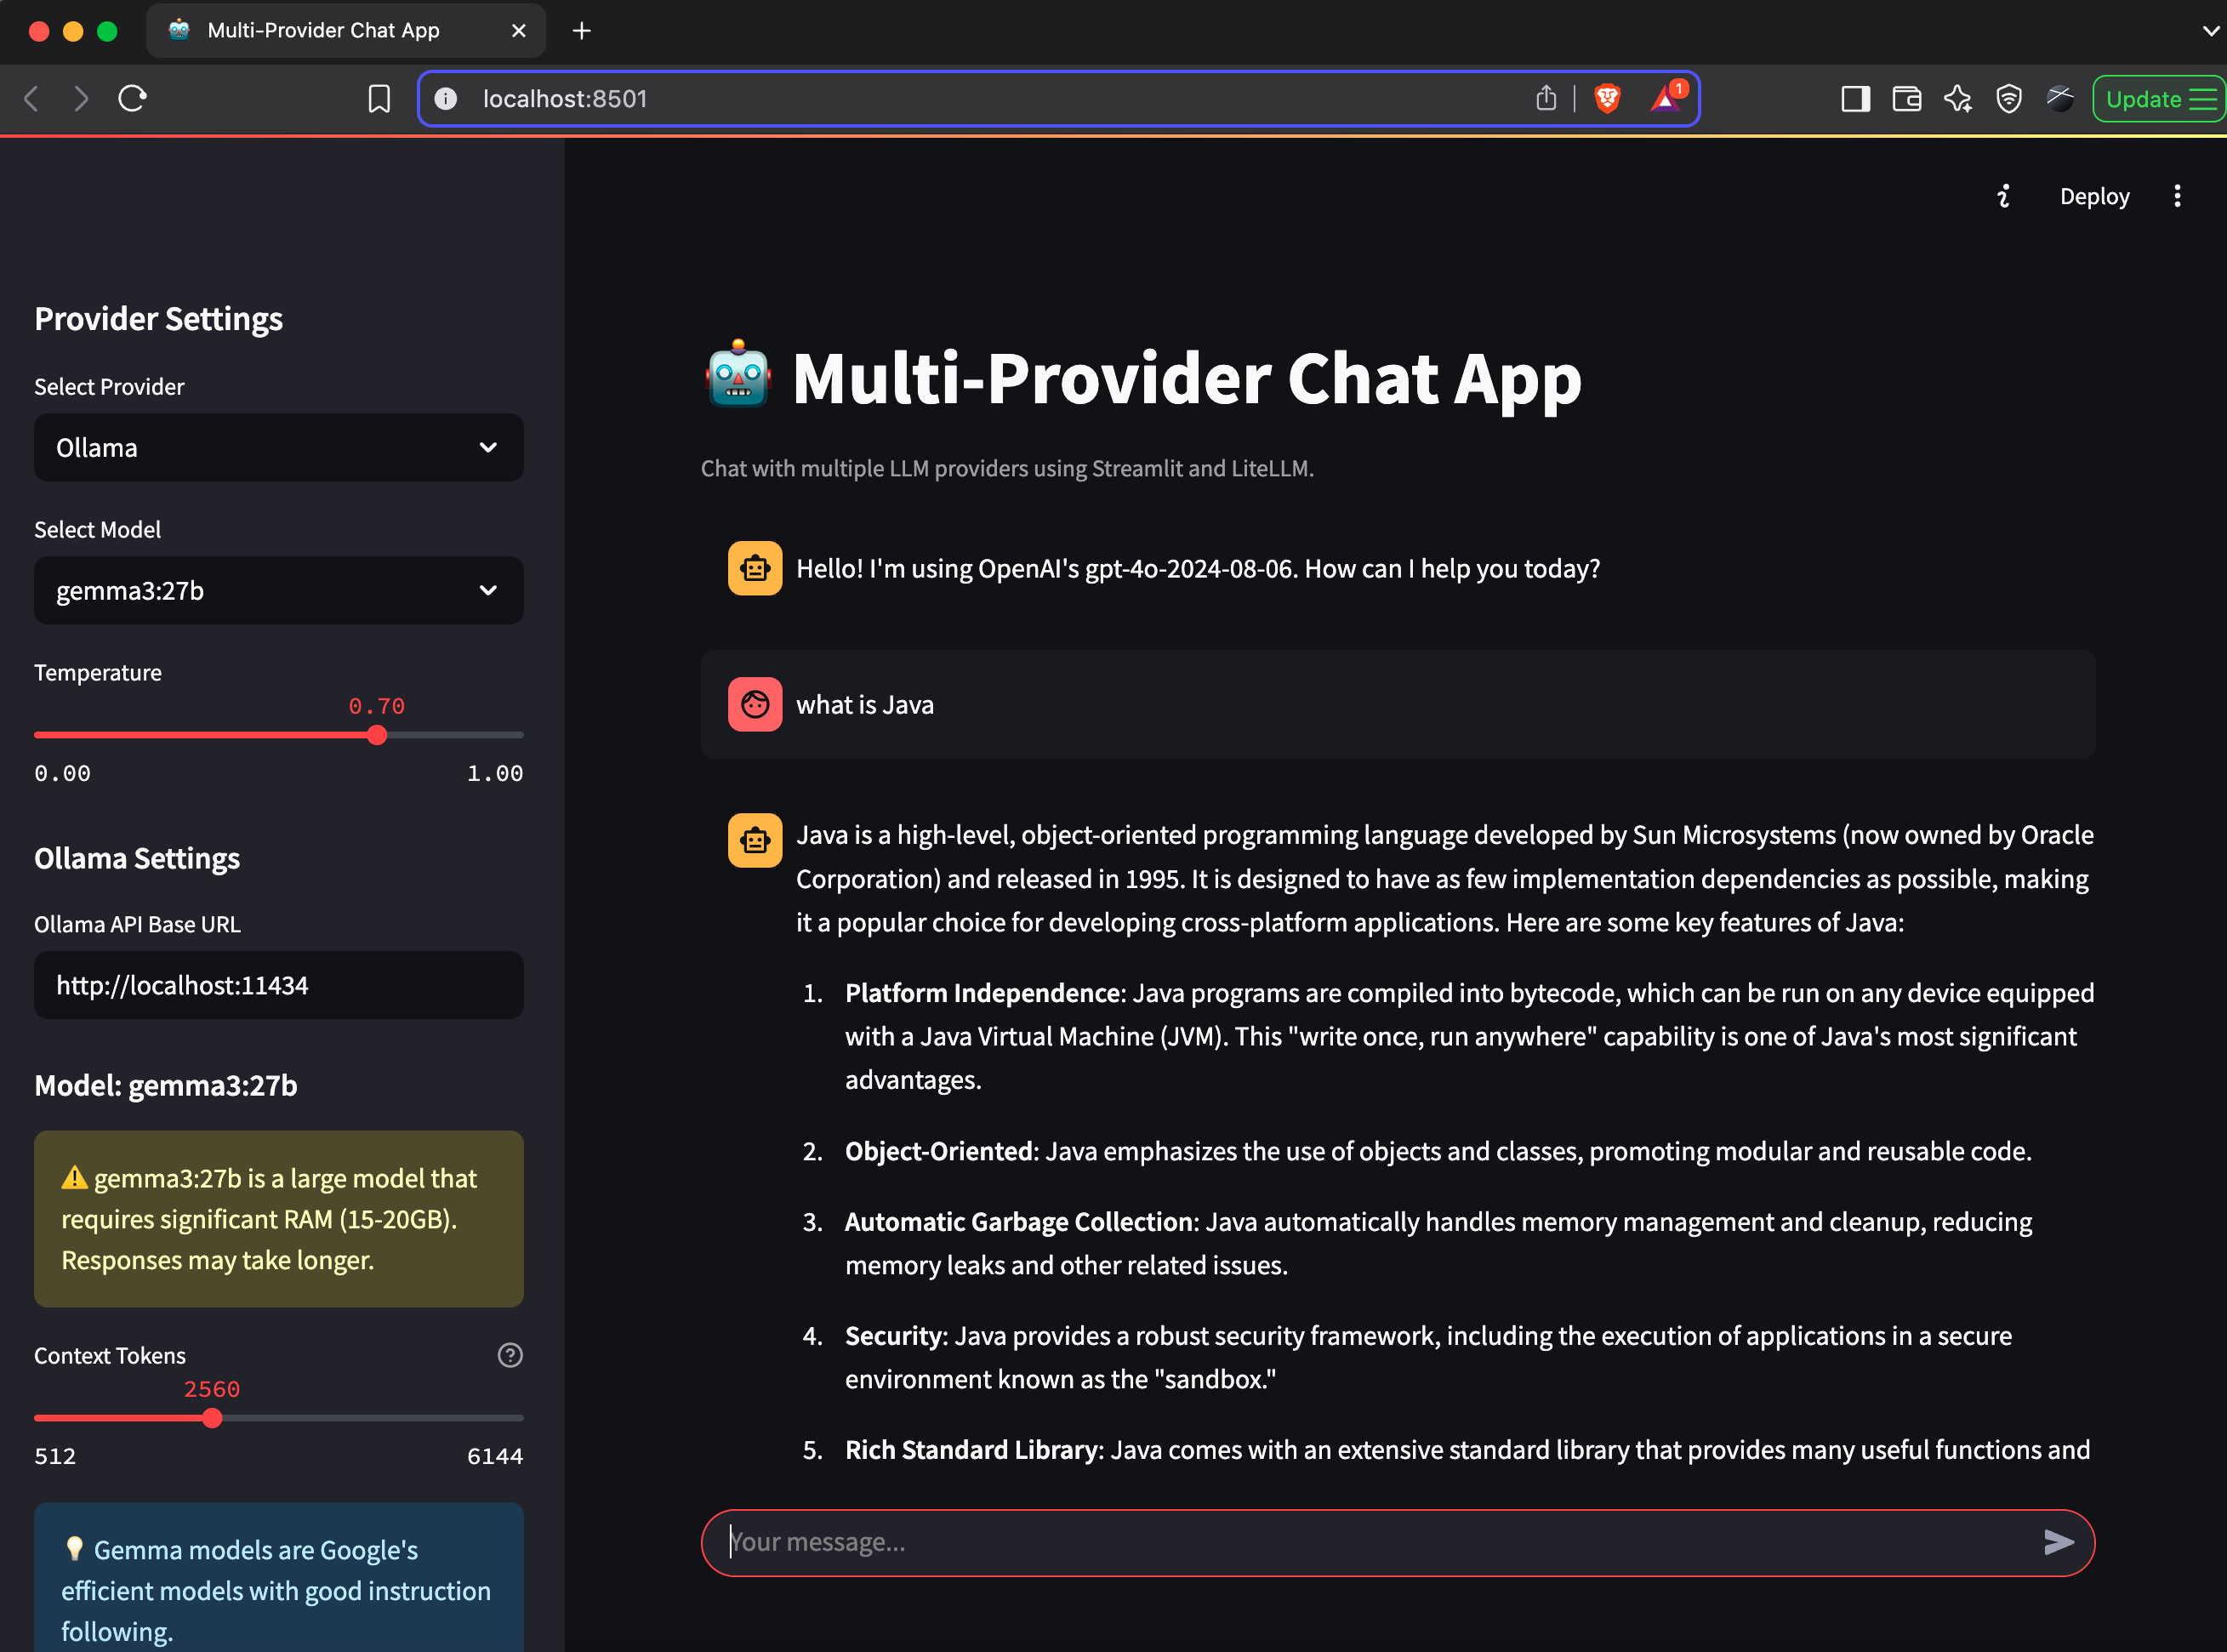
Building the User Interface with Streamlit
Now, let’s look at how we’ve built the user interface using Streamlit. The UI is divided into three main components:
- Chat Display: Shows the conversation between the user and the LLM
- Input Handling: Captures user input and generates responses
- Sidebar: Provider settings and conversation management
Chat UI
Here’s a look at the chat UI implementation:
def display_chat_messages(
    messages: List[Dict[str, str]]
) -> None:
    """Display the chat message history."""
    for message in messages:
        with st.chat_message(message["role"]):
            st.markdown(message["content"])

def handle_user_input(
    llm_provider: Optional[LLMProvider],
    conversation: Optional[Conversation],
    conversation_storage: ConversationStorage,
    selected_provider: str,
    selected_model: str,
    temperature: float,
    system_prompt: str = "You are a helpful and concise "
        "chat assistant..."
) -> None:
    """Handle user input, generate responses, and update
    the conversation."""
    # Implementation details...
The UI is clean and intuitive, using Streamlit’s built-in chat components.
Sidebar for Settings
The sidebar provides settings for selecting the provider, model, and managing conversations:
def render_provider_settings(
        providers: Dict[str, Dict[str, Any]]
) -> Tuple[str, str, float]:
    """Render the provider settings section in the sidebar."""
    st.header("Provider Settings")

    # Provider selection
    selected_provider = st.selectbox(
        "Select Provider",
        list(providers.keys())
    )

    # Model selection for the chosen provider
    provider_info = providers[selected_provider]
    selected_model = st.selectbox(
        "Select Model",
        provider_info["models"]
    )

    # Temperature slider
    temperature = st.slider(
        "Temperature",
        min_value=0.0,
        max_value=1.0,
        value=0.7,
        step=0.1
    )

    # Provider-specific settings
    if selected_provider == "Ollama":
        render_ollama_settings(selected_model)

    return selected_provider, selected_model, temperature
Conversation Management
A key feature of our application is the ability to save and load conversations. Let’s look at how we implement this functionality:
class Conversation(BaseModel):
    """A model for storing conversation history."""
    id: str
    title: Optional[str] = None
    messages: List[Message] = Field(default_factory=list)
    created_at: datetime = Field(default_factory=datetime.now)
    updated_at: datetime = Field(default_factory=datetime.now)

    def add_message(self, content: str, message_type: MessageType,
                                      role: Optional[str] = None) -> Message:
        """Add a new message to the conversation."""
        # Implementation details...

    def to_llm_messages(self) -> List[dict]:
        """Convert conversation history to a format suitable for LLM APIs."""
        # Implementation details...
And the storage mechanism:
class ConversationStorage:
    """Utility class for storing and retrieving
    conversations."""

    def __init__(
            self,
            storage_dir: Union[str, Path] = "conversations"
    ):
        self.storage_dir = Path(storage_dir)
        self.storage_dir.mkdir(
            parents=True,
            exist_ok=True
        )
        logger.info(
            f"Initialized ConversationStorage in directory: "
            f"{self.storage_dir}"
        )

    def save_conversation(
            self,
            conversation: Conversation
    ) -> bool:
        """Save a conversation to a JSON file."""
        # Implementation details...

    def load_conversation(
            self,
            conversation_id: str
    ) -> Optional[Conversation]:
        """Load a conversation from a JSON file."""
        # Implementation details...
This allows us to persist conversations across sessions and switch between them.
Putting It All Together: The Main Application
Finally, let’s look at how everything comes together in the main application:
def main():
    """Main application function."""
    # Setup environment and page
    setup_environment()
    setup_page()

    # Get available providers
    providers = get_available_providers()

    # Get conversation storage
    conversation_storage = get_conversation_storage()

    # Render sidebar components
    with st.sidebar:
        # Provider settings
        (
            selected_provider,
            selected_model,
            temperature
        ) = render_provider_settings(providers)

        # Conversation management
        render_conversation_management(
            conversation_storage,
            selected_provider,
            selected_model
        )

    # Initialize provider
    llm_provider, error_message = initialize_provider(
        selected_provider,
        selected_model
    )

    # Display error message if provider initialization failed
    if error_message:
        st.error(error_message)
        st.sidebar.error(
            f"Provider failed: {error_message}"
        )

    # Initialize chat history
    initialize_chat_history(
        selected_provider,
        selected_model
    )

    # Initialize conversation
    initialize_conversation_id()
    conversation = get_conversation(conversation_storage)

    # Display existing chat messages
    display_chat_messages(st.session_state.messages)

    # Handle user input
    handle_user_input(
        llm_provider=llm_provider,
        conversation=conversation,
        conversation_storage=conversation_storage,
        selected_provider=selected_provider,
        selected_model=selected_model,
        temperature=temperature
    )

    # Render current conversation details in sidebar
    with st.sidebar:
        render_current_conversation_details(
            conversation_storage,
            selected_provider,
            selected_model
        )
Special Feature: Ollama Integration
One of the most exciting features of our application is the ability to use local models through Ollama. Here’s how we’ve implemented Ollama-specific settings:
def render_ollama_settings(selected_model: str = ""):
    """Render Ollama-specific settings."""
    st.subheader("Ollama Settings")

    # Get the current base URL
    current_base_url = os.environ.get(
        "OLLAMA_BASE_URL",
        "http://localhost:11434"
    )

    # Allow the user to change the base URL
    ollama_base_url = st.text_input(
        "Ollama API Base URL",
        value=current_base_url
    )

    # Model-specific settings based on size
    if selected_model:
        st.subheader(f"Model: {selected_model}")

        # Show different settings based on model size
        is_large_model = any(
            size in selected_model
            for size in ["70b", "72b"]
        )
        is_medium_model = any(
            size in selected_model
            for size in ["27b", "32b"]
        )

        if is_large_model:
            st.warning(
                "⚠️ This is a very large model that requires "
                "significant RAM (40-45GB)."
            )
            # Context size settings for large models
            # ...
This allows users to use powerful local models like Llama, Gemma, and others directly from their own machines.
System Architecture Diagram
Here’s a high-level view of our application’s architecture:
flowchart TD
    User([User]) <--> StreamlitUI[Streamlit UI]

    subgraph "Chat Application"
        StreamlitUI <--> AppLogic[App Logic]
        AppLogic <--> ProviderManager[Provider Manager]
        AppLogic <--> ConversationManager[Conversation Manager]

        ConversationManager <--> ConversationStorage[(Conversation Storage)]

        ProviderManager <--> OpenAIProvider[OpenAI Provider]
        ProviderManager <--> AnthropicProvider[Anthropic Provider]
        ProviderManager <--> GeminiProvider[Google Gemini Provider]
        ProviderManager <--> PerplexityProvider[Perplexity Provider]
        ProviderManager <--> OllamaProvider[Ollama Provider]
    end

    OpenAIProvider <--> OpenAIAPI[OpenAI API]
    AnthropicProvider <--> AnthropicAPI[Anthropic API]
    GeminiProvider <--> GeminiAPI[Google Gemini API]
    PerplexityProvider <--> PerplexityAPI[Perplexity API]
    OllamaProvider <--> OllamaLocal[Local Ollama Server]

    style StreamlitUI fill:#f9f,stroke:#333,stroke-width:2px,color:black
    style ProviderManager fill:#bbf,stroke:#333,stroke-width:2px,color:black
    style ConversationManager fill:#bfb,stroke:#333,stroke-width:2px,color:black
    style ConversationStorage fill:#fbb,stroke:#333,stroke-width:2px,color:black
Class Diagram
Here’s a simplified class diagram showing the relationships between our main components:
classDiagram
    class LLMProvider {
        <<abstract>>
        +generate_completion(prompt, output_format, options, conversation)
        +generate_json(prompt, schema, options, conversation)
    }

    class OpenAIProvider {
        -api_key
        -model
        -client
        +generate_completion()
        +generate_json()
    }

    class AnthropicProvider {
        -api_key
        -model
        -client
        +generate_completion()
        +generate_json()
    }

    class GoogleGeminiProvider {
        -api_key
        -model
        -client
        +generate_completion()
        +generate_json()
    }

    class PerplexityProvider {
        -api_key
        -model
        -client
        +generate_completion()
        +generate_json()
    }

    class OllamaProvider {
        -model
        -base_url
        -client
        +generate_completion()
        +generate_json()
    }

    class Conversation {
        -id
        -title
        -messages
        -created_at
        -updated_at
        +add_message()
        +to_llm_messages()
        +ensure_alternating_messages()
    }

    class Message {
        -timestamp
        -message_type
        -content
        -role
        +to_llm_message()
    }

    class ConversationStorage {
        -storage_dir
        +save_conversation()
        +load_conversation()
        +delete_conversation()
        +list_conversations()
        +generate_conversation_title()
        +update_conversation_title()
    }

    LLMProvider <|-- OpenAIProvider
    LLMProvider <|-- AnthropicProvider
    LLMProvider <|-- GoogleGeminiProvider
    LLMProvider <|-- PerplexityProvider
    LLMProvider <|-- OllamaProvider

    Conversation "1" *-- "many" Message
    ConversationStorage -- Conversation : manages >
Sequence Diagram: Chat Interaction
This sequence diagram illustrates how a typical chat interaction works in our application:
sequenceDiagram
    participant User
    participant StreamlitUI as Streamlit UI
    participant AppLogic as App Logic
    participant Provider as LLM Provider
    participant Conv as Conversation
    participant Storage as Conversation Storage

    User->>StreamlitUI: Enter message
    StreamlitUI->>AppLogic: handle_user_input()
    AppLogic->>StreamlitUI: Add user message to UI
    AppLogic->>Conv: Add user message to conversation
    AppLogic->>Provider: generate_completion(prompt, options)

    Provider->>Provider: Format messages with conversation history
    Provider->>Provider: Call LiteLLM API client
    Provider-->>AppLogic: Return generated response

    AppLogic->>StreamlitUI: Display assistant response
    AppLogic->>Conv: Add assistant response to conversation
    AppLogic->>Storage: Auto-save conversation
    Storage-->>AppLogic: Save confirmation

    Note over User,Storage: If user switches provider or model...

    User->>StreamlitUI: Select new provider/model
    StreamlitUI->>AppLogic: Update provider settings
    AppLogic->>Provider: Initialize new provider
    StreamlitUI->>StreamlitUI: Add provider change message to UI

    Note over User,Storage: Conversation continues with new provider
Project Directory Structure
Let’s examine the detailed structure of our project:
chat/
├── ./
│   └── pyproject.toml          # Project metadata, dependencies, and build configuration
├── test/                       # Test directory
│   └── chat/                   # Test files for the chat application
├── docs/                       # Documentation
│   └── images/                 # Images for documentation
└── src/                        # Source code
    └── chat/                   # Main application code
        ├── __init__.py         # Package initialization
        ├── app.py              # Main application entry point
        ├── ai/                 # LLM provider integrations
        │   ├── __init__.py
        │   ├── anthropic.py    # Anthropic Claude provider
        │   ├── google_gemini.py # Google Gemini provider
        │   ├── llm_provider.py # Abstract base class for providers
        │   ├── ollama.py       # Ollama local model provider
        │   ├── open_ai.py      # OpenAI provider
        │   ├── perplexity.py   # Perplexity provider
        │   └── provider_manager.py # Provider initialization and management
        ├── conversation/       # Conversation models and storage
        │   ├── __init__.py
        │   ├── conversation.py # Conversation and Message models
        │   └── conversation_storage.py # Conversation persistence
        ├── ui/                 # User interface components
        │   ├── __init__.py
        │   ├── chat.py         # Chat display and input handling
        │   ├── conversation_manager.py # UI for conversation management
        │   └── sidebar.py      # Sidebar UI components
        └── util/               # Utility functions
            ├── __init__.py
            ├── json_util.py    # JSON handling utilities
            └── logging_util.py # Logging configuration
Key Directories and Files
Let’s briefly describe the main directories and their purposes:
1.pyproject.toml: Contains project metadata, dependencies, and build configuration using Poetry.
2.src/chat/ai/: Contains the LLM provider integrations:
- llm_provider.py: Abstract base class defining the interface for all providers
- Provider-specific implementations for OpenAI, Anthropic, Google Gemini, Perplexity, and Ollama
- provider_manager.py: Handles provider initialization and management
3.src/chat/conversation/: Handles conversation models and storage:
- conversation.py: Defines the Conversation and Message models
- conversation_storage.py: Manages persistence of conversations to disk
4.src/chat/ui/: Contains the Streamlit UI components:
- chat.py: Chat display and input handling
- conversation_manager.py: UI for conversation management
- sidebar.py: Sidebar UI components for settings and conversation management
5.src/chat/util/: Utility functions:
- json_util.py: Utilities for handling JSON
- logging_util.py: Logging configuration
6.src/chat/app.py: The main application entry point that ties everything together.
Running the Application
Now that we understand the structure and components of our application, let’s see how to run it:
1.Install dependencies:
```bash
pip install poetry
poetry install

```
2.Set up API keys:
Create a .env file in the root directory with your API keys:
```
OPENAI_API_KEY=your_openai_api_key
ANTHROPIC_API_KEY=your_anthropic_api_key
GOOGLE_API_KEY=your_google_api_key
PERPLEXITY_API_KEY=your_perplexity_api_key

```
3.Run the application:
```bash
poetry run streamlit run src/chat/app.py

```
4.For Ollama support: Install Ollama from ollama.ai and pull the models you want to use:
```bash
ollama pull gemma3:27b
ollama pull llama4:scout

```
Local LLM Integration with Ollama
One of the most powerful features of our application is the integration with Ollama, which allows you to run models locally on your machine. This is especially valuable for:
1.Privacy: Keep sensitive conversations on your own hardware 2.Cost savings: No API usage charges 3.Offline usage: Use AI without an internet connection 4.Experimentation: Try different models easily
Our application provides special configuration options for Ollama, including:
- Adjusting context size based on model size and available RAM
- Special handling for large models like 70B parameter models
- Model-specific recommendations and warnings
- Automatic status checking and model availability detection
Here’s a glimpse of the Ollama provider implementation:
class OllamaProvider(LLMProvider):
    """Integration with Ollama models using LiteLLM."""

    def __init__(
        self,
        api_key: Optional[str] = None,
        model: str = "llama3.3:latest"
    ):
        # Ollama doesn't require an API key, but we'll keep
        # this parameter for consistency
        self.api_key = api_key

        # LiteLLM's naming convention for Ollama models
        # depends on the model name format
        self.original_model_name = model

        if ":" in model:
            # Models with versions/variants like gemma3:27b
            # should be formatted as ollama/gemma3:27b
            self.model = f"ollama/{model}"
        elif not model.startswith("ollama/"):
            self.model = f"ollama/{model}"
        else:
            self.model = model

        # Default Ollama base URL
        self.base_url = os.getenv(
            "OLLAMA_BASE_URL",
            "http://localhost:11434"
        )
        os.environ["OLLAMA_API_BASE"] = self.base_url

        try:
            self.client = litellm
            logger.info(
                f"OllamaProvider initialized with model: "
                f"{self.model} at {self.base_url}"
            )
        except ImportError:
            logger.error(
                "litellm package not installed. "
                "Please install it (e.g., pip install litellm)"
            )
            raise
Future Enhancements
While our current application is already quite powerful, there are several exciting enhancements planned for future articles:
1. RAG (Retrieval-Augmented Generation)
We’ll be adding RAG capabilities to allow the chat application to pull information from your documents and provide more contextually relevant responses. This will be particularly useful for domain-specific applications where you want the LLM to have access to your proprietary information.
For more information on building RAG systems, check out:
- Building AI-Powered Search and RAG with PostgreSQL and Vector Embeddings
- Vector-RAG GitHub Repository
2. File Upload and Access
We’ll implement the ability to upload and process various file types, including:
- PDFs
- Word documents
- Excel spreadsheets
- Text files
- CSV data
This will allow the chat application to analyze and discuss the contents of these files.
3. MCP (Model Context Protocol) Support
We’ll add support for the Model Context Protocol, which enables more sophisticated interactions between different AI models. MCP allows for better reasoning, fact-checking, and specialized task delegation.
To learn more about MCP, check out:
Conclusion
In this tutorial, we’ve explored how to build a powerful multi-provider chat application using LiteLLM and Streamlit. We’ve seen how to:
- Create a unified interface for multiple LLM providers
- Build an intuitive chat UI with Streamlit
- Implement conversation management and persistence
- Integrate local models with Ollama
- Handle provider-specific configurations
The complete source code for this project is available on GitHub at https://github.com/RichardHightower/chat.
By using these technologies, you can create a flexible, powerful chat application that gives you access to the best AI models available, all through a single interface.
About the Author
Rick Hightower is a software developer and technology enthusiast with a passion for AI and natural language processing. He has extensive experience in building scalable, distributed systems and is currently focused on AI integration in enterprise applications.
Connect with Rick on LinkedIn or follow his articles on Medium.
TweetApache Spark Training
Kafka Tutorial
Akka Consulting
Cassandra Training
AWS Cassandra Database Support
Kafka Support Pricing
Cassandra Database Support Pricing
Non-stop Cassandra
Watchdog
Advantages of using Cloudurable™
Cassandra Consulting
Cloudurable™| Guide to AWS Cassandra Deploy
Cloudurable™| AWS Cassandra Guidelines and Notes
Free guide to deploying Cassandra on AWS
Kafka Training
Kafka Consulting
DynamoDB Training
DynamoDB Consulting
Kinesis Training
Kinesis Consulting
Kafka Tutorial PDF
Kubernetes Security Training
Redis Consulting
Redis Training
ElasticSearch / ELK Consulting
ElasticSearch Training
InfluxDB/TICK Training TICK Consulting