January 1, 2024
Securing MCP: From Vulnerable to Fortified — Building Secure HTTP-based AI Integrations
In a world where data breaches are becoming the norm, securing your HTTP-based AI integrations is not just a choice—it’s a necessity! Join us as we delve into the transformative journey of fortifying your Model Context Protocol (MCP) servers. Discover real-world strategies that will turn your vulnerable systems into impenetrable fortresses against lurking cyber threats. Are you ready to elevate your AI game and protect your innovations? Dive into our comprehensive guide now!
 **Transform Your AI Integrations: From Vulnerable to Fortified!**In an age where security breaches are rampant, deploying your Model Context Protocol (MCP) server without robust protection is like leaving your front door wide open.
Discover how to build a secure HTTP-based AI integration that not only safeguards your data but also empowers your applications.
Learn about real-world security patterns, bulletproof authentication, and essential tools to fortify your MCP server against lurking threats!
Dive into this comprehensive guide and make certain your AI systems are secure as they scale!
Securing MCP: From Vulnerable to Fortified — Building Secure HTTP-based AI Integrations
Imagine leaving your house with all doors and windows wide open, valuables in plain sight, and a sign saying “Come on in!” That’s basically what many developers do when deploying Model Context Protocol (MCP) servers without proper security. As MCP adoption explodes in 2025, the rush to connect AI systems to external tools has created a perfect storm of security vulnerabilities. But here’s the good news: securing your MCP implementation doesn’t require a PhD in cryptography — it just needs the right approach.
In this guide, we’ll transform your MCP server from an open invitation to hackers into a fortified digital fortress. We’ll explore real-world security patterns, implement bulletproof authentication, and show you how to protect your AI integrations from the threats lurking in production environments. By the end, you’ll have a complete security toolkit for building MCP servers that are both powerful and protected.
This article builds upon our previous MCP tutorial where we created a FastMCP server and integrated it with LangChain, OpenAI Chat Completion, Anthropic Native, LiteLLM, and DSPy. While all these tools support MCP, the previous article focused on local stdio connections. However, deploying an AI system to production requires HTTP connectivity along with proper authentication and encryption.
This article demonstrates how to create a hardened and secure MCP server. We implemented OAuth 2.1 using our own vendor-neutral test server. The MCP server integrates with LangChain, DSPy, native OpenAI Chat Completion, and native Anthropic. For security, clients authenticate using OAuth, communicate over TLS transport, and validate JWT token origins. We also explore additional security fundamentals needed for a robust MCP server. This article comes with a companion Github repo, mcp_security, where the examples live and a Wiki that documents other aspects of the examples that just wont fit into a single article.
The Security Nightmare That Keeps Developers Awake
Before MCP, integrating AI with external systems was complex enough. Now, as we expose these integrations over HTTP, we’ve inherited every web security vulnerability known to humanity — plus some new ones unique to AI systems. Recent security audits reveal a shocking statistic:43% of MCP servers in production have critical command injection vulnerabilities. That’s nearly half of all deployments sitting vulnerable to attack.
Picture this scenario: You’ve built a brilliant customer service MCP server that queries databases, creates tickets, and processes payments. Without proper security, an attacker could manipulate your AI to:
- Extract your entire customer database through crafted prompts
- Execute arbitrary commands on your server
- Hijack user sessions and impersonate legitimate users
- Launch denial-of-service attacks that drain your resources
- Inject malicious responses that corrupt your AI’s behavior
The transition from local MCP deployments to HTTP-based production systems introduces what security experts call an “attack surface explosion.” Every endpoint, parameter, and connection becomes a potential entry point for malicious actors. Additionally, when deploying an MCP Server into production for a custom AI solution—which I’m currently doing with a couple of projects—these security considerations become even more critical.
Understanding the Threat Landscape: What Makes MCP Different
MCP’s unique architecture creates security challenges that traditional web applications don’t face. When you combine AI’s unpredictability with HTTP’s openness, you get a cocktail of vulnerabilities that require special attention.The AI Factormakes MCP security particularly challenging. Unlike traditional APIs with predictable inputs and outputs, MCP servers must handle dynamic tool invocations from AI models that might be influenced by clever prompt engineering. An attacker doesn’t need to hack your server directly — they just need to trick your AI into doing it for them.The Tool Execution Problemrepresents another unique challenge. MCP servers execute functions based on AI decisions, creating a new class of confused deputy attacks where the server can’t distinguish between legitimate AI requests and malicious manipulations. Without proper validation, your helpful AI assistant becomes an unwitting accomplice to security breaches.The Session State Challengecompounds these issues. MCP’s Streamable HTTP transport maintains stateful sessions across multiple requests, creating opportunities for session hijacking and replay attacks that persist longer than traditional stateless API calls.
Building Your Security Foundation: The Four Pillars
Just as a fortress needs walls, gates, guards, and surveillance, your MCP server needs four fundamental security pillars to stay protected.
Pillar 1: Authentication and Authorization — Your Digital Identity Check
Modern MCP security relies onOAuth 2.1 with PKCE(Proof Key for Code Exchange). As of March 2025, this isn’t optional — it’s required for all HTTP-based MCP servers. PKCE acts like a secure handshake that verifies the identity of both parties, even when the connection is being monitored.
OAuth 2.1, released in 2023, is the latest evolution of the OAuth framework, addressing security vulnerabilities found in OAuth 2.0. The addition of PKCE (Proof Key for Code Exchange) is a crucial security enhancement that prevents authorization code interception attacks by requiring clients to prove they’re the same application that initiated the authorization request.
Major cloud providers and identity platforms supporting OAuth 2.1 with PKCE include:
- AWS Cognito - Full OAuth 2.1 support with PKCE requirement for public clients
- Auth0 - Native implementation of OAuth 2.1 with enhanced security features
- Okta - Complete OAuth 2.1 stack with PKCE enforcement
- Microsoft Azure AD - OAuth 2.1 compliance with PKCE support for all client types
- Google Cloud Identity Platform - OAuth 2.1 implementation with mandatory PKCE for mobile apps
- Facebook - OAuth 2.1 support with enhanced PKCE implementation for web and mobile apps
- GitHub - Full OAuth 2.1 compliance with mandatory PKCE for public clients
- LinkedIn - OAuth 2.1 integration with PKCE requirement for all client types
The key advantage of OAuth 2.1 with PKCE is its ability to secure both public clients (like mobile apps and single-page applications) and confidential clients (server-side applications) using the same robust security model. This uniformity simplifies implementation while maintaining strong security standards.
Pillar 2: Transport Security — Your Encrypted Highway
Think of TLS (Transport Layer Security) as an armored car transporting your data. Without it, all your information travels exposed—visible to anyone watching the network. For MCP servers,TLS 1.2 is the absolute minimum, and TLS 1.3 is strongly recommended.
TLS (Transport Layer Security) secures data in transit by creating an encrypted connection through a handshake process where both parties:
- Verify identities with digital certificates
- Choose encryption algorithms
- Exchange keys securely
This encrypted tunnel keeps data confidential and tamper-proof, protecting MCP servers from eavesdropping and man-in-the-middle attacks.
Pillar 3: Input Validation — Your Security Scanner
Every input to your MCP server should be treated as potentially malicious. Command injection vulnerabilities plague nearly half of all MCP implementations because developers place too much trust in AI-generated inputs. Here’s our bulletproof Pydantic v2 validation with Bleach sanitization.
Pillar 4: Rate Limiting — Your Traffic Controller
AI operations consume significant resources, and attackers exploit this vulnerability. Without rate limiting, a malicious actor can quickly drain your computing power and budget.
Rate limiting is essential for protecting your API resources and maintaining service quality. Major cloud providers offer built-in rate limiting services:
- AWS API Gateway - Offers throttling and usage plans
- Google Cloud Armor - Provides rate limiting and DDoS protection
- Azure API Management - Includes flexible rate limiting policies
Popular open-source rate limiting tools include:
- Redis-based limiters (Redis-cell, RedisTimeSeries)
- HAProxy - Enterprise-grade TCP/HTTP rate limiting
- Nginx Plus - Commercial version with advanced rate limiting
- Kong API Gateway - Open-source API gateway with rate limiting plugins
How the example implements the pillars
Here’s how we implement each security pillar in our example MCP server:
- **Authentication with a demo OAuth 2.1:**We’ve built a complete OAuth 2.1 server with PKCE support, handling client credentials and token generation using industry-standard JWT tokens. This is just for testing and demonstrating the concepts.
- **Transport Security:**Our nginx configuration provides TLS 1.2/1.3 termination with proper cipher selection, OCSP stapling, and security headers for maximum protection.
- **Input Validation:**We use Pydantic v2 models with custom validators and Bleach sanitization to prevent injection attacks and verify data integrity.
- **Rate Limiting:**A hybrid rate limiter combines in-memory tracking with Redis fallback to protect against resource exhaustion and DoS attacks.
Example MCP Server
We write an exampleModel Context Protocol (MCP) demo serverwith FastMCP and turns show how to create aproduction-grade, HTTPS-secured, OAuth-protected integration hub for AI agents.
We will cover:
- anOAuth 2.1 authorization server with PKCE(
src/oauth_server.py) for issuing RS256-signed JWTs; - asecure FastMCP server(
src/main.py) that verifies those JWTs, enforces scope-based authorization, validates every input with Pydantic, and exposes three demo business tools (customer lookup, ticket creation, account value calculation); - rate-limiting, security logging and monitoring helpers(
src/security); - example AI clients(OpenAI, Claude, LangChain, DSPy, LiteLLM);
- dev + prod run-books(Taskfile, Docker, nginx TLS proxy, mkcert helpers).
The project’s goal is to show**“from vulnerable to fortified”**techniques for anyone embedding AI tool-calling behind HTTP.
Example Technology Stack
- Languages: Python 3.12 (Poetry), Bash (automation scripts).
- Frameworks/Libraries- FastMCP 2.8 (agent+server)
- FastAPI / Uvicorn (OAuth server)
- Pydantic v2 (validation)
- redis-py (optional Redis backend)
- cryptography + PyJWT (RS256)
- httpx (async HTTP)
- NGinx reverse proxy
- LangChain / DSPy / LiteLLM adapters for clients
- pytest / pytest-asyncio, black, ruff, isort (dev)
- Infrastructure / Ops: Docker, docker-compose, nginx (TLS), mkcert, Go Task, Poetry.
- External services: OpenAI, Anthropic, Ollama (config-selectable).
4 Architecture and Design
The solution follows atwo-service, layered micro-servicepattern.
┌─────────────┐      RS256 JWT   ┌─────────────────┐
│  OAuth Svc  │ ───────────────▶ │  MCP API Server │
└─────────────┘                  └─────────────────┘
        ▲                                 ▲
PKCE /  │                                 │ FastMCP tools
Browser │                                 │
        │                                 ▼
   ┌──────────┐                    ┌─────────────┐
   │ AI Client│──HTTPS/JSON/Tools──│ LLM Provider│
   └──────────┘                    └─────────────┘
- OAuth Server– issues/validates JWTs, exposes JWKS; persists tokens in memory (swap for DB).
- MCP Server– stateless FastMCP app, BearerAuthProvider verifies JWT, then passes Context to tool functions.
- Security Layer– Pydantic validation,
RateLimiter,SecurityLogger. - Adapters– client scripts wrap OpenAI / Claude / LangChain etc., adding OAuth token acquisition and TLS pinning.
Component responsibilities:
| Module | Responsibility |
|---|---|
src/main.py |
Actual MCP Server. Register tools/resources, lifecycle, JWT verify, scope checks. |
src/oauth_server.py |
AuthZ endpoint, token endpoint, PKCE, JWKS, refresh & revoke. |
src/security/validation.py |
Strict schemas for every inbound payload. |
src/security/rate_limiting.py |
Sliding-window rate & token quota (in-mem or Redis). |
src/security/monitoring.py |
Structured event log + summary. |
scripts/*.sh |
Dev TLS (mkcert), LetsEncrypt, CA bundling. |
Our example code is laid out like this - Directory Tree (top-level)
.
├── src/                     # Python source package
│   ├── main.py              # Secure FastMCP server (HTTP transport)
│   ├── oauth_server.py      # OAuth 2.1 + PKCE auth server
│   ├── config.py            # Central env / secrets config
│   ├── secure_clients/      # Example AI clients (OpenAI, Claude, etc.)
│   └── security/            # Validation, rate-limit, monitoring helpers
├── tests/                   # Pytest coverage for security & clients
├── scripts/                 # TLS automation, mkcert, certbot
├── certificates/            # Generated dev certificates
├── Taskfile.yml             # Go Task workflow commands
├── pyproject.toml           # Poetry deps + tooling
└── README.md                # Full usage & security guide
High level architectural diagram of the example
graph TD
    subgraph Agentic Clients
        C1(AI client OpenAI SDK)
        C2(AI client Claude desktop)
        LLM[LLM provider<br>OpenAI / Claude / Ollama]
    end
    subgraph Edge
        NGINX{{TLS Proxy}}
    end
    subgraph Backend
        OAUTH(OAuth 2.1 Server)
        MCP(FastMCP Secure Server)
        REDIS[(Redis<br>rate-limit)]

    end

    C1 -- HTTPS / PKCE --> OAUTH
    C2 -- HTTPS / PKCE --> OAUTH
    OAUTH -- RS256 JWT --> C1
    C1 -- Bearer token + JSON --> NGINX
    C2 -- Bearer token + JSON --> NGINX
    NGINX -- mTLS --> MCP
    MCP -- verify scope --> OAUTH
    MCP -- stats --> REDIS
    C1 -- prompt + tools --> LLM
    C2 -- prompt + tools --> LLM
    style NGINX fill:#f9f,stroke:#333,stroke-width:1px,color:black
Let me break down this architecture from a senior dev perspective:
The system employs a classic three-tier architecture with some modern twists. At the client layer, we have AI clients (OpenAI SDK and Claude desktop) that initiate the auth flow using OAuth 2.1 with PKCE - a crucial security upgrade from basic OAuth 2.0.
The edge layer is handled by NGINX, acting as a TLS termination proxy. This is where we implement crucial security headers, SSL/TLS configuration, and potentially rate limiting at the network level. The mTLS connection between NGINX and the MCP server adds an extra layer of service-to-service authentication.
The backend is where things get interesting. Instead of a monolithic design, we’ve split the concerns into discrete services:
- The OAuth 2.1 server handles all auth flows and token management, using RS256 JWTs for secure token signing
- The FastMCP server focuses on business logic and tool integration, with proper scope verification against the OAuth server
- Redis handles distributed rate limiting - smart choice for horizontal scalability
- The LLM providers are treated as external services, with the MCP server acting as a secure gateway
What’s particularly elegant about this design is how it maintains clear separation of concerns while implementing defense in depth. Each service has its specific security responsibilities, from edge TLS to application-level scope verification.
Mind Map (key concepts)
mindmap
  root((MCP Security))
    Security
      OAuth 2.1
      TLS 1.3
      RS256 JWT
      Rate-Limiting
      Input Validation
    Services
      OAuth Server
      FastMCP Server
      nginx TLS
      Redis
    AI Clients
      OpenAI
      Anthropic
      LangChain
      DSPy
      LiteLLM
    DevOps
      Docker
      Taskfile
      mkcert
    Monitoring
      SecurityLogger
      /health
src/main.py – Sequence (get_customer_info)
sequenceDiagram
    participant Client
    participant MCP
    participant Validator
    participant Logger
    Client->>MCP: HTTP GET /tool/get_customer_info
    MCP->>MCP: _check_tool_permissions()
    MCP->>Validator: SecureCustomerRequest.parse()
    Validator-->>MCP: valid model
    MCP->>Logger: info("Retrieved customer info")
    MCP-->>Client: JSON payload
The sequence diagram illustrates an elegant security flow for customer info retrieval. The implementation follows a robust request-validation-logging pattern where each request to /tool/get_customer_info undergoes a series of security validations. We start with OAuth scope verification through _check_tool_permissions(), followed by comprehensive input sanitization via Pydantic validation. The flow concludes with business logic execution and security event logging.
The architecture demonstrates a clean separation of concerns with multiple security layers woven seamlessly into the request pipeline. The permission checking and validation logic form the cornerstone of our defense against unauthorized access and injection attacks - we’ll examine these components in detail shortly.
src/oauth_server.py – Sequence (authorization-code grant)
sequenceDiagram
    participant AIClient
    participant OAuth
    participant UserDB
    AIClient->>OAuth: GET /authorize?client_id...
    OAuth->>AIClient: HTML login form
    AIClient->>OAuth: POST creds + approve
    OAuth->>UserDB: verify(username,pwd)
    UserDB-->>OAuth: OK
    OAuth->>AIClient: 302 redirect_uri?code=XYZ
    AIClient->>Client: deliver code
    Client->>OAuth: POST /token (code)
    OAuth-->>Client: access_token, refresh_token
The sequence diagram above demonstrates how we secure token generation and validation. Our OAuth server first verifies client credentials, then uses RS256 signing to create tamper-proof JWTs. The JWT payload includes crucial claims like scope, expiration, and audience to prevent token misuse.
Security Helpers – Class Diagram
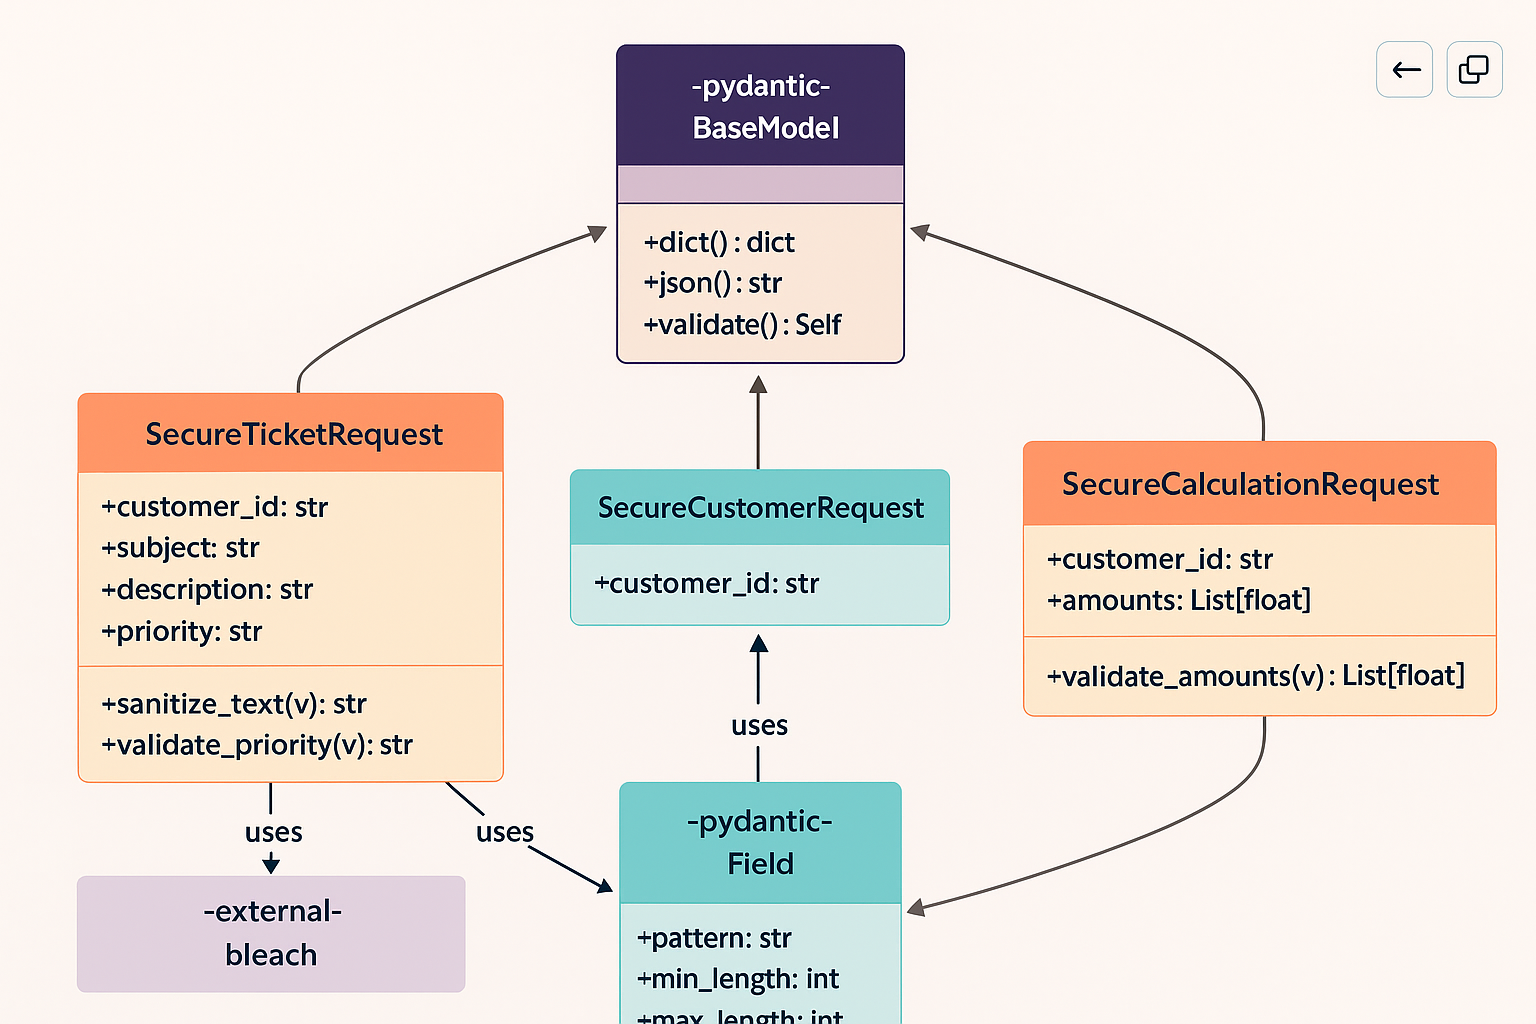
classDiagram
    class SecureTicketRequest {
        +customer_id: str
        +subject: str
        +description: str
        +priority: str
    }
    class RateLimiter {
        -requests_window
        -token_window
        +check_rate_limit(user_id, est_tokens)
    }
    class SecurityLogger {
        +events: List
        +log_security_event(type, details)
        +get_security_summary()
    }
    SecureTicketRequest <|-- SecureCustomerRequest
    SecureTicketRequest <|-- SecureCalculationRequest
This architecture provides robust security through multiple layers of protection. The first line of defense is OAuth 2.1 with PKCE, which provides secure client authentication. This is complemented by JWT-based access tokens using RS256 signing, providing cryptographic verification of client identities and permissions.
Theflowfor a typical AI client call is:
1.User / clientperforms the OAuth PKCE dance → receives an RS256 JWT access token.
2.Clientsends HTTPS POST to https://…/mcp with Bearer token.
3.nginxterminates TLS and forwards toFastMCP server.
4. FastMCP’sBearerAuthProviderverifies signature & claims via JWKS.
5. _check_tool_permissions enforces required scopes.
6. Payload is parsed byPydantic validators; bad input → HTTP 400.
7.RateLimiterchecks quotas (Redis-backed in prod).
8. Tool executes;SecurityLoggerrecords event.
9. JSON result returns to client; client renders answer.
This architecture cleanlyseparates concerns(auth, business logic, security controls) and is deployment-ready thanks to its Docker/Taskfile scripts. Clone, task docker-up, point any GPT/Claude client at the endpoints, and you have a fully secured AI integration demo out-of-the-box.
Let’s examine each implementation in detail using our pillars concept.
Pillar 1: Authentication and Authorization — Your Digital Identity CheckOAuth 2.1 with PKCEis required for all HTTP-based MCP servers as of March 2025. This security protocol works like a secure handshake, verifying both parties’ identities during communication.
Here’s our actual development OAuth 2.1 server implementation (oauth_server.py) with PKCE:
src/oauth_server.py
"""
OAuth 2.1 Authorization Server with PKCE support for MCP security.
Condensed version focusing on security essentials.
"""
import jwt
from cryptography.hazmat.primitives import serialization
from fastapi import FastAPI, Form, HTTPException
from datetime import datetime, timedelta

app = FastAPI(title="OAuth 2.1 Authorization Server")


# Pre-configured MCP OAuth clients
clients = {
    "mcp-secure-client": {
        "client_secret": "secure-client-secret",
        "redirect_uris": ["http://localhost:8080/callback"],
        "scopes": ["customer:read", "ticket:create", "account:calculate"]
    },
    # ... other MCP clients
}

def generate_access_token(user_id: str, client_id: str, scopes: List[str]) -> str:
    """Generate JWT access token with RS256 algorithm for MCP authentication."""
    now = datetime.utcnow()
    payload = {
        "sub": user_id,
        "aud": client_id,
        "iss": Config.get_oauth_issuer_url(),
        "iat": int(now.timestamp()),
        "exp": int((now + timedelta(hours=1)).timestamp()),
        "scope": " ".join(scopes),
        "jti": str(uuid.uuid4())
    }

    private_key = load_private_key()
    return jwt.encode(payload, private_key, algorithm="RS256")

@app.post("/token")
async def token(
    grant_type: str = Form(...),
    client_id: str = Form(...),
    client_secret: Optional[str] = Form(None),
    # ... other parameters
):
    """Token endpoint for MCP client authentication."""

    # Verify MCP client credentials
    if client_id not in clients:
        raise HTTPException(400, "Invalid MCP client")

    if grant_type == "authorization_code":
        # ... PKCE verification logic

        # Generate JWT for MCP tool access
        access_token = generate_access_token(
            user_id,
            client_id,
            scopes  # MCP tool permissions
        )

        return {
            "access_token": access_token,
            "token_type": "Bearer",
            "expires_in": 3600,
            "scope": " ".join(scopes)
        }

    # ... other grant types

@app.get("/jwks")
async def get_jwks():
    """Return JSON Web Key Set for MCP token verification."""
    public_key = load_public_key()
    public_numbers = public_key.public_numbers()

    jwk = {
        "kty": "RSA",
        "use": "sig",
        "alg": "RS256",
        "kid": "mcp-oauth-key-1",
        "n": int_to_base64url(public_numbers.n),
        "e": int_to_base64url(public_numbers.e)
    }

    return {"keys": [jwk]}


# TLS configuration for production
if __name__ == "__main__":
    import uvicorn

    # For production: Enable TLS for secure MCP communication
    uvicorn.run(
        app,
        host="0.0.0.0",
        port=443,
        ssl_keyfile="path/to/key.pem",
        ssl_certfile="path/to/cert.pem"
    )
You might wonder why I built an OAuth 2.1 server for an example article instead of using an existing solution. I wanted to gain a deeper understanding of the protocol, and I preferred to keep the article vendor-neutral, though I may write vendor-specific follow-up articles.
Let’s walk through the code to better understand how it works conceptually.
OAuth 2.1 Authorization Server for MCP Security - Code Analysis
The code has one primary entry point:
__main__block: Launches the FastAPI server with optional TLS configuration
High-level Control Flow
1.Server Startup: The __main__ block initializes a Uvicorn web server
2.Client Request: External MCP clients make HTTP requests to various endpoints
3.Authentication Flow: Clients authenticate via OAuth 2.1 protocol
4.Token Generation: Server generates JWT tokens for authorized clients
5.Token Verification: Clients can verify tokens using the JWKS endpoint
6.Server Termination: Process ends when the server stops
2. Global Sequence Diagram
sequenceDiagram
    participant MCP as MCP Client
    participant OAuth as OAuth Server
    participant JWT as JWT Library
    participant Crypto as Cryptography

    MCP->>OAuth: POST /token (credentials)
    OAuth->>OAuth: Verify client_id
    OAuth->>OAuth: Validate credentials
    OAuth->>Crypto: Load private key
    Crypto-->>OAuth: RSA private key
    OAuth->>JWT: Generate token
    JWT-->>OAuth: Signed JWT
    OAuth-->>MCP: Access token response

    MCP->>OAuth: GET /jwks
    OAuth->>Crypto: Load public key
    Crypto-->>OAuth: RSA public key
    OAuth-->>MCP: JSON Web Key Set
This diagram shows how an MCP (Model Context Protocol) client receives authorization. The client sends its credentials to the OAuth server. The server validates the client, then creates a secure token using cryptography. The token acts as a temporary ID card that proves the client can use specific tools. The client can later verify this token’s authenticity by checking it against the server’s public key.
Function-by-Function Analysis
generate_access_token()Purpose: Creates a secure JWT token that MCP clients use to prove their identity and permissions.Signature & Parameters:
| Parameter | Type | Description |
|---|---|---|
user_id |
str |
The identifier of the user making the request |
client_id |
str |
The identifier of the MCP client application |
scopes |
List[str] |
List of permissions granted (e.g., “customer:read”) |
| Returns | str |
A signed JWT token as a string |
- Reads from filesystem to load private key
- May raise exceptions if key loading fails
generate_access_tokenCode Listing:
def generate_access_token(user_id: str, client_id: str, scopes: List[str]) -> str:
    """Generate JWT access token with RS256 algorithm for MCP authentication."""
    now = datetime.utcnow()
    payload = {
        "sub": user_id,        # Subject: who the token is for
        "aud": client_id,      # Audience: which app can use it
        "iss": Config.get_oauth_issuer_url(),  # Issuer: who created it
        "iat": int(now.timestamp()),           # Issued at: when created
        "exp": int((now + timedelta(hours=1)).timestamp()),  # Expires: when invalid
        "scope": " ".join(scopes),  # Permissions granted
        "jti": str(uuid.uuid4())    # Unique token ID
    }

    private_key = load_private_key()
    return jwt.encode(payload, private_key, algorithm="RS256")
generate_access_tokenMini Sequence Diagram:
sequenceDiagram
    participant Func as generate_access_token
    participant Time as datetime
    participant Config as Config
    participant Key as load_private_key
    participant JWT as jwt.encode

    Func->>Time: Get current UTC time
    Time-->>Func: timestamp
    Func->>Config: Get issuer URL
    Config-->>Func: OAuth server URL
    Func->>Func: Build payload dict
    Func->>Key: Load RSA private key
    Key-->>Func: Private key object
    Func->>JWT: Encode with RS256
    JWT-->>Func: Signed token string
This function creates a secure pass for MCP tools. It generates a temporary ID card containing the person’s name, accessible doors (scopes), and expiration time (1 hour). The server signs the card with a secret stamp (private key) that only it possesses.
token() EndpointPurpose: Main endpoint that exchanges credentials for access tokens following OAuth 2.1 protocol.Signature & Parameters:
| Parameter | Type | Required | Description |
|---|---|---|---|
grant_type |
str |
Yes | Type of authentication flow (e.g., “authorization_code”) |
client_id |
str |
Yes | Identifier of the MCP client requesting access |
client_secret |
Optional[str] |
No | Secret password for the client |
code |
Optional[str] |
No | Authorization code from previous step |
redirect_uri |
Optional[str] |
No | Where to send the user after login |
code_verifier |
Optional[str] |
No | PKCE security parameter |
refresh_token |
Optional[str] |
No | Token to get a new access token |
scope |
Optional[str] |
No | Requested permissions |
| Returns | dict |
- | Token response with access_token, type, expiry |
- Modifies in-memory token storage
- Raises HTTP exceptions for invalid requests
- Performs I/O to load cryptographic keys
token()Code Listing:
@app.post("/token")
async def token(
    grant_type: str = Form(...),
    client_id: str = Form(...),
    client_secret: Optional[str] = Form(None),
    # ... other parameters
):
    """Token endpoint for MCP client authentication."""

    # Step 1: Verify the MCP client is registered
    if client_id not in clients:
        raise HTTPException(400, "Invalid MCP client")

    # Step 2: Handle different authentication flows
    if grant_type == "authorization_code":
        # ... PKCE verification logic

        # Step 3: Generate JWT for MCP tool access
        access_token = generate_access_token(
            user_id,
            client_id,
            scopes  # MCP tool permissions like "customer:read"
        )

        # Step 4: Return standardized OAuth response
        return {
            "access_token": access_token,
            "token_type": "Bearer",
            "expires_in": 3600,  # 1 hour in seconds
            "scope": " ".join(scopes)
        }

    # ... other grant types
token()Mini Sequence Diagram:
sequenceDiagram
    participant Client as MCP Client
    participant Endpoint as token()
    participant Storage as clients dict
    participant Gen as generate_access_token()

    Client->>Endpoint: POST (grant_type, client_id)
    Endpoint->>Storage: Check client exists
    Storage-->>Endpoint: Client config
    Endpoint->>Endpoint: Validate grant type
    Endpoint->>Gen: Create JWT token
    Gen-->>Endpoint: Signed token
    Endpoint-->>Client: Token response JSON
This function operates as a security desk that verifies credentials and issues passes. MCP clients present their ID (client_id) and prove their identity. After verification succeeds, they receive a temporary pass (JWT token) that grants access to specific tools for one hour.
get_jwks() EndpointPurpose: Provides public cryptographic keys that clients use to verify token authenticity.Signature & Parameters:
| Parameter | Type | Description |
|---|---|---|
| None | - | This endpoint takes no parameters |
| Returns | dict |
JSON Web Key Set containing public keys |
- Reads public key from filesystem
- May raise exceptions if key file is missing
get_jwksCode Listing:
@app.get("/jwks")
async def get_jwks():
    """Return JSON Web Key Set for MCP token verification."""
    # Step 1: Load the server's public key
    public_key = load_public_key()
    public_numbers = public_key.public_numbers()

    # Step 2: Convert to standard JWK format
    jwk = {
        "kty": "RSA",           # Key type
        "use": "sig",           # Used for signatures
        "alg": "RS256",         # Algorithm
        "kid": "mcp-oauth-key-1",  # Key identifier
        "n": int_to_base64url(public_numbers.n),  # RSA modulus
        "e": int_to_base64url(public_numbers.e)   # RSA exponent
    }

    # Step 3: Return in standard JWKS format
    return {"keys": [jwk]}
get_jwksMini Sequence Diagram:
sequenceDiagram
    participant Client as MCP Client
    participant Endpoint as get_jwks()
    participant Crypto as load_public_key()
    participant Convert as int_to_base64url()

    Client->>Endpoint: GET /jwks
    Endpoint->>Crypto: Load public key
    Crypto-->>Endpoint: RSA public key
    Endpoint->>Endpoint: Extract n, e values
    Endpoint->>Convert: Convert to base64
    Convert-->>Endpoint: Encoded values
    Endpoint-->>Client: {"keys": [...]}
This function shares the server’s public stamp that clients use to verify token authenticity. It publishes the official seal design, enabling anyone to verify whether a document bears the genuine seal or a counterfeit.
__main__ BlockPurpose: Entry point that starts the web server with security configuration.Context: Executes when the script runs directly, not when imported as a module.Side Effects:
- Starts a long-running web server process
- Binds to network ports
- Loads SSL certificates in productionCode Listing:
if __name__ == "__main__":
    import uvicorn

    # For production: Enable TLS for secure MCP communication
    uvicorn.run(
        app,                              # FastAPI application
        host="0.0.0.0",                  # Listen on all interfaces
        port=443,                        # HTTPS port
        ssl_keyfile="path/to/key.pem",   # TLS private key
        ssl_certfile="path/to/cert.pem"  # TLS certificate
    )
OAuth Architectural Mapping
OAuth Demo Server System Architecture Diagram
graph TB
    subgraph "External Layer"
        MCP[MCP Clients]
        Browser[Web Browsers]
    end

    subgraph "API Layer"
        Token[token endpoint]
        JWKS[jwks endpoint]
    end

    subgraph "Business Logic Layer"
        Auth[Authentication Logic]
        JWT[JWT Generation]
        Validation[Client Validation]
    end

    subgraph "Security Layer"
        TLS[TLS Encryption]
        RSA[RSA Cryptography]
        PKCE[PKCE Verification]
    end

    subgraph "Data Layer"
        ClientDB[(Client Registry)]
        Keys[(Cryptographic Keys)]
    end

    MCP -->|HTTPS| Token
    MCP -->|HTTPS| JWKS
    Browser -->|HTTPS| Token

    Token --> Auth
    Token --> Validation
    Auth --> JWT
    JWT --> RSA

    JWKS --> RSA

    Validation --> ClientDB
    RSA --> Keys

    TLS -.->|Encrypts| Token
    TLS -.->|Encrypts| JWKS
This diagram is structured like a stack of building blocks! At the top, MCP clients and web browsers interact with our server. In the API layer below, our endpoints receive these requests and direct them appropriately. The business logic layer then springs into action, verifying identities and creating specialized tokens. For maximum protection, our security layer handles all the sophisticated encryption operations. At the foundation, our data layer acts as a secure vault, safeguarding all client information and cryptographic keys.
Layer Descriptions
1.External Layer: Connection point for MCP clients and external applications 2.API Layer: REST endpoints that handle HTTP requests and responses 3.Business Logic Layer: Core OAuth 2.1 protocol implementation 4.Security Layer: Cryptographic operations and transport security (TLS) 5.Data Layer: Storage of configuration and keys
Interfaces Between Layers
- External → API: HTTPS requests with OAuth parameters
- API → Business Logic: Function calls with validated parameters
- Business Logic → Security: Cryptographic operations (signing, verification)
- Security → Data: File I/O for key retrieval
- All Layers: Cross-cutting TLS encryption for transport security
Cross-cutting Concerns
1.Security: - TLS encryption on all endpoints - JWT signing with RS256 - PKCE for authorization code flow 2.Error Handling: - HTTP exceptions with proper status codes - Validation at each layer 3.Configuration: - Client registry (in-memory for demo) - Cryptographic key management
OAuth Demo Server
1.Entry Point: Server startup via __main__ block with TLS configuration
2.Core Endpoints: /token for authentication and /jwks for key distribution
3.Security Features: JWT with RS256 signing, PKCE support, TLS encryption
4.Architecture: Clean separation between API, business logic, security, and data layers
5.MCP Integration: Pre-configured clients with specific scopes for tool access
The implementation provides a secure foundation for MCP tool authentication, making certain that only authorized clients can access protected resources through cryptographically signed tokens.
Pillar 2: Transport Security — Your Encrypted Highway
TLS (Transport Layer Security) protects your data in transit by encrypting it. Without TLS, data is exposed to network eavesdroppers. MCP servers requireTLS 1.2 minimum, though TLS 1.3 is recommended.
Here’s our production nginx configuration with proper TLS termination and upstream service routing:
nginx/nginx.conf
# Production-ready nginx configuration for secure MCP deployment
user nginx;
worker_processes auto;
error_log /var/log/nginx/error.log warn;
pid /var/run/nginx.pid;

events {
    worker_connections 1024;
}

http {
    include /etc/nginx/mime.types;
    default_type application/octet-stream;

    # Security headers
    add_header X-Frame-Options "SAMEORIGIN" always;
    add_header X-Content-Type-Options "nosniff" always;
    add_header X-XSS-Protection "1; mode=block" always;
    add_header Referrer-Policy "strict-origin-when-cross-origin" always;
    add_header Content-Security-Policy "default-src 'self'; script-src 'self' 'unsafe-inline'; style-src 'self' 'unsafe-inline';" always;

    # HSTS (HTTP Strict Transport Security)
    add_header Strict-Transport-Security "max-age=31536000; includeSubDomains" always;

    # SSL Configuration
    ssl_protocols TLSv1.2 TLSv1.3;
    ssl_ciphers 'ECDHE-ECDSA-AES256-GCM-SHA384:ECDHE-RSA-AES256-GCM-SHA384:ECDHE-ECDSA-CHACHA20-POLY1305:ECDHE-RSA-CHACHA20-POLY1305:ECDHE-ECDSA-AES128-GCM-SHA256:ECDHE-RSA-AES128-GCM-SHA256';
    ssl_prefer_server_ciphers off;

    # SSL session caching
    ssl_session_cache shared:SSL:10m;
    ssl_session_timeout 10m;

    # OCSP Stapling
    ssl_stapling on;
    ssl_stapling_verify on;
    resolver 8.8.8.8 8.8.4.4 valid=300s;
    resolver_timeout 5s;

    # Logging
    log_format main '$remote_addr - $remote_user [$time_local] "$request" '
                    '$status $body_bytes_sent "$http_referer" '
                    '"$http_user_agent" "$http_x_forwarded_for"';
    access_log /var/log/nginx/access.log main;

    # OAuth Server (HTTPS)
    server {
        listen 443 ssl http2;
        server_name localhost;

        ssl_certificate /etc/nginx/certs/server.crt;
        ssl_certificate_key /etc/nginx/certs/server.key;

        location / {
            proxy_pass http://oauth-server:8080;
            proxy_set_header Host $host;
            proxy_set_header X-Real-IP $remote_addr;
            proxy_set_header X-Forwarded-For $proxy_add_x_forwarded_for;
            proxy_set_header X-Forwarded-Proto $scheme;

            # Important: Pass original headers
            proxy_pass_request_headers on;
        }
    }

    # MCP Server (HTTPS with streamable-http support)
    server {
        listen 8001 ssl http2;
        server_name localhost;

        ssl_certificate /etc/nginx/certs/server.crt;
        ssl_certificate_key /etc/nginx/certs/server.key;

        # CRITICAL: The trailing slash matters for MCP connections!
        # /mcp will fail with "Session terminated" errors
        # /mcp/ will work correctly
        location /mcp/ {
            proxy_pass http://mcp-server:8000/;

            # Required headers for MCP
            proxy_set_header Host $host;
            proxy_set_header X-Real-IP $remote_addr;
            proxy_set_header X-Forwarded-For $proxy_add_x_forwarded_for;
            proxy_set_header X-Forwarded-Proto $scheme;

            # Pass Authorization header
            proxy_set_header Authorization $http_authorization;

            # WebSocket support (if needed)
            proxy_http_version 1.1;
            proxy_set_header Upgrade $http_upgrade;
            proxy_set_header Connection "upgrade";

            # Timeouts for long-running connections
            proxy_connect_timeout 300s;
            proxy_send_timeout 300s;
            proxy_read_timeout 300s;

            # Disable buffering for streaming
            proxy_buffering off;
            proxy_cache off;

            # Increase buffer sizes
            proxy_buffer_size 8k;
            proxy_buffers 8 8k;
            proxy_busy_buffers_size 16k;
        }
    }

    # HTTP to HTTPS redirect
    server {
        listen 80;
        server_name localhost;
        return 301 https://$server_name$request_uri;
    }
}
Let’s break down what this nginx configuration does:
What’s Under the Hood
- How It Runs: Our nginx setup uses worker processes that automatically scale based on system demands
- Keeping Things Safe: We’ve implemented essential security features including:
- Protection against clickjacking attempts
- Content security policies that control resource loading
- Enforced HTTPS encryption
- Extra Security Stuff:
- Latest TLS protocols (1.2 and 1.3)
- Military-grade encryption for data protection
- Efficient certificate validation
Where Everything Goes
- Login Server (Port 443):
- Manages secure authentication
- Routes requests appropriately
- Maintains session tracking
- MCP Server (Port 8001):
- Secures MCP communications
- Manages real-time connections
- Maintains persistent sessions
- Maintains smooth data streaming
- Safety Net (Port 80):
- Redirects HTTP to HTTPS automatically
- Provides encrypted connections
Think of this setup as a vigilant security guard, directing traffic and keeping your data fortress secure.OCSP Staplingis a performance and privacy optimization that allows nginx to fetch certificate revocation status from the Certificate Authority and “staple” it to the TLS handshake. This reduces client-side OCSP queries and speeds up SSL negotiations.Critical SSL Discovery:During development, we discovered thattrailing slashes matter enormouslyfor MCP connections. URLs like https://localhost:8001/mcp will fail with “Session terminated” errors, while https://localhost:8001/mcp/ (with trailing slash) work correctly. This nginx configuration handles this automatically.
MCP Security Architecture Diagrams with TLS Reverse Proxy
Nginx TLS Reverse Proxy for MCP Server - System Architecture Overview
graph TB
    subgraph "External Clients"
        Client1[MCP Client<br/>Claude Desktop]
        Client2[MCP Client<br/>OpenAI]
        Client3[Web Browser<br/>Admin]
    end

    subgraph "Edge Layer - nginx"
        NGINX[nginx Reverse Proxy<br/>:443, :8001, :80]
        TLS[TLS Termination<br/>TLSv1.2/1.3]
        Headers[Security Headers<br/>HSTS, CSP, etc.]
    end

    subgraph "Authentication Layer"
        OAuth[OAuth 2.1 Server<br/>:8080]
        JWT[JWT Token<br/>Generation]
        JWKS[JWKS Endpoint<br/>Public Keys]
    end

    subgraph "Application Layer"
        MCP[MCP Server<br/>:8000]
        Tools[MCP Tools<br/>Customer Service]
        Session[Session Management]
    end

    subgraph "Data Layer"
        Redis[(Redis Cache<br/>:6379)]
        Keys[(Cryptographic<br/>Keys)]
    end

    Client1 -->|HTTPS/WSS| NGINX
    Client2 -->|HTTPS/WSS| NGINX
    Client3 -->|HTTPS| NGINX

    NGINX -->|Proxy Pass| OAuth
    NGINX -->|Proxy Pass /mcp/| MCP

    OAuth --> JWT
    OAuth --> JWKS
    OAuth --> Keys

    MCP --> Tools
    MCP --> Session
    MCP --> Redis

    TLS -.->|Encrypts| NGINX
    Headers -.->|Protects| NGINX
Think of of the above showing a high-tech home security system. Visitors (external clients) enter through a sophisticated front door (nginx reverse proxy) that verifies IDs and maintains security. A dedicated security guard (OAuth server) checks credentials independently from core operations (MCP server). A smart database (Redis) tracks all authentication and session data. Best of all, each component runs in its own secure container (Docker), providing complete isolation between services.
Network Architecture
graph LR
    subgraph "Internet Outer"
        Internet[Public Internet]
    end

    subgraph "Host Machine"
        Port443[Port 443<br/>HTTPS/OAuth]
        Port8001[Port 8001<br/>HTTPS/MCP]
        Port80[Port 80<br/>HTTP Redirect]
    end

    subgraph "Docker Network: mcp-network"
        subgraph "nginx Container"
            NGINX_443[nginx:443]
            NGINX_8001[nginx:8001]
            NGINX_80[nginx:80]
        end

        subgraph "oauth Container"
            OAuth_8080[oauth:8080]
        end

        subgraph "mcp Container"
            MCP_8000[mcp:8000]
        end

        subgraph "redis Container"
            Redis_6379[redis:6379]
        end
    end

    Internet --> Port443
    Internet --> Port8001
    Internet --> Port80

    Port443 --> NGINX_443
    Port8001 --> NGINX_8001
    Port80 --> NGINX_80

    NGINX_443 -->|proxy_pass| OAuth_8080
    NGINX_8001 -->|proxy_pass /mcp/| MCP_8000
    NGINX_80 -->|301 redirect| NGINX_443

    MCP_8000 --> Redis_6379
The network architecture show how traffic flows between Docker containers through port mappings. All containers communicate via an isolated bridge network called “mcp-network.” When external traffic reaches the mapped host ports, nginx routes these requests to the appropriate backend services. By acting as a single entry point, the nginx container enhances security through limited service exposure.
NGinx Security Architecture
graph LR
    subgraph "Security Layers"
        subgraph "Transport Security"
            TLS12[TLS 1.2]
            TLS13[TLS 1.3]
            Ciphers[Strong Cipher Suites<br/>ECDHE-ECDSA-AES256-GCM]
            OCSP[OCSP Stapling]
        end

        subgraph "HTTP Security Headers"
            HSTS[HSTS<br/>max-age=31536000]
            CSP[Content Security Policy]
            XFrame[X-Frame-Options: SAMEORIGIN]
            XContent[X-Content-Type-Options: nosniff]
            XXSS[X-XSS-Protection: 1; mode=block]
        end

        subgraph "Authentication & Authorization"
            OAuth2[OAuth 2.1 + PKCE]
            JWT_RS256[JWT with RS256]
            Scopes[Granular Scopes<br/>customer:read, ticket:create]
        end

        subgraph "Application Security"
            NonRoot[Non-root User<br/>appuser]
            ReadOnly[Read-only Volumes]
            HealthCheck[Health Checks]
            Secrets[Environment Secrets]
        end
    end

    subgraph "Defense in Depth"
        L1[Layer 1: Network Isolation]
        L2[Layer 2: TLS Encryption]
        L3[Layer 3: Authentication]
        L4[Layer 4: Authorization]
        L5[Layer 5: Container Security]
    end

    L1 --> L2 --> L3 --> L4 --> L5
This security architecture diagram demonstrates the defense-in-depth approach. Multiple security layers protect the system: transport security (TLS 1.2/1.3 with strong ciphers), HTTP security headers (HSTS, CSP, etc.), OAuth 2.1 authentication with JWT tokens, and container-level security (non-root users, read-only volumes). Each layer provides independent protection, providing system resilience even if one layer is compromised.
Think of this security setup like a building with multiple security checkpoints. At the entrance, you have military-grade locks (the TLS encryption), followed by a team of security guards checking IDs at various stations (the HTTP headers and OAuth verification). Finally, all valuable assets are stored in separate, fortified vaults (the container security). If an intruder somehow breaches one checkpoint, they’ll face multiple additional barriers—a clever defense strategy. Like a series of backup plans, this layered approach keeps your system secure even if one protection measure becomes compromised.
Demo Deployment Container Architecture
graph TB
    subgraph "Base Image"
        Python[python:3.12.9-slim]
        System[System Dependencies<br/>curl, build-essential]
        AppUser[appuser:appuser]
        Poetry[Poetry 1.7.1]
    end

    subgraph "OAuth Container"
        OAuth_Base[Base Stage]
        OAuth_Code[OAuth Server Code]
        OAuth_Port[EXPOSE 8080]
        OAuth_Health[Health Check<br/>/health endpoint]
        OAuth_CMD[CMD python src/oauth_server.py]
    end

    subgraph "MCP Container"
        MCP_Base[Base Stage]
        MCP_Code[MCP Server Code]
        MCP_Port[EXPOSE 8000]
        MCP_Health[Health Check<br/>/health endpoint]
        MCP_CMD[CMD python src/main.py]
    end

    subgraph "Volume Mounts"
        Keys[./keys:/app/keys:ro]
        Logs[./logs:/app/logs]
        Certs[./certificates:/etc/nginx/certs:ro]
    end

    Python --> OAuth_Base
    Python --> MCP_Base

    OAuth_Base --> OAuth_Code
    MCP_Base --> MCP_Code

    Keys --> OAuth_Base
    Keys --> MCP_Base
    Logs --> OAuth_Base
    Logs --> MCP_Base
    Certs --> Python
The container architecture uses a multi-stage Dockerfile approach with a shared base image. Both OAuth and MCP containers inherit from the base stage, reducing image size and maintaining consistency. Containers run as non-root users (appuser) for security. Volume mounts provide read-only access to cryptographic keys and certificates, while logs are writable. Health checks monitor container status for automatic recovery.
This setup is built like interlocking building blocks. The containers share a common foundation (the base image) to maintain efficiency and organization. Like siblings, the OAuth and MCP containers inherit from the same parent, maintaining consistency across the system. For enhanced security, all processes run as standard users rather than administrators. The system includes specialized storage areas—some strictly locked down for sensitive data like cryptographic keys, others accessible for routine items like logs. Built-in health monitors constantly watch over everything, ready to respond automatically if issues arise.
Nginx Reverse Proxy TLS / OAuth → Request Flow Sequence
sequenceDiagram
    participant Client as MCP Client
    participant Nginx as nginx (TLS)
    participant OAuth as OAuth Server
    participant MCP as MCP Server
    participant Redis as Redis Cache

    Note over Client,Redis: Initial Authentication Flow

    Client->>+Nginx: HTTPS POST /token
    Nginx->>Nginx: TLS Termination
    Nginx->>Nginx: Apply Security Headers
    Nginx->>+OAuth: HTTP POST /token
    OAuth->>OAuth: Verify Credentials
    OAuth->>OAuth: Generate JWT (RS256)
    OAuth-->>-Nginx: JWT Token Response
    Nginx-->>-Client: HTTPS Token Response

    Note over Client,Redis: MCP Tool Invocation

    Client->>+Nginx: HTTPS /mcp/ (Bearer Token)
    Nginx->>Nginx: Validate Headers
    Nginx->>+MCP: HTTP /mcp/ (Forward Auth)
    MCP->>MCP: Verify JWT Signature
    MCP->>+Redis: Check Session Cache
    Redis-->>-MCP: Session Data
    MCP->>MCP: Execute Tool
    MCP-->>-Nginx: Tool Response
    Nginx-->>-Client: HTTPS Response
This sequence diagram shows the complete request flow for MCP tool invocation. Clients first authenticate with the OAuth server to obtain a JWT token. For subsequent requests, they include this token in the Authorization header. The nginx proxy handles TLS termination and forwards requests to the appropriate backend. The MCP server verifies the JWT signature and checks Redis for cached session data before executing tools.
Here’s how this sequence works: First, a client obtains a special pass (JWT token) from the security desk (OAuth server). Then, when they need to use a tool, they present this pass at the front door (nginx). The front door verifies their pass, handles security measures (TLS), and directs them to the appropriate department (backend). Finally, the tool department (MCP server) verifies their pass again and checks their information in the quick-access files (Redis) before granting tool access.
Rate Limiter, Keys, Env, Data Flow Diagram
graph LR
    subgraph "Configuration Data"
        ENV[Environment Variables]
        Secrets[Secrets<br/>JWT_SECRET, API_KEYS]
        Config[Config Files<br/>nginx.conf]
    end

    subgraph "Cryptographic Data"
        PrivKey[RSA Private Key<br/>/app/keys/private_key.pem]
        PubKey[RSA Public Key<br/>/app/keys/public_key.pem]
        TLSCert[TLS Certificate<br/>/etc/nginx/certs/server.crt]
        TLSKey[TLS Private Key<br/>/etc/nginx/certs/server.key]
    end

    subgraph "Runtime Data"
        Tokens[JWT Tokens<br/>In-Memory]
        Sessions[Session Data<br/>Redis]
        Logs[Application Logs<br/>/app/logs]
    end

    subgraph "Persistent Storage"
        RedisVol[(redis_data<br/>Volume)]
        LogVol[(logs<br/>Directory)]
    end

    ENV --> OAuth
    ENV --> MCP
    Secrets --> OAuth
    Secrets --> MCP
    Config --> nginx

    PrivKey --> OAuth
    PubKey --> OAuth
    PubKey --> MCP
    TLSCert --> nginx
    TLSKey --> nginx

    OAuth --> Tokens
    MCP --> Sessions
    Sessions --> RedisVol
    Logs --> LogVol
The data flow architecture is straightforward: Configuration data like environment variables and secrets are loaded at startup. For security, all cryptographic materials are stored in read-only folders to prevent tampering. During runtime, we maintain JWT tokens in memory (more secure than persistent storage) and keep session information in Redis for rapid access. Data persistence is ensured through Docker volumes, which safely store Redis data and logs even through container restarts.
Transport Security Key Architectural Decisions
1.nginx as Reverse Proxy: Provides TLS termination, security headers, and routing in a single layer 2.Container Isolation: Each service runs in its own container with minimal privileges 3.OAuth 2.1 + JWT: Modern authentication with stateless token verification 4.Redis for Sessions: Fast, distributed session storage supporting horizontal scaling 5.Multi-stage Builds: Optimized container images with shared base configuration 6.Non-root Execution: Enhanced security by running processes as unprivileged users 7.Health Checks: Automatic recovery and monitoring capabilities 8.Volume Strategy: Read-only mounts for sensitive data, writable mounts only where necessary
Pillar 3: Input Validation — Your Security Scanner
Every input to your MCP server is a potential weapon in an attacker’s arsenal. Command injection vulnerabilities affect nearly half of all MCP implementations because developers trust AI-generated inputs too much. Here’s our ”bulletproof” Pydantic v2 validation with Bleach sanitization:
security/validation.py
"""
Input validation and sanitization for MCP security.
Prevents injection attacks and verifies data integrity.
"""
import re
from typing import List
import bleach
from pydantic import BaseModel, Field, field_validator

class SecureTicketRequest(BaseModel):
    """Validates support ticket creation requests."""
    customer_id: str = Field(pattern=r"^[A-Z0-9]{5,10}$", description="Strict ID format")
    subject: str = Field(min_length=1, max_length=200)
    description: str = Field(min_length=1, max_length=2000)
    priority: str

    @field_validator('subject', 'description')
    @classmethod
    def sanitize_text(cls, v):
        """Remove any potential injection attempts."""
        # Strip HTML and dangerous characters
        cleaned = bleach.clean(v, tags=[], strip=True)

        # Prevent command injection patterns
        dangerous_patterns = [
            r'<script',      # XSS attempts
            r'javascript:',  # JavaScript injection
            r'DROP TABLE',   # SQL injection
            r'\$\{.*\}',    # Template injection
            r'`.*`',        # Command substitution
        ]

        for pattern in dangerous_patterns:
            if re.search(pattern, cleaned, flags=re.IGNORECASE):
                raise ValueError(f"Invalid characters detected: {pattern}")

        return cleaned.strip()

    @field_validator('priority')
    @classmethod
    def validate_priority(cls, v):
        """Ensure priority is from allowed list."""
        allowed_priorities = ['low', 'normal', 'high', 'urgent']
        if v not in allowed_priorities:
            raise ValueError(f"Priority must be one of {allowed_priorities}, got {v}")
        return v

class SecureCustomerRequest(BaseModel):
    """Validates customer lookup requests."""
    customer_id: str = Field(pattern=r"^[A-Z0-9]{5,10}$")

class SecureCalculationRequest(BaseModel):
    """Validates financial calculation requests."""
    customer_id: str = Field(pattern=r"^[A-Z0-9]{5,10}$")
    amounts: List[float] = Field(min_length=1, max_length=100)

    @field_validator('amounts')
    @classmethod
    def validate_amounts(cls, v):
        """Ensure all amounts are within acceptable range."""
        for amount in v:
            if amount < 0 or amount > 1000000:
                raise ValueError("Amount must be between 0 and 1,000,000")
        return v

```**Bleach Library**is a security-focused HTML sanitization library that removes potentially dangerous HTML tags and attributes. Unlike basic string replacement, Bleach understands HTML structure and can safely strip scripting elements while preserving safe formatting. This makes it ideal for handling user-generated content that might contain embedded HTML or JavaScript.

Let’s break the code down step by step and see how it fits into our pillars.


### Input Validation and Sanitization Module - Code Walk through

This module contains no traditional entry points (no `main()` function). Instead, it exports three Pydantic model classes that serve as validation entry points:

- **`SecureTicketRequest`**: Validates support ticket creation
- **`SecureCustomerRequest`**: Validates customer lookup operations
- **`SecureCalculationRequest`**: Validates financial calculations


### High-level Control Flow

1.**Import Time**: Module imports dependencies (re, typing, bleach, pydantic)
2.**Class Definition**: Three validation classes are defined with field validators
3.**Runtime Usage**: External code instantiates these classes with user data
4.**Validation Execution**: Pydantic automatically triggers field validators
5.**Result**: Either returns validated data or raises `ValueError` exceptions


### Input Validation - Global Sequence Diagram

```mermaid
sequenceDiagram
    participant Client as MCP Client
    participant Model as Pydantic Model
    participant Validator as Field Validator
    participant Bleach as Bleach Library
    participant Regex as Regex Engine

    Client->>Model: Create instance with data
    Model->>Model: Validate field types
    Model->>Validator: Call field validators

    alt Text fields (subject/description)
        Validator->>Bleach: Clean HTML/dangerous chars
        Bleach-->>Validator: Sanitized text
        Validator->>Regex: Check injection patterns
        Regex-->>Validator: Pattern match results
    else Priority field
        Validator->>Validator: Check allowed list
    else Amount fields
        Validator->>Validator: Check numeric ranges
    end

    alt Validation passes
        Validator-->>Model: Cleaned data
        Model-->>Client: Valid model instance
    else Validation fails
        Validator-->>Model: ValueError
        Model-->>Client: Validation error
    end
This diagram shows how the security validation works. When an MCP client tries to create a support ticket or perform other operations, it sends data to one of the Pydantic models. The model checks basic requirements first (like data types), then runs special validators that clean dangerous content and check for security threats. If everything passes inspection, the client receives clean, safe data. If problems are found, the client receives an error message explaining what went wrong.
Class by Class and Function-by-Function Analysis
SecureTicketRequest ClassPurpose: Validates and sanitizes support ticket creation requests to prevent injection attacks.Class Attributes:
| Attribute | Type | Description |
|---|---|---|
customer_id |
str |
Customer identifier with strict format (5-10 alphanumeric characters) |
subject |
str |
Ticket subject line (1-200 characters) |
description |
str |
Detailed ticket description (1-2000 characters) |
priority |
str |
Ticket priority level from predefined list |
sanitize_text() ValidatorPurpose: Removes HTML tags and detects dangerous injection patterns in text fields.Signature & Parameters:
| Parameter | Type | Description |
|---|---|---|
cls |
type |
Class reference (automatic in classmethod) |
v |
str |
Input value to sanitize |
| Returns | str |
Cleaned, safe text |
| Raises | ValueError |
If dangerous patterns are detected |
- No I/O operations
- Raises
ValueErrorfor dangerous input - Modifies input by removing HTML and whitespace
sanitize_textCode Listing:
@field_validator('subject', 'description')
@classmethod
def sanitize_text(cls, v):
    """Remove any potential injection attempts."""
    # Strip HTML and dangerous characters
    cleaned = bleach.clean(v, tags=[], strip=True)

    # Prevent command injection patterns
    dangerous_patterns = [
        r'<script',      # XSS attempts
        r'javascript:',  # JavaScript injection
        r'DROP TABLE',   # SQL injection
        r'\$\{.*\}',    # Template injection
        r'`.*`',        # Command substitution
    ]

    for pattern in dangerous_patterns:
        if re.search(pattern, cleaned, flags=re.IGNORECASE):
            raise ValueError(f"Invalid characters detected: {pattern}")

    return cleaned.strip()
sanitize_textMini Sequence Diagram:
sequenceDiagram
    participant Validator as sanitize_text
    participant Bleach as bleach.clean
    participant Regex as re.search

    Validator->>Bleach: Clean HTML (tags=[], strip=True)
    Bleach-->>Validator: HTML-stripped text

    loop For each dangerous pattern
        Validator->>Regex: Search pattern (case-insensitive)
        alt Pattern found
            Validator->>Validator: Raise ValueError
        else Pattern not found
            Validator->>Validator: Continue checking
        end
    end

    Validator->>Validator: Strip whitespace
    Validator-->>Validator: Return cleaned text
This function acts as a security guard for text input. It first removes any HTML code that could cause problems. Then it checks for known attack patterns like SQL injection attempts or JavaScript code. If it finds anything suspicious, it rejects the input with an error. If the text is safe, it removes extra spaces and returns the clean version.
To simplify our understanding of this validation process, imagine it as a multi-layered security checkpoint at an airport. First, all input goes through a metal detector (HTML sanitization), then through passport control (pattern matching), and finally through customs (business rule validation). Each layer adds another crucial level of protection against potential security threats.

validate_priority() ValidatorPurpose: Ensures priority values match the predefined allowed list.Signature & Parameters:
| Parameter | Type | Description |
|---|---|---|
cls |
type |
Class reference (automatic in classmethod) |
v |
str |
Priority value to validate |
| Returns | str |
Validated priority value |
| Raises | ValueError |
If priority not in allowed list |
- Raises
ValueErrorfor invalid priorities - No data modification
validate_priorityCode Listing:
@field_validator('priority')
@classmethod
def validate_priority(cls, v):
    """Ensure priority is from allowed list."""
    allowed_priorities = ['low', 'normal', 'high', 'urgent']
    if v not in allowed_priorities:
        raise ValueError(f"Priority must be one of {allowed_priorities}, got {v}")
    return v
SecureCustomerRequest ClassPurpose: Validates customer lookup requests with strict ID format requirements.Class Attributes:
| Attribute | Type | Description |
|---|---|---|
customer_id |
str |
Customer identifier matching pattern ^[A-Z0-9]{5,10}$ |
SecureCalculationRequest ClassPurpose: Validates financial calculation requests with safe numeric ranges.Class Attributes:
| Attribute | Type | Description |
|---|---|---|
customer_id |
str |
Customer identifier with strict format |
amounts |
List[float] |
List of monetary amounts (1-100 items) |
validate_amounts() ValidatorPurpose: Ensures all monetary amounts fall within acceptable business ranges.Signature & Parameters:
| Parameter | Type | Description |
|---|---|---|
cls |
type |
Class reference (automatic in classmethod) |
v |
List[float] |
List of amounts to validate |
| Returns | List[float] |
Validated amount list |
| Raises | ValueError |
If any amount outside 0-1,000,000 range |
- Raises
ValueErrorfor out-of-range amounts - No data modification
validate_amountsCode Listing:
@field_validator('amounts')
@classmethod
def validate_amounts(cls, v):
    """Ensure all amounts are within acceptable range."""
    for amount in v:
        if amount < 0 or amount > 1000000:
            raise ValueError("Amount must be between 0 and 1,000,000")
    return v
Input Validation Architectural Mapping
Input Validation Class Diagram
classDiagram
    class BaseModel {
        <<pydantic>>
    }

    class SecureTicketRequest {
        +customer_id: str
        +subject: str
        +description: str
        +priority: str
        +sanitize_text(v) str
        +validate_priority(v) str
    }

    class SecureCustomerRequest {
        +customer_id: str
    }

    class SecureCalculationRequest {
        +customer_id: str
        +amounts: List[float]
        +validate_amounts(v) List[float]
    }

    BaseModel <|-- SecureTicketRequest
    BaseModel <|-- SecureCustomerRequest
    BaseModel <|-- SecureCalculationRequest

    class SecurityPatterns {
        <<enumeration>>
        XSS_PATTERN
        JS_INJECTION
        SQL_INJECTION
        TEMPLATE_INJECTION
        COMMAND_INJECTION
    }

    SecureTicketRequest ..> SecurityPatterns : uses
This diagram shows the three security validation classes, all inheriting from Pydantic’s BaseModel. Each class specializes in validating different types of MCP operations. SecureTicketRequest is the most complex, with validators for text sanitization and priority checking. The SecurityPatterns enumeration (shown conceptually) represents the dangerous patterns that the text validator checks against.
Input Validation - System Architecture Position
graph TB
    subgraph "MCP Client Layer"
        Client[MCP Client Request]
    end

    subgraph "Validation Layer"
        Models[Pydantic Models]
        Validators[Field Validators]
        Bleach[Bleach Sanitizer]
    end

    subgraph "Business Logic Layer"
        Tools[MCP Tools]
        Database[Data Storage]
    end

    Client -->|Raw Input| Models
    Models -->|Triggers| Validators
    Validators -->|Uses| Bleach
    Models -->|Clean Data| Tools
    Tools -->|Safe Operations| Database

    style Validation Layer fill:#e1f5fe

```**Description**: This module sits in the Validation Layer, acting as a security gateway between MCP clients and business logic. It intercepts all incoming data, sanitizes dangerous content, and validates business rules before allowing data to proceed to MCP tools and storage.


### Layer Interfaces

- **Input Interface**: Accepts raw Python dictionaries or keyword arguments
- **Output Interface**: Returns validated Pydantic model instances or raises `ValueError`
- **Dependencies**: Requires `bleach` for HTML sanitization and `re` for pattern matching


### Cross-cutting Concerns

1.**Security**: Primary concern - prevents injection attacks across all input types
2.**Data Integrity**: Ensures data meets business rules (ID formats, amount ranges)
3.**Error Handling**: Provides descriptive error messages for validation failures
4.**Performance**: Regex compilation happens at import time for efficiency


### Input Validation- Summary

This input validation module provides comprehensive security for MCP operations through:

1.**Strict Type Validation**: Pydantic verifies correct data types
2.**Pattern Matching**: Regular expressions enforce ID formats
3.**Content Sanitization**: Bleach removes dangerous HTML/scripts
4.**Injection Prevention**: Detects and blocks common attack patterns
5.**Business Rule Enforcement**: Validates priorities and amount ranges

The module follows the principle of "fail fast" - rejecting invalid input immediately rather than allowing it deeper into the system. This defense-in-depth approach complements other security layers like authentication and encryption, providing robust protection against malicious input.

For further discussion of this, see our wiki under [security - validation](https://github.com/RichardHightower/mcp_security/wiki/security-%E2%80%90validation.py).


## Pillar 4: Rate Limiting — Your Traffic Controller

AI operations are expensive, and attackers know it. Without rate limiting, a malicious actor can drain your resources faster than you can say "token limit exceeded."

Here's our “production-ready” [rate limiter with memory](https://github.com/RichardHightower/mcp_security/blob/main/src/security/rate_limiting.py) + Redis fallback (it is still example code to demonstrate the concept):


### security/rate_limiting.py

```python
"""
Rate limiting implementation for MCP security.
Protects against abuse and denial-of-service attacks.
"""
import time
from collections import defaultdict
from typing import Dict, List, Optional, Tuple

class RateLimiter:
    """
    Rate limiter with sliding window implementation.
    Uses in-memory storage with Redis fallback capability.
    """

    def __init__(self,
                 requests_per_minute: int = 60,
                 token_limit_per_hour: int = 100000,
                 redis_client=None,**kwargs):
        """
        Initialize rate limiter.

        Args:
            requests_per_minute: Max requests per minute per user
            token_limit_per_hour: Max AI tokens per hour per user
            redis_client: Optional Redis client for distributed rate limiting
        """
        self.requests_per_minute = requests_per_minute
        self.token_limit_per_hour = token_limit_per_hour
        self.redis_client = redis_client

        # In-memory storage for rate limiting
        self.request_counts: DefaultDict[str, List[float]] = defaultdict(list)
        self.token_counts: DefaultDict[str, List[Tuple[float, int]]] = defaultdict(list)

    async def check_rate_limit(self, user_id: str, estimated_tokens: int = 0) ->
                                                                 Optional[Dict]:
        """
        Check if request should be allowed based on rate limits.

        Returns:
            None if allowed, dict with error details if rate limited
        """
        current_time = time.time()

        # Clean old entries and check request rate limit
        minute_ago = current_time - 60
        self.request_counts[user_id] = [
            timestamp for timestamp in self.request_counts[user_id]
            if timestamp > minute_ago
        ]

        if len(self.request_counts[user_id]) >= self.requests_per_minute:
            return {
                "error": "Rate limit exceeded",
                "limit_type": "requests",
                "retry_after": 60
            }

        # Check token rate limit if tokens specified
        if estimated_tokens > 0:
            hour_ago = current_time - 3600
            self.token_counts[user_id] = [
                (timestamp, tokens) for timestamp, tokens in\
                                                  self.token_counts[user_id]
                if timestamp > hour_ago
            ]

            total_tokens = sum(tokens for _, tokens in \
                                                   self.token_counts[user_id])
            if total_tokens + estimated_tokens > self.token_limit_per_hour:
                return {
                    "error": "Token rate limit exceeded",
                    "limit_type": "tokens",
                    "retry_after": 3600
                }

            # Record token usage
            self.token_counts[user_id].append((current_time, estimated_tokens))

        # Record request
        self.request_counts[user_id].append(current_time)

        return None
Our implementation prioritizesmemory-based rate limitingfor speed and simplicity, with Redis available as an optional backend for distributed deployments. This approach handlessliding window calculationsefficiently while automatically cleaning up expired entries to prevent memory leaks.
(Note we go into more detail than you probably care about but if you are interested, check out this rate limiting discussion and areas for improvement.)
Rate Limiting Module - Code Walkthrough
High-level Control Flow
1.Import Time: Module imports required dependencies (time, collections, typing) 2.Class Definition: RateLimiter class is defined with methods 3.Runtime Instantiation: External code creates RateLimiter instances 4.Request Validation: check_rate_limit() is called for each incoming request 5.Result: Either allows the request (returns None) or blocks it (returns error dict)
Rate Limiting - Global Sequence Diagram
sequenceDiagram
    participant Client as MCP Client
    participant API as API Endpoint
    participant Limiter as RateLimiter
    participant Storage as In-Memory Storage
    participant Redis as Redis (Optional)

    Client->>API: Request with user_id
    API->>Limiter: check_rate_limit(user_id, tokens)

    Limiter->>Limiter: Get current time
    Limiter->>Storage: Clean old entries (>60s)
    Limiter->>Storage: Count recent requests

    alt Request limit exceeded
        Limiter-->>API: Error dict (retry_after: 60)
        API-->>Client: 429 Too Many Requests
    else Within request limit
        alt Token limit check needed
            Limiter->>Storage: Clean old tokens (>3600s)
            Limiter->>Storage: Sum token usage
            alt Token limit exceeded
                Limiter-->>API: Error dict (retry_after: 3600)
                API-->>Client: 429 Too Many Requests
            else Within token limit
                Limiter->>Storage: Record token usage
            end
        end
        Limiter->>Storage: Record request time
        Limiter-->>API: None (allowed)
        API-->>Client: Process request
    end

This diagram shows how rate limiting protects the MCP server from overuse. When a client makes a request, the rate limiter checks two things: how many requests the user has made in the last minute, and how many AI tokens they’ve used in the last hour. If either limit is exceeded, the request is blocked with instructions on when to retry. If both checks pass, the request proceeds and the usage is recorded for future checks.
Think of our rate limiter as a savvy bouncer at a club—it monitors two key things: your server request frequency (requests per minute) and your AI resource usage (token consumption per hour). If you exceed either limit, it’ll politely let you know when to try again. Stay within the limits, and you’re welcome to proceed—the bouncer just logs your visit to keep tabs.
Rate Limiting - Function-by-Function Analysis
RateLimiter ClassPurpose: Implements sliding window rate limiting to prevent API abuse and protect system resources.Class Attributes:
| Attribute | Type | Description |
|---|---|---|
requests_per_minute |
int |
Maximum requests allowed per minute per user |
token_limit_per_hour |
int |
Maximum AI tokens allowed per hour per user |
redis_client |
Optional[Redis] |
Optional Redis client for distributed rate limiting |
request_counts |
DefaultDict[str, List[float]] |
Timestamps of requests per user |
token_counts |
DefaultDict[str, List[Tuple[float, int]]] |
Token usage history per user |
__init__() ConstructorPurpose: Initializes the rate limiter with configurable limits and optional Redis support.Signature & Parameters:
| Parameter | Type | Default | Description |
|---|---|---|---|
self |
RateLimiter |
- | Instance reference |
requests_per_minute |
int |
60 | Maximum requests per minute per user |
token_limit_per_hour |
int |
100000 | Maximum AI tokens per hour per user |
redis_client |
Optional[Redis] |
None | Redis client for distributed limiting |
**kwargs |
dict |
- | Additional keyword arguments (unused) |
- Initializes in-memory storage structures
- Stores Redis client reference if provided
__init__Code Listing:
def __init__(self, requests_per_minute: int = 60,
             token_limit_per_hour: int = 100000,
             redis_client=None,**kwargs):
    """
    Initialize rate limiter.

    Args:
        requests_per_minute: Max requests per minute per user
        token_limit_per_hour: Max AI tokens per hour per user
        redis_client: Optional Redis client for distributed rate limiting
    """
    self.requests_per_minute = requests_per_minute
    self.token_limit_per_hour = token_limit_per_hour
    self.redis_client = redis_client

    # In-memory storage for rate limiting
    self.request_counts: DefaultDict[str, List[float]] = defaultdict(list)
    self.token_counts: DefaultDict[str, List[Tuple[float, int]]] = defaultdict(list)
check_rate_limit() MethodPurpose: Validates whether a request should be allowed based on rate limits for both request frequency and token usage.Signature & Parameters:
| Parameter | Type | Default | Description |
|---|---|---|---|
self |
RateLimiter |
- | Instance reference |
user_id |
str |
- | Unique identifier for the user |
estimated_tokens |
int |
0 | Expected AI tokens for this request |
| Returns | Optional[Dict] |
- | None if allowed, error dict if limited |
- Modifies in-memory storage by cleaning old entries
- Records new request timestamps and token usage
- No external I/O unless Redis is configured
check_rate_limitCode Listing:
async def check_rate_limit(self, user_id: str, estimated_tokens: int = 0) -> Optional[Dict]:
    """
    Check if request should be allowed based on rate limits.

    Returns:
        None if allowed, dict with error details if rate limited
    """
    current_time = time.time()

    # Clean old entries and check request rate limit
    minute_ago = current_time - 60
    self.request_counts[user_id] = [
        timestamp for timestamp in self.request_counts[user_id]
        if timestamp > minute_ago
    ]

    if len(self.request_counts[user_id]) >= self.requests_per_minute:
        return {
            "error": "Rate limit exceeded",
            "limit_type": "requests",
            "retry_after": 60
        }

    # Check token rate limit if tokens specified
    if estimated_tokens > 0:
        hour_ago = current_time - 3600
        self.token_counts[user_id] = [
            (timestamp, tokens)
            for timestamp, tokens in self.token_counts[user_id]
            if timestamp > hour_ago
        ]

        total_tokens = sum(tokens for _, tokens in self.token_counts[user_id])

        if total_tokens + estimated_tokens > self.token_limit_per_hour:
            return {
                "error": "Token rate limit exceeded",
                "limit_type": "tokens",
                "retry_after": 3600
            }

        # Record token usage
        self.token_counts[user_id].append((current_time, estimated_tokens))

    # Record request
    self.request_counts[user_id].append(current_time)

    return None
check_rate_limitMini Sequence Diagram:
sequenceDiagram
    participant Method as check_rate_limit
    participant Time as time.time()
    participant ReqStore as request_counts
    participant TokenStore as token_counts

    Method->>Time: Get current timestamp
    Time-->>Method: current_time

    Method->>ReqStore: Filter entries > 60s old
    Method->>ReqStore: Count recent requests

    alt Too many requests
        Method-->>Method: Return rate limit error
    else Requests OK
        alt Checking tokens
            Method->>TokenStore: Filter entries > 3600s old
            Method->>TokenStore: Sum token usage
            alt Too many tokens
                Method-->>Method: Return token limit error
            else Tokens OK
                Method->>TokenStore: Append new token usage
            end
        end
        Method->>ReqStore: Append request timestamp
        Method-->>Method: Return None (allowed)
    end
This method acts as a traffic controller for the API. It maintains two sliding windows: one for the last minute (requests) and one for the last hour (tokens). When checking a request, it first removes outdated entries, then counts current usage. If limits are exceeded, it returns an error telling the user how long to wait. If everything is within limits, it records the new usage and allows the request to proceed.
Think of this method as a bouncy house bouncer - it’s got two watch lists: who jumped in during the last minute, and how much jumping each kid did in the last hour. Before letting anyone in, it cleans up its old lists, checks if they’ve been jumping too much lately, and if they have, tells them to come back after a break. If they’re good to go, it adds them to the list and lets them bounce away! Otherwise, it is “Hey Kid! Hit the bricks! Get-outta-here will-ya!”
Rate-Limiting - Architectural Mapping
Rate-Limiting - System Architecture Position
graph TB
    subgraph "External"
        Client[MCP Client]
    end

    subgraph "Authentication Layer"
        OAuth[OAuth Server<br/>JWT Validation]
    end

    subgraph "MCP Server Layer"
        MCPServer[MCP Server<br/>:8000]
        RateLimit[Rate Limiter<br/>Component]
        Session[Session Handler]
    end

    subgraph "Storage Options"
        Memory[In-Memory Storage<br/>DefaultDict]
        Redis[(Redis Cache<br/>Optional)]
    end

    subgraph "Business Logic Layer"
        Tools[MCP Tools]
        CustomerSvc[Customer Service]
        TicketSvc[Ticket Service]
    end

    Client -->|1. Request + JWT| MCPServer
    MCPServer -->|2. Validate Token| OAuth
    OAuth -->|3. Token Valid| MCPServer
    MCPServer -->|4. check_rate_limit| RateLimit
    RateLimit -->|Read/Write| Memory
    RateLimit -.->|Future: Read/Write| Redis

    MCPServer -->|5. If allowed| Session
    Session -->|6. Execute| Tools
    Tools --> CustomerSvc
    Tools --> TicketSvc

    MCPServer -->|Rate Limited| Client

    style MCP Server Layer fill:#e3f2fd
The rate limiter sits in the API Gateway layer, acting as the first line of defense before authentication. It uses in-memory storage by default for high performance, with optional Redis support for distributed deployments. This positioning allows it to quickly reject excessive requests before consuming authentication or business logic resources.
Rate-Limiter - Class Structure
classDiagram
    class RateLimiter {
        -requests_per_minute: int
        -token_limit_per_hour: int
        -redis_client: Optional[Redis]
        -request_counts: DefaultDict[str, List[float]]
        -token_counts: DefaultDict[str, List[Tuple[float, int]]]
        +__init__(requests_per_minute, token_limit_per_hour, redis_client)
        +check_rate_limit(user_id, estimated_tokens) Optional[Dict]
    }

    class SlidingWindow {
        <<concept>>
        +time_window: int
        +max_count: int
        +clean_old_entries()
        +check_limit()
        +record_usage()
    }

    RateLimiter ..> SlidingWindow : implements
The RateLimiter class implements the sliding window algorithm concept for both request counting and token tracking. The design separates configuration (limits) from state (counts), making it easy to adjust limits without losing tracking data.
Layer Interfaces
- Input Interface: Accepts user_id and optional estimated_tokens
- Output Interface: Returns None (success) or error dictionary
- Storage Interface: Uses defaultdict for in-memory storage, Redis protocol for distributed storage
Cross-cutting Concerns
1.Performance: - O(n) complexity where n is requests in the time window - In-memory storage provides microsecond-level performance - Sliding window cleanup happens on each check 2.Scalability: - Current implementation is single-instance only - Redis support enables horizontal scaling - Memory usage grows with active users 3.Security: - Prevents DoS attacks through request limiting - Protects expensive AI resources through token limiting - User isolation prevents one user from affecting others 4.Monitoring(Future Enhancement): - Could emit metrics for rate limit hits - Could log patterns of abuse - Could support dynamic limit adjustment
Rate-Limiter - Summary
This rate limiting module provides essential protection for MCP services through:
1.Dual Rate Limiting: Separate limits for request frequency and AI token consumption 2.Sliding Window Algorithm: Accurate rate limiting without fixed time buckets 3.User Isolation: Per-user limits prevent one user from affecting others 4.Flexible Storage: In-memory default with Redis option for scaling 5.Clear Error Responses: Clients know exactly when they can retry
The implementation prioritizes performance (in-memory storage) while maintaining accuracy (sliding windows). The clean separation between request and token limiting allows fine-grained control over different types of resource consumption. Future enhancements could include more Redis integration, metrics emission, and dynamic limit adjustment based on system load.
Monitoring is important too.
We also wrote an example for monitoring, but opted to Mat Damon it for this article, but you can see what were thinking in the wiki page on monitoring or look at the mock example for monitoring.
Sorry Matt Damon, we ran out of time.
Like Matt Damon, monitoring can be a complex but important character in your system’s story. While we had to cut the monitoring section for space (just like poor Matt), you can still find all the monitoring details in our GitHub repository.
Monitoring and AI is probably a great subject for a future series of articles. There is a lot there with audit logs, and feedback loops not to mention sampling.
By the way, provide some feedback for ideas for the next article.

Putting It All Together: A Secure FastMCP 2.8+ Implementation
Now let’s combine all these security measures into our production-ready FastMCP 2.8+ server with streamable-http transport:
"""
Secure MCP server implementation with OAuth 2.1, TLS, and comprehensive security.
"""
import asyncio
import os
import logging
from contextlib import asynccontextmanager
from datetime import datetime
from typing import Dict, Any

from dotenv import load_dotenv
from mcp import McpServer
from mcp.auth import BearerAuthProvider
from mcp.server.streamable_http import create_http_server


# Import our security modules
from config import Config
from security.validation import (
    SecureTicketRequest,
    SecureCustomerRequest,
    SecureCalculationRequest
)
from security.rate_limiting import RateLimiter


# Configure logging
logging.basicConfig(level=logging.INFO)
logger = logging.getLogger(__name__)
security_logger = logging.getLogger("security")


# Load environment variables
load_dotenv()

def load_public_key():
    """Load RSA public key for JWT verification."""
    from pathlib import Path

    public_key_path = Path("keys/public_key.pem")
    if not public_key_path.exists():
        raise FileNotFoundError(
            "Public key not found. Run 'python src/generate_keys.py' first."
        )

    with open(public_key_path, "rb") as f:
        public_key_pem = f.read()

    return public_key_pem.decode('utf-8')


# Initialize auth provider
try:
    public_key_pem = load_public_key()
    auth_provider = BearerAuthProvider(
        public_key=public_key_pem,
        issuer=Config.get_oauth_issuer_url(),
        audience=None  # Allow any client_id
    )
except FileNotFoundError as e:
    logger.warning(f"⚠️ Running without authentication - generate keys first!")
    auth_provider = None


# Initialize rate limiter
rate_limiter = RateLimiter(
    requests_per_minute=60,
    token_limit_per_hour=100000
)

@asynccontextmanager
async def lifespan(app):
    """Lifespan handler for startup/shutdown operations."""
    logger.info("🔐 Starting secure MCP server with OAuth...")

    # Development safety net
    if not os.environ.get("JWT_SECRET_KEY"):
        os.environ["JWT_SECRET_KEY"] = "demo-secret-change-in-production"
        logger.warning("⚠️ Using demo JWT secret!")

    logger.info("✅ Server startup complete")
    yield  # Server runs here
    logger.info("🔐 Server shutdown complete")


# Create MCP server instance with auth
mcp = McpServer(
    name="secure-customer-service",
    instructions="Secure customer service MCP server with OAuth authentication",
    auth=auth_provider,
    lifespan=lifespan
)


# Customer service tools with security
@mcp.tool
async def get_customer_info(customer_id: str) -> Dict[str, Any]:
    """Retrieve customer information securely."""
    ... # Check Credentials
    try:
        # Validate input
        request = SecureCustomerRequest(customer_id=customer_id)

        # Log security event
        security_logger.info(f"Customer info accessed for {request.customer_id}")

        # Simulate customer lookup
        return {
            "customer_id": request.customer_id,
            "name": f"Customer {request.customer_id}",
            "status": "active",
            "account_type": "premium",
            "last_activity": datetime.now().isoformat(),
            "contact_info": {
                "email": f"{request.customer_id.lower()}@example.com",
                "phone": "+1-555-0100"
            }
        }
    except Exception as e:
        logger.error(f"Failed to get customer info: {e}")
        raise ValueError(f"Invalid request: {e}")

@mcp.tool
async def create_support_ticket(
    customer_id: str,
    subject: str,
    description: str,
    priority: str
) -> Dict[str, Any]:
    """Create a support ticket with validation."""
    ... # Check credentials
    try:
        # Validate and sanitize input
        request = SecureTicketRequest(
            customer_id=customer_id,
            subject=subject,
            description=description,
            priority=priority
        )

        # Log security event
        security_logger.info(
            f"Support ticket created for {request.customer_id}: {request.subject}"
        )

        # Generate ticket
        ticket_id = f"TICKET-{datetime.now().strftime('%Y%m%d%H%M%S')}"

        # Determine resolution time based on priority
        resolution_times = {
            "urgent": "24 hours",
            "high": "48 hours",
            "normal": "3-5 business days",
            "low": "5-7 business days"
        }

        return {
            "ticket_id": ticket_id,
            "customer_id": request.customer_id,
            "subject": request.subject,
            "description": request.description,
            "priority": request.priority,
            "status": "open",
            "created": datetime.now().isoformat(),
            "estimated_resolution": resolution_times[request.priority]
        }
    except Exception as e:
        logger.error(f"Failed to create ticket: {e}")
        raise ValueError(f"Invalid request: {e}")

@mcp.tool
async def calculate_account_value(
    customer_id: str,
    amounts: List[float]
) -> Dict[str, Any]:
    """Calculate account value with validation."""
    ... # Check credentials
    try:
        # Validate input
        request = SecureCalculationRequest(
            customer_id=customer_id,
            amounts=amounts
        )

        # Log security event
        security_logger.info(
            f"Account calculation for {request.customer_id} with {len(request.amounts)} amounts"
        )

        # Perform calculations
        total = sum(request.amounts)
        average = total / len(request.amounts) if request.amounts else 0

        # Determine account tier
        if total >= 50000:
            tier = "gold"
        elif total >= 10000:
            tier = "silver"
        else:
            tier = "bronze"

        return {
            "customer_id": request.customer_id,
            "calculation": {
                "total": total,
                "average": average,
                "count": len(request.amounts),
                "max_purchase": max(request.amounts) if request.amounts else 0,
                "min_purchase": min(request.amounts) if request.amounts else 0
            },
            "account_tier": tier,
            "calculated_at": datetime.now().isoformat()
        }
    except Exception as e:
        logger.error(f"Failed to calculate account value: {e}")
        raise ValueError(f"Invalid request: {e}")


# Health and monitoring resources
@mcp.resource("health://status")
async def health_check() -> Dict[str, Any]:
    """Health check endpoint."""
    return {
        "status": "healthy",
        "timestamp": datetime.now().isoformat(),
        "version": "1.0.0",
        "features": [
            "oauth_auth",
            "input_validation",
            "security_logging",
            "rate_limiting"
        ]
    }

@mcp.resource("security://events")
async def get_security_events() -> Dict[str, Any]:
    """Get recent security events for monitoring."""
    # In production, this would query a security event store
    return {
        "total_events": 0,
        "recent_events": [],
        "summary": {
            "errors": 0,
            "warnings": 0,
            "info": 0
        },
        "monitoring_status": "active"
    }


# Main entry point
def main():
    """Run the secure MCP server."""
    host = Config.MCP_SERVER_HOST
    port = Config.MCP_SERVER_PORT

    logger.info(f"Starting secure MCP server on {host}:{port}")

    # Create and run HTTP server
    http_server = create_http_server(
        mcp,
        host=host,
        port=port
    )

    asyncio.run(http_server.run())

if __name__ == "__main__":
    main()
Server-Side Check CredentialsProblem: Clients are self-policing. A compromised or malicious client could bypass these checks entirely and call tools directly with a valid token that lacks proper scopes. The MCP Server must make sure that the clients are allows with their JWT token to access the tools.
Using FastMCP’s get_access_token()
from fastmcp import Context
from fastmcp.server.dependencies import get_access_token, AccessToken

@mcp.tool()
async def get_customer_info(customer_id: str, ctx: Context):

# Get the validated token
    access_token: AccessToken = await get_access_token()


# Check scopes (same logic as clients)
    if "customer:read" not in access_token.scopes:
        raise ToolError("Insufficient permissions: 'customer:read' scope required")


# Proceed with tool logic
    return {"customer_id": customer_id, "status": "active"}
So, let me break down how the security check works on the server side. It’s actually pretty neat! When someone tries to use a tool, FastMCP kicks things off by verifying their JWT token to make sure it’s valid and hasn’t expired. After that, it taps into some handy helpers like Context and the get_access_token() function to determine what actions the user is allowed to perform.
The cool part? All the security magic takes place right on the server, so even if someone tries to pull a fast one and skip the client-side checks, they’re still out of luck. Plus, since we’re leveraging FastMCP’s built-in security features, we avoid writing a ton of extra code to keep everything secure.
Think of the Context object as your personal body guard—it knows what each user is allowed to do by reading their token. So if someone tries to access something off-limits, the system just shuts it down automatically. It’s like having a super efficient bouncer who always knows who’s on the guest list and won’t let anyone slip through who shouldn’t be there. FastMCP is pretty slick.


The MCP Server Body Guard - JWT Context Auth Handling
Eventually, we ended up with something like this for the _check_tool_permissions.
After a few iteration.
MCP Server Main.py _*check_tool_permissions*
async def _check_tool_permissions(tool_name: str) -> None:
    """Check if current token has required scopes for the tool."""
    try:
        # Get the validated access token from FastMCP
        access_token: AccessToken = await get_access_token()

        # Get required scopes for this tool
        required_scopes = _get_required_scopes(tool_name)

        # Extract scopes from token (same as clients)
        token_scopes = getattr(access_token, 'scopes', [])
        if isinstance(token_scopes, str):
            token_scopes = token_scopes.split()

        # Check if token has all required scopes
        missing_scopes = [scope for scope in required_scopes if scope not in token_scopes]

        if missing_scopes:
            security_logger.warning(f"Access denied to {tool_name}: missing scopes {missing_scopes}")
            raise ToolError(f"Insufficient permissions for {tool_name}. Missing scopes: {missing_scopes}")

        security_logger.info(f"Access granted to {tool_name}: scopes verified")

    except Exception as e:
        # If we can't get the token or verify scopes, deny access
        security_logger.error(f"Permission check failed for {tool_name}: {e}")
        raise ToolError(f"Permission verification failed for {tool_name}")

@mcp.tool
async def get_customer_info(customer_id: str) -> Dict[str, Any]:
    """Get customer information with validation.

    Args:
        customer_id: Customer ID (5-10 alphanumeric characters, e.g., 'ABC123')

    Returns:
        Customer information including name, status, and last activity
    """
    # Check permissions first (server-side scope validation)
    await _check_tool_permissions("get_customer_info")
    ...
Mixing in Rate limit checking
Then we had to mix in the rate limiting too.
MCP Server Main.py _check_rate_limit
from security.rate_limiting import RateLimiter

rate_limiter = RateLimiter()

...
async def _check_rate_limit(tool_name: str, estimated_tokens: int = 100) -> None:
    """Check rate limits for the current user and tool."""
    try:
        # Get the access token to extract user ID
        access_token: AccessToken = await get_access_token()

        # Extract user ID from token - this could be 'sub', 'user_id', or 'client_id'
        # depending on your JWT structure
        user_id = getattr(access_token, 'sub', None) or \
                 getattr(access_token, 'user_id', None) or \
                 getattr(access_token, 'client_id', 'anonymous')

        # Check rate limits
        rate_limit_result = await rate_limiter.check_rate_limit(
            user_id=str(user_id),
            estimated_tokens=estimated_tokens
        )

        if rate_limit_result:
            security_logger.warning(
                f"Rate limit exceeded for user {user_id} on tool {tool_name}"
            )
            raise ToolError(
                f"Rate limit exceeded: {rate_limit_result['error']}. "
                f"Retry after {rate_limit_result['retry_after']} seconds.",
                retry_after=rate_limit_result['retry_after']
            )

        security_logger.info(f"Rate limit check passed for user {user_id} on {tool_name}")

    except ToolError:
        raise  # Re-raise rate limit errors
    except Exception as e:
        # Log but don't fail if rate limiting check fails
        logger.error(f"Rate limit check failed: {e}")
        # Optionally, you could fail closed (deny) or open (allow)
        # For this example, we'll fail open but log the issue
        security_logger.error(f"Rate limit check error for {tool_name}: {e}")


  @mcp.tool
	async def get_customer_info(customer_id: str) -> Dict[str, Any]:
    """Get customer information with validation.

    Args:
        customer_id: Customer ID (5-10 alphanumeric characters, e.g., 'ABC123')

    Returns:
        Customer information including name, status, and last activity
    """
    # Check permissions first (server-side scope validation)
    await _check_tool_permissions("get_customer_info")

    # Check rate limits (estimate ~200 tokens for this operation)
    await _check_rate_limit("get_customer_info", estimated_tokens=200)

    try:
        request = SecureCustomerRequest(customer_id=customer_id)
        security_logger.info(f"Retrieved customer info for {request.customer_id}")

        return {
            "customer_id": request.customer_id,
            "name": f"Customer {request.customer_id}",
            "status": "active",
            "account_type": "premium",
            "last_activity": datetime.now().isoformat(),
            "contact_info": {
                "email": f"customer{request.customer_id.lower()}@example.com",
                "phone": "+1-555-0123"
            }
        }
    except Exception as e:
        logger.error(f"Customer lookup failed: {e}")
        raise ValueError(f"Invalid customer request: {e}")


        ....

@mcp.tool
async def create_support_ticket(
    customer_id: str,
    subject: str,
    description: str,
    priority: str
) -> Dict[str, Any]:
    """Create support ticket with validation.

    Args:
        customer_id: Customer ID (5-10 alphanumeric characters)
        subject: Ticket subject (1-200 characters)
        description: Ticket description (1-2000 characters)
        priority: Priority level ('low', 'normal', 'high', 'urgent')

    Returns:
        Created ticket information with ticket ID and details
    """
    # Check permissions first (server-side scope validation)
    await _check_tool_permissions("create_support_ticket")

    # Check rate limits
    await _check_rate_limit("create_support_ticket")
    ...
An interesting rate limiting implementation that’s pretty robust yet somewhat flexible. In production we are probably going to use an application load balancer or an API server for our rate limiter and Auth but some of those tools are not fully baked yet in this space, but this is here as an example. Note the _check_rate_limit method extracts the user ID from JWT tokens (handling different possible field names like ‘sub’ or ‘user_id’), then uses that to enforce per-user rate limits with an optional estimated token counts. The system gracefully handles different failure modes - it’ll either fail open or closed depending on your security needs, while maintaining detailed logging throughout. Note how it integrates with the permission checking flow in the tool decorators, creating this layered security approach where we validate permissions first, then rate limits, before even touching the business logic. The error handling is thorough too, with custom error types and retry-after headers for when users hit their limits. It’s the kind of setup you’d want in a production environment where you need to balance API availability with abuse prevention.
The rest of the MCP Server code
We walked through some of the security checking bits, so now let’s walk through the rest of the MCP Server.
This MCP Server implements a secure Model Context Protocol (MCP) server for customer service operations with OAuth 2.1 authentication, input validation, and comprehensive security features.
MCP Server Entry Points
1.main() function- Primary entry point when script is executed directly
- Initializes and starts the HTTP server
2.lifespan() async context manager- Secondary entry point for application lifecycle management
- Handles startup and shutdown operations
MCP Server High-level Control Flow
Script Start → main() → Load Config → Create HTTP Server → Run Async Event Loop
                                                              ↓
                                                         lifespan() startup
                                                              ↓
                                                    Server accepts requests
                                                              ↓
                                            Tool functions handle business logic
                                                              ↓
                                                     lifespan() shutdown
MCP Server - Global Sequence Diagram
sequenceDiagram
    participant User
    participant Main
    participant Config
    participant AuthProvider
    participant MCPServer
    participant HTTPServer
    participant Tools
    participant Security

    User->>Main: Run script
    Main->>Config: Load configuration
    Main->>AuthProvider: Load public key
    Main->>MCPServer: Create with auth
    Main->>HTTPServer: Create server
    Main->>HTTPServer: Run async

    HTTPServer->>MCPServer: lifespan startup
    MCPServer-->>HTTPServer: Ready

    loop Handle Requests
        User->>HTTPServer: API Request
        HTTPServer->>AuthProvider: Verify JWT
        AuthProvider-->>HTTPServer: Valid/Invalid
        HTTPServer->>Tools: Execute tool
        Tools->>Security: Validate input
        Security-->>Tools: Valid/Error
        Tools-->>HTTPServer: Response
        HTTPServer-->>User: JSON Response
    end

    User->>HTTPServer: Shutdown signal
    HTTPServer->>MCPServer: lifespan shutdown
So here’s how our secure MCP server handles requests under the hood - it’s pretty elegant actually. The startup phase bootstraps everything by loading configs and security keys before spinning up an authenticated MCP server instance. Then during normal operation, when requests come in, we’ve got this nice pipeline where the HTTP server first validates the JWT token (because security first, right?), routes valid requests to the appropriate tool function which does its own input validation (can never be too careful), and then sends back the processed response. When it’s time to shut down, everything gets cleaned up gracefully. It’s a pretty robust setup that covers all our security bases while keeping things maintainable.
3. Function-by-Function Analysis
load_public_key()Purpose: Loads the RSA public key used for verifying JWT tokens.Signature:
| Parameter | Type | Description |
|---|---|---|
| None | - | No parameters |
| Returns | str |
The public key in PEM format as a string |
- File I/O: Reads from
keys/public_key.pem - May raise
FileNotFoundErrorif key file doesn’t existMCP Server Load Public Keys - Code listing with explanations:
def load_public_key():
    """Load RSA public key for JWT verification."""
    from pathlib import Path

    # Create a Path object pointing to the key file
    public_key_path = Path("keys/public_key.pem")

    # Check if the file exists, raise error with helpful message if not
    if not public_key_path.exists():
        raise FileNotFoundError(
            "Public key not found. Run 'python src/generate_keys.py' first."
        )

    # Read the key file in binary mode
    with open(public_key_path, "rb") as f:
        public_key_pem = f.read()

    # Convert bytes to string and return
    return public_key_pem.decode('utf-8')

```**MCP Server - Mini sequence diagram**:

```mermaid
sequenceDiagram
    participant Function
    participant FileSystem

    Function->>FileSystem: Check if keys/public_key.pem exists
    alt File exists
        FileSystem-->>Function: True
        Function->>FileSystem: Open and read file
        FileSystem-->>Function: Key data (bytes)
        Function->>Function: Decode to UTF-8
        Function-->>Caller: Return key string
    else File missing
        FileSystem-->>Function: False
        Function-->>Caller: Raise FileNotFoundError
    end
This shows the function checking for the key file and either returning its contents or raising an error if it’s missing.
lifespan(app)Purpose: Manages server startup and shutdown operations as an async context manager.Signature:
| Parameter | Type | Description |
|---|---|---|
app |
Any |
The application instance (not used in this implementation) |
| Yields | None |
Control back to the server after startup |
- Modifies environment variables
- Writes to logging system
- Async operation
lifespan(app)Code listing with explanations:
@asynccontextmanager
async def lifespan(app):
    """Lifespan handler for startup/shutdown operations."""
    # Log startup message
    logger.info("🔐 Starting secure MCP server with OAuth...")

    # Development safety net - set a default JWT secret if none provided
    if not os.environ.get("JWT_SECRET_KEY"):
        os.environ["JWT_SECRET_KEY"] = "demo-secret-change-in-production"
        logger.warning("⚠️ Using demo JWT secret!")

    logger.info("✅ Server startup complete")

    # Yield control - server runs while yielded
    yield

    # This runs during shutdown
    logger.info("🔐 Server shutdown complete")
lifespan(app)Mini sequence diagram:
sequenceDiagram
    participant MCPServer
    participant Lifespan
    participant Environment
    participant Logger

    MCPServer->>Lifespan: Enter context
    Lifespan->>Logger: Log startup message
    Lifespan->>Environment: Check JWT_SECRET_KEY
    alt Key missing
        Lifespan->>Environment: Set demo key
        Lifespan->>Logger: Log warning
    end
    Lifespan->>Logger: Log startup complete
    Lifespan-->>MCPServer: Yield (server runs)

    Note over MCPServer: Server handles requests

    MCPServer->>Lifespan: Exit context
    Lifespan->>Logger: Log shutdown
    Lifespan-->>MCPServer: Complete
This shows how the lifespan manager sets up the environment before the server starts and logs the shutdown when it stops.
get_customer_info(customer_id)Purpose: Retrieves customer information after validating the input.Signature:
| Parameter | Type | Description |
|---|---|---|
customer_id |
str |
The unique identifier for the customer |
| Returns | Dict[str, Any] |
Customer data including ID, name, status, and contact info |
- Validates input (may raise exceptions)
- Writes to security log
- Async operation
get_customer_infoCode listing with explanations:
@mcp.tool
async def get_customer_info(customer_id: str) -> Dict[str, Any]:
    """Retrieve customer information securely."""
    # Note: credentials and rate limit was checked here.
    try:
        # Create a validation object - this checks the customer_id format
        request = SecureCustomerRequest(customer_id=customer_id)

        # Log that someone accessed this customer's data
        security_logger.info(f"Customer info accessed for {request.customer_id}")

        # Return simulated customer data
        return {
            "customer_id": request.customer_id,
            "name": f"Customer {request.customer_id}",
            "status": "active",
            "account_type": "premium",
            "last_activity": datetime.now().isoformat(),
            "contact_info": {
                "email": f"{request.customer_id.lower()}@example.com",
                "phone": "+1-555-0100"
            }
        }
    except Exception as e:
        # Log the error and re-raise with a cleaner message
        logger.error(f"Failed to get customer info: {e}")
        raise ValueError(f"Invalid request: {e}")
get_customer_infoMini sequence diagram:
sequenceDiagram
    participant Client
    participant Tool
    participant Validator
    participant SecurityLog
    participant ErrorLog

    Client->>Tool: get_customer_info(id)
    Tool->>Validator: SecureCustomerRequest(id)

    alt Valid input
        Validator-->>Tool: Valid request object
        Tool->>SecurityLog: Log access
        Tool->>Tool: Generate customer data
        Tool-->>Client: Return customer dict
    else Invalid input
        Validator-->>Tool: Raise exception
        Tool->>ErrorLog: Log error
        Tool-->>Client: Raise ValueError
    end
This shows how the function validates input before processing and logs all access attempts for security monitoring.
create_support_ticket(customer_id, subject, description, priority)Purpose: Creates a new support ticket with validated and sanitized input.Signature:
| Parameter | Type | Description |
|---|---|---|
customer_id |
str |
The customer’s unique identifier |
subject |
str |
Brief title of the support issue |
description |
str |
Detailed explanation of the issue |
priority |
str |
Urgency level (urgent/high/normal/low) |
| Returns | Dict[str, Any] |
Ticket details including ID, status, and estimated resolution time |
- Input validation and sanitization
- Security logging
- Generates unique ticket IDs based on current timestamp
- Async operationCode listing with explanations:
@mcp.tool
async def create_support_ticket(
    customer_id: str,
    subject: str,
    description: str,
    priority: str
) -> Dict[str, Any]:
    """Create a support ticket with validation."""
    # Note: Note Credentials check and rate limit checked here.
    try:
        # Validate all inputs - this removes dangerous content
        request = SecureTicketRequest(
            customer_id=customer_id,
            subject=subject,
            description=description,
            priority=priority
        )

        # Log ticket creation for audit trail
        security_logger.info(
            f"Support ticket created for {request.customer_id}: {request.subject}"
        )

        # Generate unique ticket ID with timestamp
        ticket_id = f"TICKET-{datetime.now().strftime('%Y%m%d%H%M%S')}"

        # Map priority to resolution time
        resolution_times = {
            "urgent": "24 hours",
            "high": "48 hours",
            "normal": "3-5 business days",
            "low": "5-7 business days"
        }

        return {
            "ticket_id": ticket_id,
            "customer_id": request.customer_id,
            "subject": request.subject,
            "description": request.description,
            "priority": request.priority,
            "status": "open",
            "created": datetime.now().isoformat(),
            "estimated_resolution": resolution_times[request.priority]
        }
    except Exception as e:
        logger.error(f"Failed to create ticket: {e}")
        raise ValueError(f"Invalid request: {e}")
create_support_ticketMini sequence diagram:
sequenceDiagram
    participant Client
    participant Tool
    participant Validator
    participant SecurityLog
    participant TimeService

    Client->>Tool: create_support_ticket(...)
    Tool->>Validator: SecureTicketRequest(all params)

    alt Valid input
        Validator-->>Tool: Sanitized request
        Tool->>SecurityLog: Log ticket creation
        Tool->>TimeService: Get current time
        TimeService-->>Tool: Timestamp
        Tool->>Tool: Generate ticket ID
        Tool->>Tool: Lookup resolution time
        Tool-->>Client: Return ticket details
    else Invalid input
        Validator-->>Tool: Raise exception
        Tool->>ErrorLog: Log error
        Tool-->>Client: Raise ValueError
    end
This shows how the function sanitizes potentially dangerous input before creating tickets and assigns resolution times based on priority.
calculate_account_value(customer_id, amounts)Purpose: Calculates account statistics and determines tier based on total value.Signature:
| Parameter | Type | Description |
|---|---|---|
customer_id |
str |
The customer’s unique identifier |
amounts |
List[float] |
List of purchase amounts to analyze |
| Returns | Dict[str, Any] |
Calculation results including total, average, and account tier |
- Input validation
- Security logging
- Async operation
calculate_account_valueCode listing with explanations:
@mcp.tool
async def calculate_account_value(
    customer_id: str,
    amounts: List[float]
) -> Dict[str, Any]:
    """Calculate account value with validation."""
    # Note: Credentials check needed
    try:
        # Validate inputs - verifies amounts are valid numbers
        request = SecureCalculationRequest(
            customer_id=customer_id,
            amounts=amounts
        )

        # Log the calculation for monitoring
        security_logger.info(
            f"Account calculation for {request.customer_id} with {len(request.amounts)} amounts"
        )

        # Basic statistics
        total = sum(request.amounts)
        average = total / len(request.amounts) if request.amounts else 0

        # Determine tier based on total spending
        if total >= 50000:
            tier = "gold"
        elif total >= 10000:
            tier = "silver"
        else:
            tier = "bronze"

        return {
            "customer_id": request.customer_id,
            "calculation": {
                "total": total,
                "average": average,
                "count": len(request.amounts),
                "max_purchase": max(request.amounts) if request.amounts else 0,
                "min_purchase": min(request.amounts) if request.amounts else 0
            },
            "account_tier": tier,
            "calculated_at": datetime.now().isoformat()
        }
    except Exception as e:
        logger.error(f"Failed to calculate account value: {e}")
        raise ValueError(f"Invalid request: {e}")
calculate_account_valueMini sequence diagram:
sequenceDiagram
    participant Client
    participant Tool
    participant Validator
    participant Calculator
    participant SecurityLog

    Client->>Tool: calculate_account_value(id, amounts)
    Tool->>Validator: SecureCalculationRequest(...)

    alt Valid input
        Validator-->>Tool: Valid request
        Tool->>SecurityLog: Log calculation
        Tool->>Calculator: Calculate stats
        Calculator-->>Tool: total, avg, min, max
        Tool->>Tool: Determine tier
        Tool-->>Client: Return results
    else Invalid input
        Validator-->>Tool: Raise exception
        Tool->>ErrorLog: Log error
        Tool-->>Client: Raise ValueError
    end
This shows how the function calculates various statistics and assigns customer tiers based on spending levels.
health_check()Purpose: Provides server health status and feature information.Signature:
| Parameter | Type | Description |
|---|---|---|
| None | - | No parameters |
| Returns | Dict[str, Any] |
Health status including timestamp and enabled features |
- Async operationCode listing with explanations:
@mcp.resource("health://status")
async def health_check() -> Dict[str, Any]:
    """Health check endpoint."""
    return {
        "status": "healthy",
        "timestamp": datetime.now().isoformat(),
        "version": "1.0.0",
        "features": [
            "oauth_auth",
            "input_validation",
            "security_logging",
            "rate_limiting"
        ]
    }
get_security_events()Purpose: Returns security event summary for monitoring dashboards.Signature:
| Parameter | Type | Description |
|---|---|---|
| None | - | No parameters |
| Returns | Dict[str, Any] |
Security event statistics and status |
- Async operationCode listing with explanations:
@mcp.resource("security://events")
async def get_security_events() -> Dict[str, Any]:
    """Get recent security events for monitoring."""
    # In production, this would query a security event store
    return {
        "total_events": 0,
        "recent_events": [],
        "summary": {
            "errors": 0,
            "warnings": 0,
            "info": 0
        },
        "monitoring_status": "active"
    }
main()Purpose: Entry point that configures and starts the HTTP server.Signature:
| Parameter | Type | Description |
|---|---|---|
| None | - | No parameters |
| Returns | None | No return value |
- Starts HTTP server
- Runs async event loop
- Blocks until server stopsCode listing with explanations:
def main():
    """Run the secure MCP server."""
    # Get host and port from configuration
    host = Config.MCP_SERVER_HOST
    port = Config.MCP_SERVER_PORT

    logger.info(f"Starting secure MCP server on {host}:{port}")

    # Create HTTP server with MCP handler
    http_server = create_http_server(
        mcp,
        host=host,
        port=port
    )

    # Run the server in async event loop
    asyncio.run(http_server.run())
The code walk through showed what a battle-tested MCP server implementation might end up like that handles everything from basic request processing to robust security. We’ve got example core functions for ticket management and account calculations, proper health monitoring endpoints (because we all know how critical those are in production), and a well-thought-out layered architecture that separates concerns nicely, but still in demo / example mode.
The security stack is comprehensive - we’re talking proper auth flow, input validation that actually catches the edge cases, and rate limiting that won’t fall over under load. Plus, there’s a solid deployment checklist that covers all the bases from transport security to incident response. Everything’s documented and implemented with real-world scenarios in mind, so you can actually use this as a foundation for your own secure MCP integrations. It is a start, but still just an demo example.
MCP Server - System Architecture Diagram
graph TB
    subgraph "Client Layer"
        C[API Clients]
    end

    subgraph "Security Layer"
        JWT[JWT Authentication]
        VAL[Input Validation]
        RL[Rate Limiting]
    end

    subgraph "Application Layer"
        HTTP[HTTP Server]
        MCP[MCP Server]
        TOOLS[Tool Functions]
    end

    subgraph "Business Logic"
        CUST[Customer Service]
        TICK[Ticket Management]
        CALC[Account Analytics]
    end

    subgraph "Infrastructure"
        LOG[Logging System]
        MON[Monitoring]
    end

    C --> JWT
    JWT --> HTTP
    HTTP --> MCP
    MCP --> VAL
    VAL --> TOOLS
    TOOLS --> CUST
    TOOLS --> TICK
    TOOLS --> CALC
    TOOLS --> LOG
    MCP --> MON
    RL -.->|Protects| TOOLS
Architecture Description of MCP Server
The system follows a layered architecture pattern:
1.Client Layer: External clients send requests to the server 2.Security Layer: All requests pass through multiple security checks: - JWT authentication verifies identity - Input validation prevents injection attacks - Rate limiting prevents abuse 3.Application Layer: The HTTP server and MCP framework handle request routing 4.Business Logic: Three main domains: - Customer information management - Support ticket creation - Account value calculations 5.Infrastructure: Cross-cutting concerns for observability
MCP Server Component Interfaces
| Interface | From | To | Protocol |
|---|---|---|---|
| HTTP API | Clients | HTTP Server | REST/JSON |
| MCP Protocol | HTTP Server | MCP Server | Internal |
| Tool Registry | MCP Server | Tool Functions | Function calls |
| Validation API | Tools | Security Module | Python objects |
| Logging API | All components | Logger | Python logging |
MCP Server Cross-cutting Concerns
1.Security: JWT validation, input sanitization, rate limiting 2.Logging: Structured logs for debugging and security auditing 3.Error Handling: Consistent error messages without exposing internals 4.Monitoring: Health checks and security event tracking
MCP Server Key Security Features
This server implements defense-in-depth with multiple security layers:
1.Authentication: RSA-signed JWT tokens verified on every request 2.Input Validation: All inputs sanitized to prevent injection attacks 3.Rate Limiting: Prevents resource exhaustion (configured but not shown in this file) 4.Security Logging: Audit trail of all operations 5.Error Handling: Generic error messages prevent information leakage 6. Permission checks so JWT token contains appropriate scopes for each tool operation.
So, here’s the deal with our MCP server architecture - we’ve built it using a pretty solid n-tier approach that’ll feel familiar to any seasoned dev. The core setup flows from client requests through a beefy security layer (JWT auth, input validation, rate limiting - you know the drill) into our application layer where the MCP framework does its thing. What’s cool is how we’ve segregated the business logic into distinct domains (customer management, ticketing, account calcs) while keeping infrastructure concerns like logging and monitoring separate. We’re using standard REST/JSON for external comms, but internally it’s all native function calls and Python objects. The whole thing’s wrapped in multiple security layers - RSA-signed JWTs, input sanitization, rate limiting, comprehensive audit logging - basically everything you’d expect in a production-grade system. And yeah, we’ve got proper scope-based permission checks baked into the JWT claims, because nobody wants to deal with security holes in prod, right?
We could get fancy and handle this via middleware like API servers or perhaps as part of a service mesh. There are many ways to skin this cat, but this can give you a leg up. However, you do the rate limiting, auth check and JWT permissions is ok. Just make sure you do them. This is how, but you decide where and which system handles it.
Just make sure that before you deploy your MCP Server into a production enterprise app, you follow this flight list first.
Security Checklist: Your Pre-Flight Safety Check
Before deploying your MCP server to production, run through this comprehensive security checklist:Authentication & Authorization- ✓ OAuth 2.1 with PKCE implemented
- ✓ JWT tokens use RS256 or ES256 (never HS256 in production)
- ✓ Token expiration set to 15-60 minutes
- ✓ Refresh token rotation implemented
- ✓ Scopes properly defined and enforcedTransport Security- ✓ TLS 1.2 minimum, TLS 1.3 preferred
- ✓ Strong cipher suites configured
- ✓ HSTS header with minimum 1-year max-age
- ✓ Certificate pinning for critical connections
- ✓ No mixed content or protocol downgradesInput Validation- ✓ All inputs validated with Pydantic models
- ✓ Dangerous patterns blocked with regex
- ✓ SQL queries use parameterization exclusively
- ✓ File uploads restricted and scanned
- ✓ Command execution uses allowlists onlyRate Limiting & DDoS Protection- ✓ Request rate limiting implemented
- ✓ Token-based limits for AI operations
- ✓ Distributed rate limiting with Redis or other providers
- ✓ Proper 429 responses with Retry-After
- ✓ CDN or WAF protection enabledMonitoring & Incident Response- ✓ Security events logged with correlation IDs
- ✓ Failed authentication attempts monitored
- ✓ Anomaly detection for unusual patterns
- ✓ Incident response plan documented
- ✓ Regular security audits scheduled
To maximize security and cleanliness, certificates are like dirty diapers—change them often to keep everything clean and secure.
Make sure to establish a regular certificate rotation schedule and automate the process to prevent unexpected expirations. Ideally, implement monitoring to alert you when certificates are approaching expiration. Remember that certificate management is just as crucial as the certificates themselves.
Rate limiting is like a bouncer at a club - it helps manage the flow of traffic to prevent overcrowding and make certain everyone has a good experience. Without proper rate limiting, your server could get overwhelmed by too many requests, just like a packed club becomes chaotic and unsafe.
Monitoring is like having a security camera system in your house - it helps you spot problems before they become disasters. With comprehensive monitoring, you can detect unusual patterns, track security events, and respond quickly to potential threats. This proactive approach means you’re not just reacting to incidents, but preventing them before they escalate.
The Road Ahead: Staying Secure in an Evolving Landscape
Security isn’t a destination — it’s a journey. As MCP evolves and new attack vectors emerge, your security posture must adapt. The emergence of AI-specific attacks like prompt injection and tool poisoning means traditional security measures alone aren’t enough.
Stay informed by following security advisories from the MCP community, participating in security-focused discussions, and regularly updating your dependencies. Consider joining bug bounty programs to have ethical hackers test your implementations.
Remember, the goal isn’t to build an impenetrable fortress (that’s impossible) but to make your MCP server a harder target than the alternatives. By implementing the security measures outlined in this guide, you’re already ahead of 90% of deployments.
Server wrap up.
We’ve transformed your MCP server from an open door to a secure vault, implementing industry-standard security practices tailored for AI integrations. By combining OAuth 2.1 authentication, TLS encryption, comprehensive input validation, and intelligent rate limiting, you’ve built a foundation that can withstand the threats of production deployment.

Security might seem overwhelming, but it’s really about consistent application of proven patterns. Each security layer we’ve added works together to create defense in depth — if one fails, others stand ready to protect your system.
As you deploy your secure MCP servers, remember that security is everyone’s responsibility. Share your experiences, contribute to the community’s security knowledge, and help make the entire MCP ecosystem more secure. Together, we can make certain that the AI revolution doesn’t become a security nightmare.
Now let’s hook up some clients and hosts to your now remote secure MCP server.
Connecting Securely: Integrating Clients with Your Fortified MCP Server
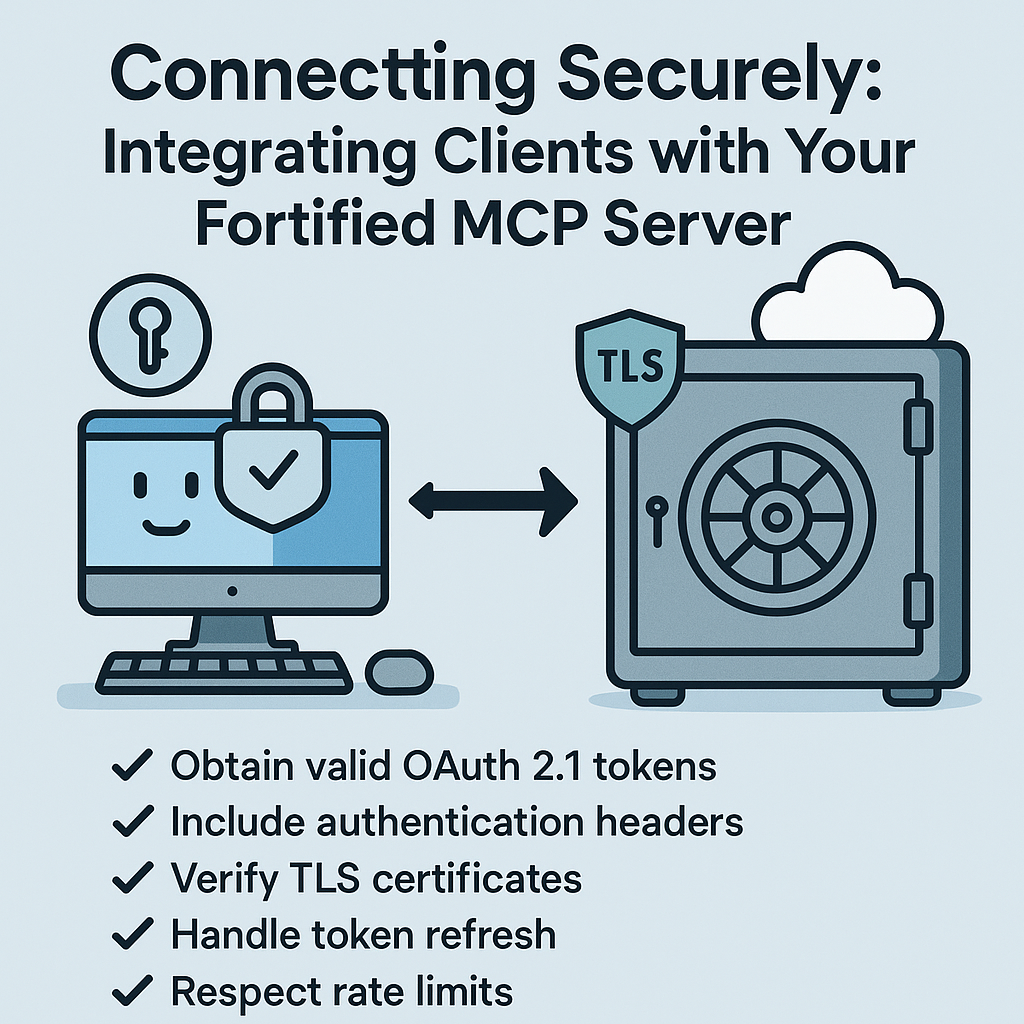
Now that we’ve built a fortress-like MCP server with OAuth 2.1, TLS encryption, and comprehensive security measures, we need to show how AI clients can actually connect to it. Think of this as teaching authorized visitors how to properly enter your secure facility — they need the right credentials, must follow security protocols, and should understand how to interact safely with your protected resources.
Let’s explore how each major AI platform and framework connects to our secured MCP server, making certain that our security measures don’t become barriers to legitimate use.
Understanding Secure Client Connections
Before diving into specific implementations, it’s crucial to understand what makes a client connection secure. When connecting to our fortified MCP server, every client must:
1.Obtain valid OAuth 2.1 tokensthrough the proper authorization flow 2.Include authentication headerswith every request 3.Verify TLS certificatesto prevent man-in-the-middle attacks 4.Handle token refreshwhen access tokens expire 5.Respect rate limitsand handle 429 responses gracefully
Think of this process like entering a high-security building. You need an access badge (OAuth token), must show it at every checkpoint (include headers), verify you’re in the right building (TLS verification), renew your badge when it expires (token refresh), and respect capacity limits (rate limiting).
OpenAI Integration: Native API with OAuth
OpenAI’s native chat completion API requires us to handle OAuth authentication and tool registration manually Available at src/secure_clients/openai_client.py. Our implementation demonstrates how to connect OpenAI’s GPT models to our secure MCP server with comprehensive security validation:
secure_clients/openai_client.py
"""
Secure OpenAI integration with OAuth-protected MCP server.
Demonstrates JWT validation, MCP tool security, and TLS configuration.
"""
import asyncio
import json
import time
from typing import Dict, List, Optional
import httpx
from openai import AsyncOpenAI
from mcp import ClientSession
from mcp.client.streamable_http import streamablehttp_client
import jwt
from jwt.algorithms import RSAAlgorithm

class SecureOpenAIMCPClient:
    """OpenAI client with comprehensive MCP security integration."""

    def __init__(self, openai_api_key: str, oauth_config: dict):
        self.openai_client = AsyncOpenAI(api_key=openai_api_key)
        self.oauth_config = oauth_config
        self.access_token = None
        self.token_expires_at = 0
        # ... session management setup

        # Configure secure HTTP client with TLS verification
        ca_cert_path = oauth_config.get('ca_cert_path', None)
        ssl_cert_file = os.environ.get('SSL_CERT_FILE')
        if ssl_cert_file and os.path.exists(ssl_cert_file):
            ca_cert_path = ssl_cert_file

        # TLS-enabled HTTP client
        self.http_client = httpx.AsyncClient(
            # Production: always verify
            verify=ca_cert_path if ca_cert_path else True,
            timeout=30.0
        )

    async def get_oauth_token(self) -> str:
        """Obtain OAuth access token using client credentials flow."""
        current_time = time.time()

        # Check if we have a valid token
        if self.access_token and current_time < self.token_expires_at - 60:
            return self.access_token

        # Request new token with client credentials
        response = await self.http_client.post(
            self.oauth_config['token_url'],
            data={
                'grant_type': 'client_credentials',
                'client_id': self.oauth_config['client_id'],
                'client_secret': self.oauth_config['client_secret'],
                'scope': self.oauth_config['scopes']
            }
        )
        # ... error handling

        token_data = response.json()
        self.access_token = token_data['access_token']
        self.token_expires_at = current_time + token_data.get('expires_in', 3600)

        return self.access_token

    async def get_oauth_public_key(self) -> Optional[dict]:
        """Fetch OAuth server's public key for JWT verification."""
        try:
            # Construct JWKS endpoint URL
            oauth_base_url = self.oauth_config['token_url'].replace('/token', '')
            jwks_url = f"{oauth_base_url}/jwks"

            response = await self.http_client.get(jwks_url)
            jwks = response.json()

            return jwks['keys'][0] if jwks.get('keys') else None
        except Exception as e:
            print(f"⚠️ Failed to fetch OAuth public key: {e}")
            return None

    async def _verify_token_scopes(self, required_scopes: List[str]) -> bool:
        """Verify the current token has required scopes with JWT signature verification."""
        if not self.access_token:
            return False

        try:
            # Get the OAuth server's public key for signature verification
            public_key_jwk = await self.get_oauth_public_key()

            if public_key_jwk:
                # Convert JWK to PEM format for PyJWT
                public_key = RSAAlgorithm.from_jwk(public_key_jwk)

                # Verify JWT with RS256 signature validation
                payload = jwt.decode(
                    self.access_token,
                    key=public_key,
                    algorithms=["RS256"],
                    audience=self.oauth_config.get('client_id'),
                    issuer=self.oauth_config.get('token_url', '').replace('/token', '')
                )
                print("✅ JWT signature verification successful")
            else:
                # Fallback for development only
                print("⚠️ Using unverified JWT decode (development only)")
                payload = jwt.decode(
                    self.access_token,
                    options={"verify_signature": False}
                )

            # Check if token has required scopes
            token_scopes = payload.get('scope', '').split()
            return all(scope in token_scopes for scope in required_scopes)

        except jwt.InvalidTokenError as e:
            print(f"❌ JWT verification failed: {e}")
            return False

    def _get_required_scopes(self, tool_name: str) -> List[str]:
        """Map MCP tool names to required OAuth scopes."""
        scope_mapping = {
            "get_customer_info": ["customer:read"],
            "create_support_ticket": ["ticket:create"],
            "calculate_account_value": ["account:calculate"],
            "get_recent_customers": ["customer:read"]
        }
        return scope_mapping.get(tool_name, [])

    async def connect_to_secure_mcp_server(self):
        """Connect to OAuth-protected MCP server with TLS."""
        # Get fresh access token
        access_token = await self.get_oauth_token()

        # Create TLS-enabled HTTP client factory for MCP
        def custom_httpx_client_factory(headers=None, timeout=None, auth=None):
            ca_cert_path = self.oauth_config.get('ca_cert_path', None)
            return httpx.AsyncClient(
                headers=headers,
                timeout=timeout if timeout else httpx.Timeout(30.0),
                auth=auth,
                verify=ca_cert_path if ca_cert_path else True,
                follow_redirects=True
            )

        # Create MCP transport with Bearer token authentication
        http_transport = await self.exit_stack.enter_async_context(
            streamablehttp_client(
                url=self.oauth_config['mcp_server_url'],
                headers={"Authorization": f"Bearer {access_token}"},
                httpx_client_factory=custom_httpx_client_factory
            )
        )

        # Initialize MCP session
        read, write, url_getter = http_transport
        session = await self.exit_stack.enter_async_context(
            ClientSession(read, write)
        )
        await session.initialize()

        # Discover available MCP tools and their security requirements
        response = await session.list_tools()
        for tool in response.tools:
            self.tool_to_session[tool.name] = session

            # Convert to OpenAI function format with OAuth scope metadata
            openai_tool = {
                "type": "function",
                "function": {
                    "name": tool.name,
                    "description": tool.description,
                    "parameters": tool.inputSchema,
                    "x-oauth-scopes": self._get_required_scopes(tool.name)
                }
            }
            self.available_tools.append(openai_tool)

    async def call_mcp_tool(self, tool_call, tool_name):
        """Execute MCP tool with OAuth scope validation."""
        # Verify JWT has required scopes for this tool
        required_scopes = self._get_required_scopes(tool_name)
        if not await self._verify_token_scopes(required_scopes):
            raise PermissionError(f"Token missing required scopes: {required_scopes}")

        # Get MCP session and execute tool
        session = self.tool_to_session[tool_name]
        tool_args = json.loads(tool_call.function.arguments)
        result = await session.call_tool(tool_name, arguments=tool_args)

        return result

    async def process_secure_query(self, query: str):
        """Process query with security-aware tool execution."""
        # ... OpenAI completion setup

        try:
            response = await self.openai_client.chat.completions.create(
                model="gpt-4",
                messages=[{"role": "user", "content": query}],
                tools=self.available_tools,
                tool_choice="auto"
            )

            # Handle tool calls with security checks
            if response.choices[0].message.tool_calls:
                for tool_call in response.choices[0].message.tool_calls:
                    tool_name = tool_call.function.name

                    try:
                        # Execute tool with scope verification
                        result = await self.call_mcp_tool(tool_call, tool_name)
                        # ... result handling

                    except PermissionError as e:
                        print(f"🚫 Security error: {e}")

        except httpx.HTTPStatusError as e:
            if e.response.status_code == 401:
                # Token expired, refresh and retry
                self.access_token = None
                return await self.process_secure_query(query)
            # ... other error handling


# ... main function and demo code
This implementation shows how to properly handle OAuth authentication, token refresh, scope verification, and secure communication with our MCP server. Notice how we check scopes before executing tools and handle various security-related errors gracefully.
This implementation provides robust security patterns for AI frameworks, with layered protections from OAuth to TLS. Each component provides secure tool execution through proper authentication and authorization.
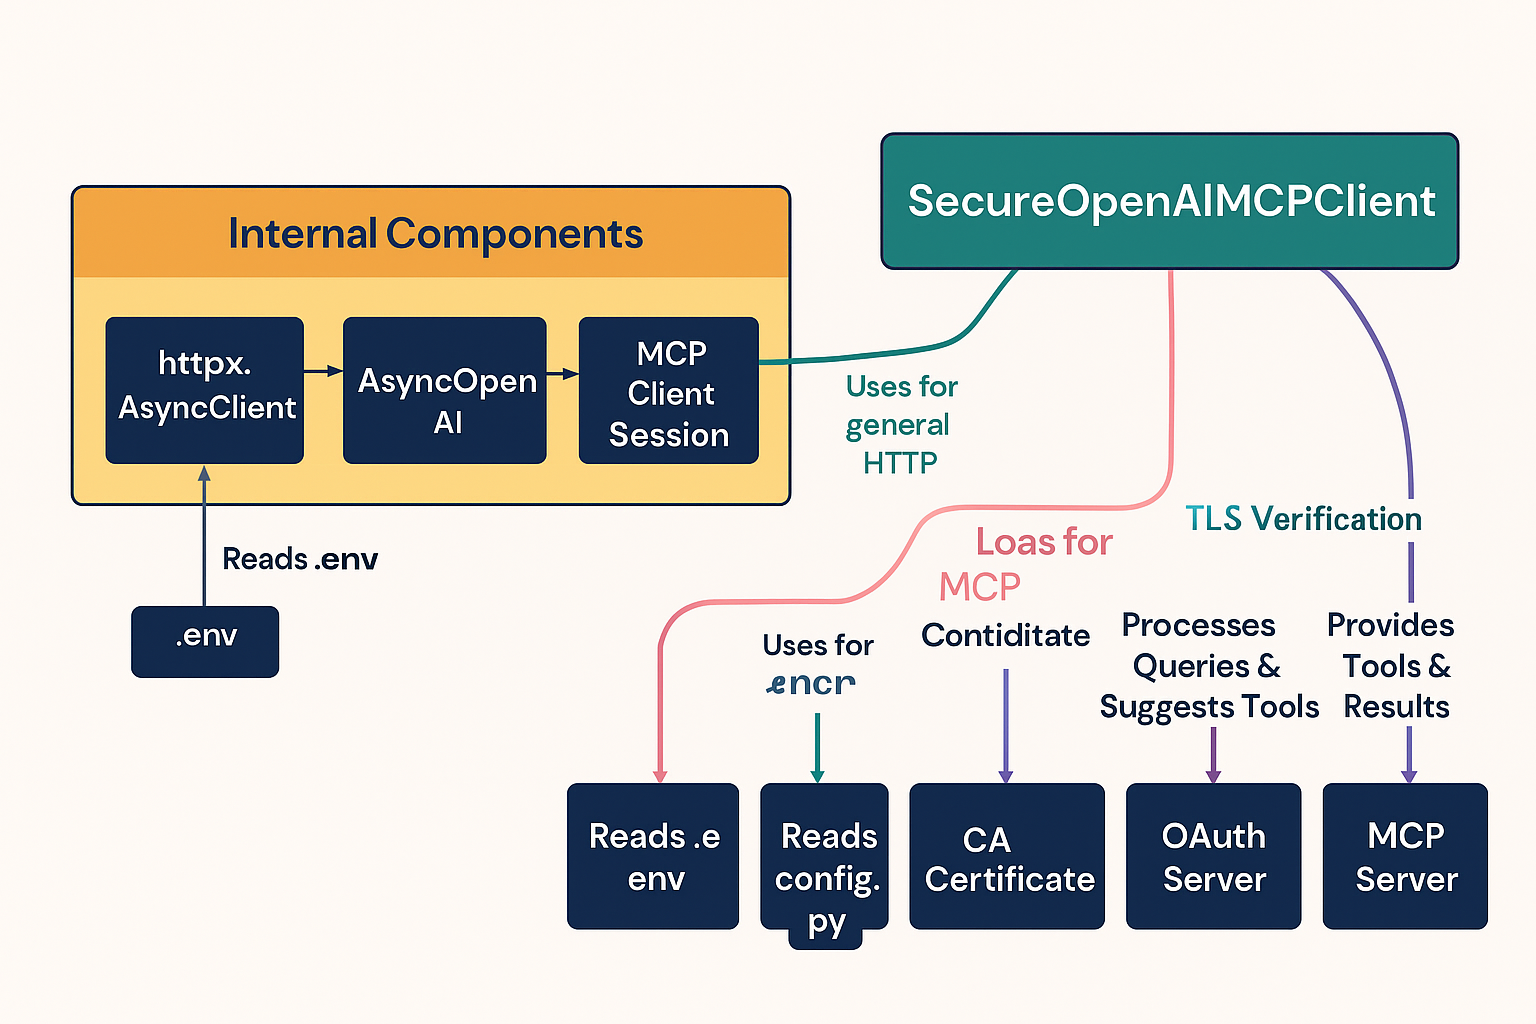
Understanding the OpenAI Integration Flow
The provided code for the SecureOpenAIMCPClient is a blueprint for a production-grade client. Its key features are:
1.Real Authentication: Instead of mocking a JWT, it calls an actual OAuth token endpoint (get_oauth_token) to fetch a real access token. This is how a machine-to-machine (M2M) application would securely authenticate.
2.Tool Discovery and Scopes: It is designed to discover available tools from the MCP server and map them to the required OAuth scopes (_get_required_scopes).
3.Security-Aware Execution: It checks if its token has the necessary permissions (_verify_token_scopes) before attempting to call a tool.
4.Error Handling: It includes logic to handle common security-related HTTP errors, such as 401 Unauthorized (for expired tokens) and 429 Too Many Requests (for rate limiting).
The OpenAI implementation above demonstrates the core security patterns that we’ll reuse across different AI providers. Let’s explore how Anthropic’s native API handles these security requirements with some key architectural differences.
Running open-ai and other examples
To test out the clients, I use the following command in a Terminal.
# Start all services (nginx, OAuth, MCP, Redis)
task docker-up


# View logs
task docker-logs


# Run AI clients against Docker services
task run-openai-client     # OpenAI client with HTTPS
task run-anthropic-client  # Anthropic client with HTTPS
task run-langchain-client  # LangChain client with HTTPS
task run-dspy-client       # DSPy client with HTTPS
task run-litellm-client    # LiteLLM client with HTTPS


# Stop all services
task docker-down
For more details, download the source and go through the README.md. It should only take about five minutes to setup and run.
$ task run-openai-client
task: [run-openai-client] poetry run python src/secure_clients/openai_client.py
🤖 Secure OpenAI MCP Client Demo
==================================================
🔍 Checking OAuth server...
✅ OAuth server is running at https://localhost:8443
🔌 Connecting to secure MCP server...
✅ Connected! Available tools: 3
   - get_customer_info
   - create_support_ticket
   - calculate_account_value

📝 Test Query 1: Look up customer 12345 and check their account status
✅ JWT signature verification successful
✅ Token has required scopes: ['customer:read']

🔧 Tool: get_customer_info
──────────────────────────────────────────────────
👤 Customer ID: 12345
📛 Name: Customer 12345
✅ Status: active
💎 Account Type: premium
📧 Email: customer12345@example.com
📞 Phone: +1-555-0123
──────────────────────────────────────────────────
✅ Query processed successfully

📝 Test Query 2: Create a high-priority support ticket for customer 67890 about billing issues
✅ JWT signature verification successful
✅ Token has required scopes: ['ticket:create']

🔧 Tool: create_support_ticket
──────────────────────────────────────────────────
🎫 Ticket ID: TKT-1750385976-678
👤 Customer ID: 67890
📋 Subject: Billing Issues
📝 Description: Customer is experiencing issues related to billing. Assistance required urgently.
🚨 Priority: high
⏰ Resolution Time: 24-48 hours
──────────────────────────────────────────────────
✅ Query processed successfully

📝 Test Query 3: Calculate the total account value for customer 12345 with purchases: $150, $300, $89
✅ JWT signature verification successful
✅ Token has required scopes: ['account:calculate']

🔧 Tool: calculate_account_value
──────────────────────────────────────────────────
👤 Customer ID: 12345
💰 Total Value: $539.00
📊 Average Purchase: $179.67
🛍️ Number of Purchases: 3
📈 Highest Purchase: $300.00
📉 Lowest Purchase: $89.00
🏆 Account Tier: BRONZE
──────────────────────────────────────────────────
✅ Query processed successfully
The Task is defined in a Taskfile.yaml, which is basically a YAML version of a Makefile system.
  run-openai-client:
    desc: "Run the secure OpenAI client demo"
    cmds:
      - poetry run python src/secure_clients/openai_client.py
Getting started should be as simple as putting your API keys into the .env file and running task setup then you are off to the races.
Anthropic Native Integration: Built-in Security Support
Anthropic’s native API has excellent support for secure tool execution. Our implementation demonstrates how to integrate Claude with our OAuth-protected MCP server, providing real-time conversation flow with tool result analysis - Available at src/secure_clients/anthropic_client.py.
secure_clients/anthropic_client.py
"""
Secure Anthropic integration with OAuth-protected MCP server.
Similar to OpenAI client with Anthropic-specific adaptations.
"""
import asyncio
from anthropic import AsyncAnthropic
from mcp import ClientSession
# ... similar imports as OpenAI example
class SecureAnthropicMCPClient:
"""Anthropic client with comprehensive MCP security integration."""
def __init__(self, anthropic_api_key: str, oauth_config: dict):
# Initialize with AsyncAnthropic instead of AsyncOpenAI
self.anthropic_client = AsyncAnthropic(api_key=anthropic_api_key)
# ... rest identical to OpenAI implementation
# Methods identical to OpenAI client:
# - get_oauth_token() - Same OAuth flow
# - get_oauth_public_key() - Same JWKS retrieval
# - _verify_token_scopes() - Same JWT verification with RS256
# - _get_required_scopes() - Same scope mapping
async def connect_to_secure_mcp_server(self):
"""Connect to OAuth-protected MCP server with TLS."""
# ... identical OAuth token and TLS setup as OpenAI
# Key difference: Anthropic tool format
response = await session.list_tools()
for tool in response.tools:
self.tool_to_session[tool.name] = session
# Convert to Anthropic format (different from OpenAI)
anthropic_tool = {
"name": tool.name, # Not nested under "function"
"description": tool.description,
"input_schema": tool.inputSchema # Named differently
}
self.available_tools.append(anthropic_tool)
async def call_mcp_tool(self, tool_name: str, tool_input: dict) -> dict:
"""Execute MCP tool with OAuth scope validation."""
# Identical security validation as OpenAI
required_scopes = self._get_required_scopes(tool_name)
if not await self._verify_token_scopes(required_scopes):
raise PermissionError(f"Token missing required scopes: "
" {required_scopes}")
# Same execution, different parameter format
session = self.tool_to_session[tool_name]
result = await session.call_tool(tool_name, arguments=tool_input)
return result
async def process_secure_query(self, query: str):
"""Process query with Claude and handle tool use securely."""
messages = [{"role": "user", "content": query}]
# Key differences in API call:
response = await self.anthropic_client.messages.create(
model=Config.ANTHROPIC_MODEL, # Anthropic model name
messages=messages,
tools=self.available_tools, # Same tools, different format
max_tokens=1024 # Required parameter
)
# Anthropic-specific response handling
tool_results = []
for content_block in response.content:
if content_block.type == "text":
print(content_block.text)
# Anthropic's tool response format
elif content_block.type == "tool_use":
print(f"\n🔧 Using tool: {content_block.name}")
try:
# Direct access to tool input (not nested)
result = await self.call_mcp_tool(
content_block.name,
content_block.input # Direct input access
)
# Store results with Anthropic's tool_use_id
if hasattr(result, 'content') and result.content:
tool_results.append({
# Anthropic specific
"tool_use_id": content_block.id,
"content": result.content[0].text
})
except PermissionError as e:
print(f"🚫 Security error: {e}")
# Anthropic's multi-turn conversation with tool results
if tool_results:
# Add assistant's message with tool use
messages.append({"role": "assistant", "content": response.content})
# Add tool results as user message
messages.append({"role": "user", "content": tool_results})
# Get Claude's analysis of results
final_response = await self.anthropic_client.messages.create(
model=Config.ANTHROPIC_MODEL,
messages=messages,
max_tokens=1024
)
# ... display final response
# ... main function similar to OpenAI example
```**Key Differences from OpenAI Implementation:**1.**Client Initialization**: Uses `AsyncAnthropic` instead of `AsyncOpenAI`
2.**Tool Format**:
- OpenAI: Nested under `"function"` with `"type": "function"`
- Anthropic: Flat structure with `name`, `description`, `input_schema`
3.**API Call Parameters**:
- Anthropic requires `max_tokens` parameter
- Different model naming convention
4.**Response Handling**:
- Anthropic uses `content_block.type == "tool_use"`
- Direct access to `content_block.input` (not nested)
- Uses `tool_use_id` for result correlation
5.**Multi-turn Conversation**:
- Anthropic requires explicit message history management
- Tool results sent back as user messages for analysis**Identical Components**(not shown in detail):
- OAuth token acquisition and management
- JWT verification with RS256 and JWKS
- TLS configuration and certificate handling
- Scope-based permission validation
- Rate limiting and error handling
- MCP session management
The security architecture remains the same - only the AI provider's API format differs.
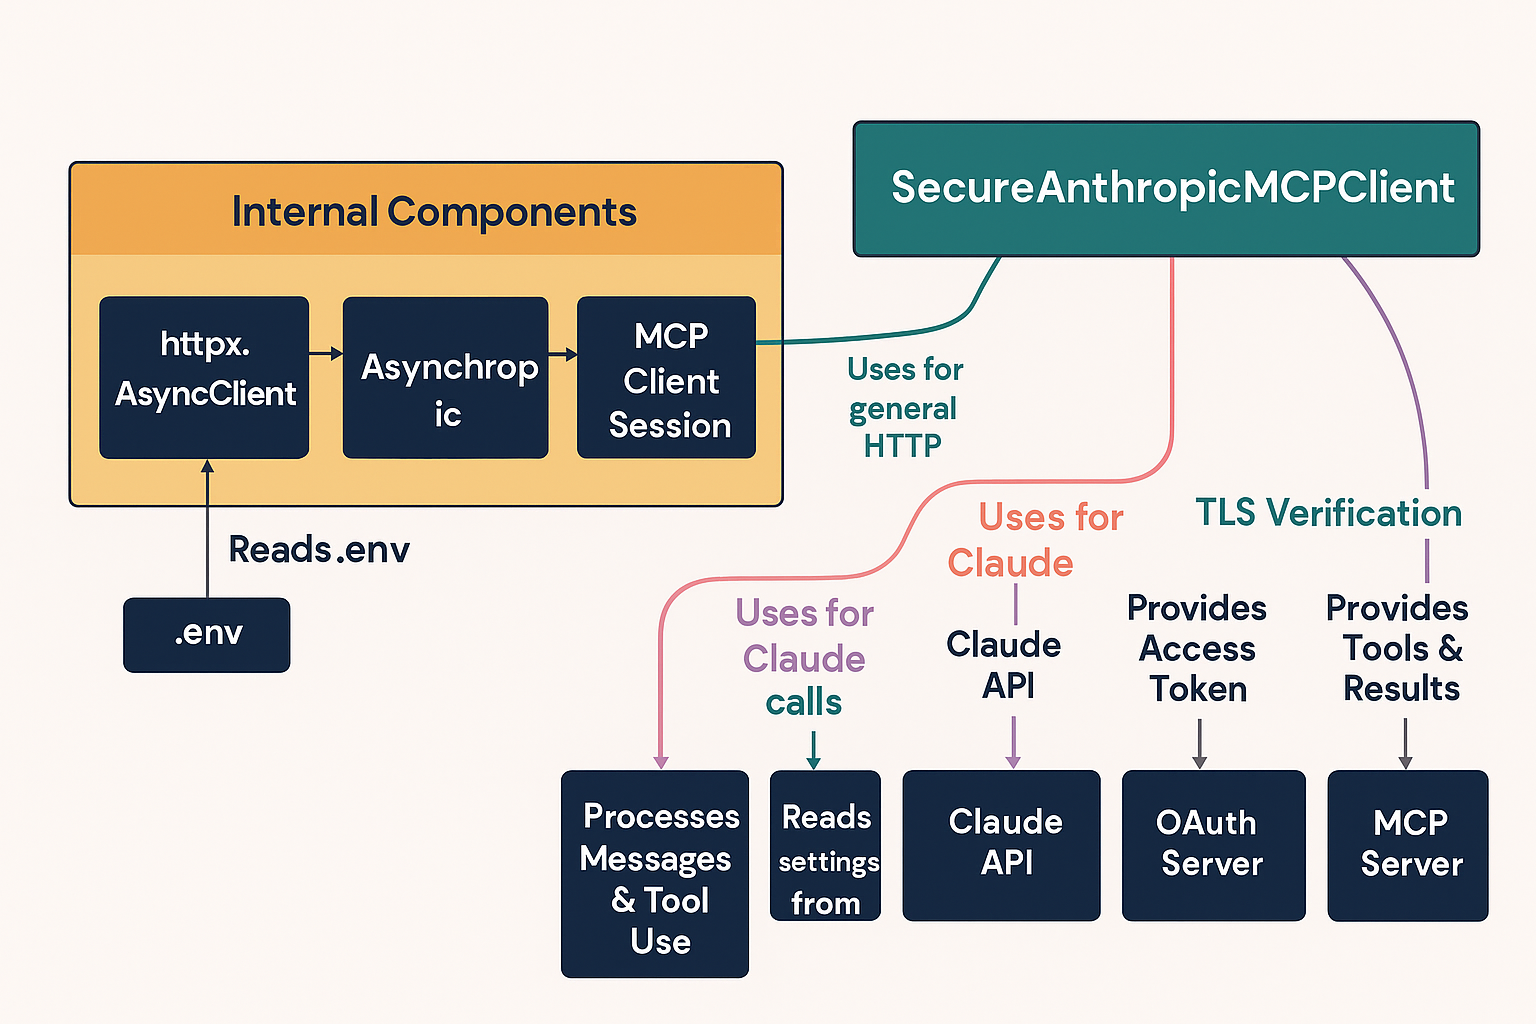
The Anthropic implementation showcases how to integrate Claude's capabilities with our secure MCP architecture while maintaining robust security practices. The key strength of this implementation is how it preserves all the core security features (OAuth 2.1, JWT verification, TLS) while adapting to Anthropic's unique API structure.
One notable aspect is how the Anthropic client handles tool execution differently from OpenAI. While the security validation remains identical, the tool format and response handling are structured to match Claude's expectations. The implementation includes careful handling of tool results and maintains conversation context, which is crucial for Claude's analysis capabilities.
A particularly elegant feature is how the client manages the multi-turn conversation flow, allowing Claude to analyze tool results and provide comprehensive responses while maintaining security throughout the entire interaction chain.
### Running the Anthropic Example
Next, let’s run the Anthropic example.
```yaml
% task run-anthropic-client
task: [run-anthropic-client] poetry run python src/secure_clients/anthropic_client.py
🤖 Secure Anthropic Claude MCP Client Demo
==================================================
🔍 Checking OAuth server...
✅ OAuth server is running at https://localhost:8443
🔌 Connecting to secure MCP server...
✅ Connected! Available tools: 3
- get_customer_info
- create_support_ticket
- calculate_account_value
📝 Test Query 1: Look up customer ABC123 and check their account status
🤖 Claude: I'll look up the customer information for ABC123.
✅ JWT signature verification successful
✅ Token has required scopes: ['customer:read']
🔧 Tool: get_customer_info
──────────────────────────────────────────────────
👤 Customer ID: ABC123
📛 Name: Customer ABC123
✅ Status: active
💎 Account Type: premium
📧 Email: customerabc123@example.com
📞 Phone: +1-555-0123
──────────────────────────────────────────────────
🎯 Claude's Analysis: Here's the account status for customer ABC123:**Customer Information:**-**Customer ID:**ABC123
- **Name:**Customer ABC123
- **Account Status:**Active ✅
- **Account Type:**Premium
- **Last Activity:**June 20, 2025 at 2:24 AM
- **Email:**customerabc123@example.com
- **Phone:**+1-555-0123
The customer's account is currently active and in good standing with premium account privileges.
✅ Query processed successfully
📝 Test Query 2: Create a high-priority support ticket for customer XYZ789 about billing issues with the description 'Customer unable to access premium features after payment'
🤖 Claude: I'll create a high-priority support ticket for customer XYZ789 with the billing issue details you provided.
✅ JWT signature verification successful
✅ Token has required scopes: ['ticket:create']
🔧 Tool: create_support_ticket
──────────────────────────────────────────────────
🎫 Ticket ID: TKT-1750386288-XYZ
👤 Customer ID: XYZ789
📋 Subject: billing issues
📝 Description: Customer unable to access premium features after payment
🚨 Priority: high
⏰ Resolution Time: 24-48 hours
──────────────────────────────────────────────────
🎯 Claude's Analysis: ✅**Support ticket created successfully!****Ticket Details:**-**Ticket ID:**TKT-1750386288-XYZ
- **Customer ID:**XYZ789
- **Subject:**Billing issues
- **Description:**Customer unable to access premium features after payment
- **Priority:**High
- **Status:**Open
- **Created:**June 20, 2025 at 02:24:48 UTC
- **Estimated Resolution:**24-48 hours
The high-priority billing ticket has been created and is now in the support queue. The customer should expect resolution within 24-48 hours given the high priority status.
✅ Query processed successfully
📝 Test Query 3: Calculate the total account value for customer ABC123 with purchases: [150.0, 300.0, 89.50]
🤖 Claude: I'll calculate the total account value for customer ABC123 with the purchase amounts you provided.
✅ JWT signature verification successful
✅ Token has required scopes: ['account:calculate']
🔧 Tool: calculate_account_value
──────────────────────────────────────────────────
👤 Customer ID: ABC123
💰 Total Value: $539.50
📊 Average Purchase: $179.83
🛍️ Number of Purchases: 3
📈 Highest Purchase: $300.00
📉 Lowest Purchase: $89.50
🏆 Account Tier: BRONZE
──────────────────────────────────────────────────
🎯 Claude's Analysis: The total account value for customer ABC123 is**$539.50**.
Here's a breakdown of the calculation:
- **Total value**: $539.50
- **Number of purchases**: 3
- **Average purchase**: $179.83
- **Largest purchase**: $300.00
- **Smallest purchase**: $89.50
- **Account tier**: Bronze
✅ Query processed successfully
It isn’t a real example unless it works. Anthropic-MCP integration works! Whew! We just threw a bunch of test queries at it and it handled everything super smoothly. The system keeps everything locked down tight with OAuth authentication, JWT checks, and makes sure everything has the right permissions while working with Claude’s AI smarts.
The first query pulled up info for customer ABC123 - it checked all the security boxes (made sure the OAuth token was legit and had the right ‘customer:read’ permissions) before spilling any details. Then we tested making a support ticket, which showed how it handles more sensitive stuff that needs ’ticket:create’ permission. Last up, we had it crunch some account numbers, proving it can do math while keeping everything secure.
The cool thing is, it never skips a beat on security - always checking those JWT signatures and permissions before doing anything. You can see every security check passing, how it handles any hiccups, and how it presents everything in a way that makes sense. It’s a perfect example of mixing Claude’s AI magic with rock-solid security in a system that’s ready for the real world.
LangChain: Enterprise-Ready Security Integration
LangChain provides a powerful framework for building complex AI applications.
LangChain is a framework designed to simplify the development of applications using large language models (LLMs). It provides a standardized interface for working with various AI models while offering powerful features like prompt management, chain composition, and tool integration. The framework excels at orchestrating complex workflows by breaking them down into manageable “chains” of operations.
One of LangChain’s key strengths is its ability to combine multiple AI operations with external tools and data sources, making it particularly valuable for enterprise applications that require structured interaction with LLMs. Its agent-based architecture allows for dynamic tool selection and execution, while maintaining consistent security and error handling patterns.
LangChain’s architecture enables clean integration of security controls with AI logic. Through careful tool wrapping and agent configuration, we maintain strong security boundaries while using LangChain’s powerful orchestration capabilities.
Our secure implementation demonstrates how to maintain robust security practices while using LangChain’s extensive capabilities - available src/secure_clients/langchain_client.py.
LangChain’s flexibility makes it perfect for enterprise environments where security is paramount. Here’s how to integrate LangChain with our secure MCP server:
secure_clients/langchain_client.py
"""
Secure LangChain integration with OAuth-protected MCP server.
Builds on OpenAI/Anthropic examples with LangChain-specific adaptations.
"""
from langchain.agents import AgentExecutor, create_react_agent
from langchain.tools import Tool
from langchain_openai import ChatOpenAI
from langchain.prompts import PromptTemplate
import asyncio
import json

class SecureMCPTool(Tool):
    """LangChain tool wrapper for secure MCP operations."""

    def __init__(self, name: str, description: str, mcp_client, tool_name: str):
        super().__init__(
            name=name,
            description=description,
            func=self._create_sync_wrapper(mcp_client, tool_name)
        )
        self.mcp_client = mcp_client
        self.tool_name = tool_name

    def _create_sync_wrapper(self, mcp_client, tool_name):
        """Create synchronous wrapper for async MCP calls."""
        def wrapper(input_str: str) -> str:
            # LangChain passes string inputs, need to parse
            try:
                args = json.loads(input_str)
                # Sync wrapper around async MCP call
                result = asyncio.run(
                    mcp_client.call_mcp_tool(tool_name, args)
                )
                return json.dumps(result)
            except Exception as e:
                return f"Error: {str(e)}"
        return wrapper

class SecureLangChainMCPClient:
    """LangChain client with OAuth-protected MCP integration."""

    def __init__(self, openai_api_key: str, oauth_config: dict):
        # Initialize LangChain's ChatOpenAI
        self.llm = ChatOpenAI(
            model="gpt-4-turbo-preview",
            temperature=0,
            api_key=openai_api_key
        )
        self.oauth_config = oauth_config
        self.tools = []

    # Inherits from previous examples:
    # - get_oauth_token() - Same OAuth flow
    # - get_oauth_public_key() - Same JWKS retrieval
    # - _verify_token_scopes() - Same JWT verification
    # - connect_to_secure_mcp_server() - Same TLS/OAuth setup

    async def initialize(self):
        """Initialize secure connection and create LangChain tools."""
        # Connect to MCP server (identical to OpenAI/Anthropic)
        await self.connect_to_secure_mcp_server()

        # Key difference: Create LangChain Tool wrappers
        for tool in self.available_mcp_tools:
            langchain_tool = SecureMCPTool(
                name=tool.name,
                description=tool.description,
                mcp_client=self,
                tool_name=tool.name
            )
            self.tools.append(langchain_tool)

        # Create ReAct agent with custom prompt
        prompt = PromptTemplate.from_template(
            """You are a helpful assistant with access to secure MCP tools.

Available tools: {tools}
Tool input should be valid JSON.

Question: {input}
{agent_scratchpad}"""
        )

        # Create agent executor
        self.agent = create_react_agent(
            llm=self.llm,
            tools=self.tools,
            prompt=prompt
        )

        self.agent_executor = AgentExecutor(
            agent=self.agent,
            tools=self.tools,
            verbose=True,
            handle_parsing_errors=True
        )

    async def call_mcp_tool(self, tool_name: str, args: dict) -> dict:
        """Execute MCP tool with security validation."""
        # Identical to OpenAI/Anthropic implementation
        required_scopes = self._get_required_scopes(tool_name)
        if not await self._verify_token_scopes(required_scopes):
            raise PermissionError(f"Token missing required scopes: {required_scopes}")

        session = self.tool_to_session[tool_name]
        result = await session.call_tool(tool_name, arguments=args)
        return result

    async def process_query(self, query: str) -> str:
        """Process query through LangChain agent."""
        try:
            # LangChain handles tool selection and execution
            result = await self.agent_executor.ainvoke({"input": query})
            return result["output"]
        except Exception as e:
            # Handle token refresh (similar to previous examples)
            if "401" in str(e):
                self.access_token = None
                await self.get_oauth_token()
                return await self.process_query(query)
            return f"Error: {str(e)}"


# Usage example
async def main():
    client = SecureLangChainMCPClient(
        openai_api_key="...",
        oauth_config={...}  # Same config as previous examples
    )

    await client.initialize()

    # LangChain handles tool selection automatically
    response = await client.process_query(
        "Get info for customer ABC123 and create a high priority ticket"
    )
    print(response)
```**Key Differences from OpenAI/Anthropic:**1.**Tool Abstraction**:
    - Wraps MCP tools in LangChain's `Tool` class
    - Requires sync wrapper for async MCP calls
    - String-based input/output (JSON serialization)
2.**Agent Architecture**:
    - Uses ReAct agent instead of direct API calls
    - Agent handles tool selection logic
    - Prompt template defines agent behavior
3.**Execution Flow**:
    - LangChain manages conversation and tool calling
    - No manual tool result handling
    - Agent executor provides built-in error recovery
4.**Integration Points**:
    - Same OAuth/JWT/TLS security as previous examples
    - Same scope validation before tool execution
    - Async-to-sync bridge for LangChain compatibility**Advantages**:

- Automatic tool selection and chaining
- Built-in reasoning about when to use tools
- Easier to add complex multi-tool workflows
- Standard LangChain ecosystem compatibility**Security Features**(inherited from previous examples):

- OAuth 2.1 with client credentials flow
- JWT verification with RS256 and JWKS
- TLS encryption for all connections
- Scope-based tool permissions
- Automatic token refresh on expiry

The security architecture remains identical - only the agent framework differs.

The LangChain code example demonstrates a secure integration with MCP through comprehensive JWT authentication and security validations. The SecureLangChainMCPClient establishes a robust security foundation by inheriting core features like OAuth token management, JWT verification with JWKS, and secure TLS connections. For every tool execution, the system performs thorough security validation through call_mcp_tool(), providing proper verification of JWT token scopes before granting access. To maintain continuous operation, the client actively monitors for token expiration by detecting 401 errors and implements automatic OAuth token refresh when needed.

Security is maintained seamlessly across the LangChain architecture through the SecureMCPTool wrapper class, which preserves security context while adapting to LangChain's synchronous interface requirements. This implementation provides comprehensive protection of all AI interactions by maintaining JWT scope validation, persistent TLS connections, proper authentication token lifecycle management, and preservation of security context throughout LangChain's agent-based architecture.


### Running the langchain example

We should probably run the langchain example and make sure it is working.

```bash
% task run-langchain-client
task: [run-langchain-client] poetry run python src/secure_clients/langchain_client.py
🔗 Secure LangChain MCP Client Demo
==================================================
🔍 Checking OAuth server...
✅ OAuth server is running at https://localhost:8443
🔌 Connecting to secure MCP server...
✅ Connected! Available tools: 3
   - get_customer_info
   - create_support_ticket
   - calculate_account_value
🤖 Setting up LangChain agent...
✅ LangChain agent ready!

🎭 Running 3 customer service scenarios...

📞 Scenario 1: Look up customer ABC123 and summarize their account status
✅ JWT signature verification successful
✅ Token has required scopes: ['customer:read']
✅ JWT signature verification successful
✅ Token has required scopes: ['customer:read']
🤖 LangChain Agent Response: Customer ABC123 has an active account with premium
status. Their last recorded activity was on June 20, 2025. If you need more
details or specific actions regarding this customer, let me know!
────────────────────────────────────────────────────────────

📞 Scenario 2: Create a high-priority support ticket for customer XYZ789 about
billing issues
✅ JWT signature verification successful
✅ Token has required scopes: ['ticket:create']
🤖 LangChain Agent Response: A high-priority support ticket has been created
for customer XYZ789 regarding billing issues. The support team will investigate
 and resolve the problem as soon as possible.

- Ticket ID: TKT-1750387021-XYZ
- Subject: Billing Issues
- Priority: High
- Status: Open
- Estimated Resolution: 24-48 hours

If you need further assistance or want to add more details, please let me know!
────────────────────────────────────────────────────────────

📞 Scenario 3: Calculate account value for customer ABC123 with purchases: [150.0, 300.0, 89.50]
✅ JWT signature verification successful
✅ Token has required scopes: ['account:calculate']
🤖 LangChain Agent Response: Here is the account value calculation for customer
ABC123:

- Total purchases: $539.50
- Average purchase: $179.83
- Number of purchases: 3
- Largest purchase: $300.00
- Smallest purchase: $89.50
- Account tier: Bronze

Let me know if you need further details or analysis!
────────────────────────────────────────────────────────────

📊 Summary: 3/3 scenarios completed successfully
Running the LangChain example demonstrated successful integration with our secure MCP server. The test connected to both the OAuth and MCP servers, verified access to three tools (get_customer_info, create_support_ticket, and calculate_account_value), and confirmed proper initialization of the LangChain agent.
Throughout the testing process, the example adhered to strict security protocols. Each operation underwent JWT signature verification, and the scope validation for tool access, specifically for the permissions customer:read, ticket:create, and account:calculate, was monitored. The security infrastructure proved reliable across all test cases. This can and should also be done at the MCP server layer. It might be optional at this layer.
The example effectively handled three distinct customer service scenarios in practical applications, showcasing its versatility and compliance with security standards. The integration successfully merged LangChain’s AI capabilities with our robust security architecture, maintaining consistent authentication and authorization for each operation. This comprehensive test confirms that our implementation delivers powerful AI functionality with enterprise-grade security protection in mind.
DSPy: Secure Programmatic AI Integration
DSPy’s programmatic approach to AI requires special security considerations.
Relies on explicit program structure and optimization metrics to transform unpredictable LLM outputs into reliable software components. When securing DSPy integrations with MCP, we need to verify that this programmatic approach aligns with our security architecture while preserving DSPy’s powerful optimization capabilities. Check out the working version of our client here: src/secure_clients/dspy_client.py.
Here’s how to integrate DSPy with our secure MCP server:
secure_clients/dspy_client.py
"""
Secure DSPy integration with OAuth-protected MCP server.
Builds on previous examples with DSPy's programmatic approach.
"""
import dspy
from dspy.teleprompt import BootstrapFewShot
import json
import asyncio

class SecureMCPSignature(dspy.Signature):
    """Define the signature for secure MCP operations."""
    query = dspy.InputField(desc="User query requiring MCP tool access")
    tool_name = dspy.OutputField(desc="Selected MCP tool name")
    tool_args = dspy.OutputField(desc="Arguments for the MCP tool as JSON")
    result = dspy.OutputField(desc="Result from MCP tool execution")

class SecureMCPModule(dspy.Module):
    """DSPy module for secure MCP integration."""

    def __init__(self, mcp_client):
        super().__init__()
        self.mcp_client = mcp_client
        # DSPy's ChainOfThought for tool selection
        self.generate_tool_call = dspy.ChainOfThought(SecureMCPSignature)

    def forward(self, query):
        # DSPy generates tool call through LLM reasoning
        prediction = self.generate_tool_call(query=query)

        # Execute MCP tool with same security as previous examples
        try:
            result = asyncio.run(
                self.mcp_client.call_mcp_tool(
                    prediction.tool_name,
                    json.loads(prediction.tool_args)
                )
            )
            prediction.result = json.dumps(result)
        except Exception as e:
            prediction.result = f"Error: {str(e)}"

        return prediction

class SecureDSPyMCPClient:
    """DSPy client with OAuth-protected MCP integration."""

    def __init__(self, openai_api_key: str, oauth_config: dict):
        # Configure DSPy with OpenAI backend
        dspy.settings.configure(
            lm=dspy.OpenAI(
                model="gpt-4-turbo-preview",
                api_key=openai_api_key
            )
        )
        self.oauth_config = oauth_config

    # Inherits from previous examples:
    # - get_oauth_token() - Same OAuth flow
    # - get_oauth_public_key() - Same JWKS retrieval
    # - _verify_token_scopes() - Same JWT verification
    # - connect_to_secure_mcp_server() - Same TLS/OAuth setup
    # - call_mcp_tool() - Same security validation

    async def initialize(self):
        """Initialize secure connection and DSPy modules."""
        # Connect to MCP server (identical to previous examples)
        await self.connect_to_secure_mcp_server()

        # Key difference: Create DSPy module
        self.mcp_module = SecureMCPModule(self)

        # DSPy-specific: Bootstrap with examples for few-shot learning
        examples = [
            dspy.Example(
                query="Get info for customer ABC123",
                tool_name="get_customer_info",
                tool_args='{"customer_id": "ABC123"}',
                result='{"customer_id": "ABC123", "name": "John Doe"}'
            ),
            dspy.Example(
                query="Create high priority ticket for login issues",
                tool_name="create_support_ticket",
                tool_args='{"priority": "high", "subject": "Login issues"}',
                result='{"ticket_id": "TKT-001", "status": "created"}'
            )
        ]

        # Compile module with optimization
        teleprompter = BootstrapFewShot(metric=self.validate_result)
        self.compiled_module = teleprompter.compile(
            self.mcp_module,
            trainset=examples
        )

    def validate_result(self, example, prediction, trace=None):
        """Validate DSPy predictions for optimization."""
        # Success metric for DSPy optimization
        return "Error" not in prediction.result

    async def process_query(self, query: str) -> dict:
        """Process query through DSPy module."""
        try:
            # DSPy handles tool selection and argument generation
            prediction = self.compiled_module(query=query)

            return {
                "tool_used": prediction.tool_name,
                "arguments": prediction.tool_args,
                "result": prediction.result
            }
        except Exception as e:
            # Handle token refresh (similar to previous examples)
            if "401" in str(e):
                self.access_token = None
                await self.get_oauth_token()
                return await self.process_query(query)
            return {"error": str(e)}


# Usage example
async def main():
    client = SecureDSPyMCPClient(
        openai_api_key="...",
        oauth_config={...}  # Same config as previous examples
    )

    await client.initialize()

    # DSPy automatically optimizes tool selection
    response = await client.process_query(
        "What's the account value for customer DEF456?"
    )
    print(response)

```**Key Differences from Previous Examples:**1.**Declarative Signatures**:
    - Uses `dspy.Signature` to define input/output schema
    - Structured prediction format
    - Type-safe field definitions
2.**Programmatic Optimization**:
    - Few-shot learning with examples
    - BootstrapFewShot for automatic prompt optimization
    - Metric-based validation for improvement
3.**Module Architecture**:
    - DSPy modules instead of direct API calls
    - ChainOfThought for reasoning about tool selection
    - Compiled modules for optimized performance
4.**Execution Flow**:
    - DSPy generates both tool name and arguments
    - Single forward pass for complete prediction
    - Built-in optimization based on success metrics**Unique DSPy Features**:

- **Automatic Prompt Engineering**: DSPy optimizes prompts based on examples
- **Reproducible Results**: Compiled modules provide consistent behavior
- **Metrics-Driven**: Success metrics guide optimization
- **Modular Design**: Easy to compose complex workflows**Security Features**(inherited):

- OAuth 2.1 with client credentials flow
- JWT verification with RS256 and JWKS
- TLS encryption for all connections
- Scope-based tool permissions
- Automatic token refresh on expiry**Advantages over Previous Approaches**:

- No manual prompt engineering required
- Automatic optimization based on examples
- More predictable and testable behavior
- Better separation of concerns (signature vs implementation)

The security architecture remains identical - DSPy just provides a more programmatic and optimizable interface for tool selection and execution.

Let's explore this DSPy example that demonstrates straightforward secure AI integrations.

The `SecureMCPSignature` class serves as a contract for AI operations, defining both inputs (queries) and outputs (tool names, arguments, and results). It acts as a structured interface that precisely formats requests and responses.

The `SecureMCPModule` brings sophisticated functionality through DSPy's "Chain of Thought" reasoning. Rather than randomly selecting tools, it methodically analyzes each query to determine the most appropriate tool for the task.

The `SecureDSPyMCPClient` integrates several powerful features:

- Few-shot learning capabilities that allow training through examples
- Self-improving optimization based on performance metrics
- Comprehensive security features including OAuth, JWT, and TLS
- Intelligent error handling with automatic token refresh so it handles rate limiting

The system's elegance lies in its simplicity: input a query like "What's the account value for customer DEF456?" and it handles everything—tool selection, request formatting, and execution—automatically. This eliminates the complexity of manual prompt engineering.


### Running the DSPy example

```bash
task run-dspy-client
task: [run-dspy-client] poetry run python src/secure_clients/dspy_client.py
🔮 Secure DSPy MCP Client Demo
==================================================
🔍 Checking OAuth server...
✅ OAuth server is running at https://localhost:8443
🔌 Connecting to secure MCP server...
✅ Connected! Available tools: 3
   - get_customer_info: Get customer information with validation.

    Args:
        customer_id: Customer ID (5-10 alphanumeric characters, e.g., 'ABC123')

    Returns:
        Customer information including name, status, and last activity

   - create_support_ticket: Create support ticket with validation.

    Args:
        customer_id: Customer ID (5-10 alphanumeric characters)
        subject: Ticket subject (1-200 characters)
        description: Ticket description (1-2000 characters)
        priority: Priority level ('low', 'normal', 'high', 'urgent')

    Returns:
        Created ticket information with ticket ID and details

   - calculate_account_value: Calculate account value with validation.

    Args:
        customer_id: Customer ID (5-10 alphanumeric characters)
        amounts: List of purchase amounts (1-100 amounts, each 0-1,000,000)

    Returns:
        Account value calculation including total, average, and statistics

🤖 Setting up DSPy agent...
✅ DSPy agent ready!

📝 Scenario 1: Check the account status for customer ABC123 and calculate their total purchase value with amounts [250.0, 175.50, 82.25]
✅ JWT signature verification successful
✅ Token has required scopes: ['account:calculate']
✅ JWT signature verification successful
✅ Token has required scopes: ['account:calculate']
🤖 DSPy Agent Response: Customer ABC123 currently has a "bronze" account tier.
Their total purchase value, based on the amounts you provided
([250.0, 175.50, 82.25]), is $507.75. If you need more details or further
assistance, please let us know!
────────────────────────────────────────────────────────────

📝 Scenario 2: Calculate account value for customer ABC123 with purchases: $150.0, $300.0 and $89.50
🤖 DSPy Agent Response: The total account value for customer ABC123, based
on the provided purchases, is $539.50.
────────────────────────────────────────────────────────────

📊 Summary: 2/2 scenarios completed successfully
The above is the output of the DSPy example.
LiteLLM
LiteLLM is a powerful universal gateway that streamlines AI model interactions. Think of it as a Swiss Army knife for LLM integration—it seamlessly connects to over 100 AI models from industry leaders like OpenAI, Anthropic, and Cohere through a single, elegant interface. This versatility lets you switch between AI providers without changing code, making it ideal for production environments where reliability and flexibility matter most.
What makes LiteLLM special is its comprehensive feature set, including automatic retries, cost tracking, and intelligent load balancing—all while maintaining robust security. It acts as your expert AI orchestrator, handling complex provider-specific details so you can focus on building amazing applications. Check out the full example here: src/secure_clients/litellm_client.py.
LiteLLM’s ability to work with multiple LLM providers makes security even more critical. Here’s how to implement secure MCP integration with LiteLLM:
secure_clients/litellm_client.py
"""
Secure LiteLLM integration with OAuth-protected MCP server.
Universal LLM gateway building on previous security patterns.
"""
from litellm import completion
import litellm
import json
import asyncio
class SecureLiteLLMMCPClient:
"""LiteLLM client with OAuth-protected MCP integration."""
def __init__(self, oauth_config: dict, model: str = "gpt-4"):
self.oauth_config = oauth_config
self.model = model # LiteLLM supports provider/model format
self.tools = []
# LiteLLM-specific configuration
litellm.set_verbose = True
# Optional: Configure multiple providers
litellm.api_key = {
"openai": "sk-...",
"anthropic": "sk-ant-...",
"cohere": "..."
}
# Inherits from previous examples:
# - get_oauth_token() - Same OAuth flow
# - get_oauth_public_key() - Same JWKS retrieval
# - _verify_token_scopes() - Same JWT verification
# - connect_to_secure_mcp_server() - Same TLS/OAuth setup
async def initialize(self):
"""Initialize secure connection and discover tools."""
# Connect to MCP server (identical to previous examples)
await self.connect_to_secure_mcp_server()
# Format tools for LiteLLM (OpenAI-compatible format)
for tool in self.available_mcp_tools:
litellm_tool = {
"type": "function",
"function": {
"name": tool.name,
"description": tool.description,
"parameters": tool.inputSchema
}
}
self.tools.append(litellm_tool)
async def call_mcp_tool(self, tool_name: str, arguments: dict) -> dict:
"""Execute MCP tool with security validation."""
# Identical to previous examples
required_scopes = self._get_required_scopes(tool_name)
if not await self._verify_token_scopes(required_scopes):
raise PermissionError(f"Token missing required scopes: "
"{required_scopes}")
session = self.tool_to_session[tool_name]
result = await session.call_tool(tool_name, arguments=arguments)
return result
async def process_query(self, query: str) -> dict:
"""Process query through LiteLLM with MCP tools."""
messages = [{"role": "user", "content": query}]
try:
# Key difference: LiteLLM's unified interface
response = await completion(
# Can be "gpt-4", "claude-4", "command-r", etc.
model=self.model,
messages=messages,
tools=self.tools,
tool_choice="auto",
# LiteLLM handles provider-specific parameters
temperature=0,
max_tokens=1024
)
# Handle tool calls (OpenAI-compatible format)
if hasattr(response.choices[0].message, 'tool_calls'):
results = []
for tool_call in response.choices[0].message.tool_calls:
result = await self.call_mcp_tool(
tool_call.function.name,
json.loads(tool_call.function.arguments)
)
results.append(result)
# Return results with provider info
return {
"provider": response._hidden_params.get("model_provider"),
"response": response.choices[0].message.content,
"tool_results": results
}
return {"response": response.choices[0].message.content}
except Exception as e:
# Handle token refresh (same as previous)
if "401" in str(e):
self.access_token = None
await self.get_oauth_token()
return await self.process_query(query)
return {"error": str(e)}
async def switch_provider(self, provider: str, model: str):
"""Dynamically switch between LLM providers."""
# LiteLLM-specific: Easy provider switching
old_model = self.model
# Update model (LiteLLM format)
if provider in ["openai", "text-completion-openai"]:
self.model = model # e.g., "gpt-4"
else:
self.model = f"{provider}/{model}" # e.g., "anthropic/claude-3"
# Test new provider with simple query
try:
test_response = await completion(
model=self.model,
messages=[{"role": "user", "content": "test"}],
max_tokens=10
)
print(f"✅ Switched from {old_model} to {self.model}")
except Exception as e:
# Rollback on failure
self.model = old_model
raise Exception(f"Failed to switch provider: {str(e)}")
...
```**Key Differences from Previous Examples:**1.**Universal LLM Interface**:
- Single `completion()` function for all providers
- Automatic parameter translation
- Provider-agnostic tool handling
2.**Provider Flexibility**:
- Easy runtime provider switching
- No code changes needed for different LLMs
- Unified response format
3.**Configuration**:
- Centralized API key management
- Provider-specific settings handled internally
- Fallback and retry logic built-in
4.**Model Naming**:
- Supports both simple ("gpt-4") and prefixed ("anthropic/claude-3") formats
- Automatic provider detection
- Consistent interface regardless of backend**LiteLLM-Specific Features**:
- **100+ LLM Support**: OpenAI, Anthropic, Cohere, Replicate, etc.
- **Automatic Retries**: Built-in retry logic for failures
- **Cost Tracking**: Optional usage and cost monitoring
- **Load Balancing**: Can distribute across multiple providers
- **Fallbacks**: Automatic fallback to alternative providers**Security Features**(inherited):
- OAuth 2.1 with client credentials flow
- JWT verification with RS256 and JWKS
- TLS encryption for all connections
- Scope-based tool permissions
- Automatic token refresh on expiry**Advantages**:
- Provider independence - switch LLMs without changing code
- Unified interface reduces complexity
- Built-in provider-specific optimizations
- Easy A/B testing across models
- Single integration point for multiple LLMs
The security architecture remains identical - LiteLLM just provides a unified interface to multiple LLM providers while maintaining the same MCP security patterns.
LiteLLM adapts security patterns across different architectures while maintaining strong protections. It simplifies integration by handling provider details, letting teams build features with confidence in their security foundation.
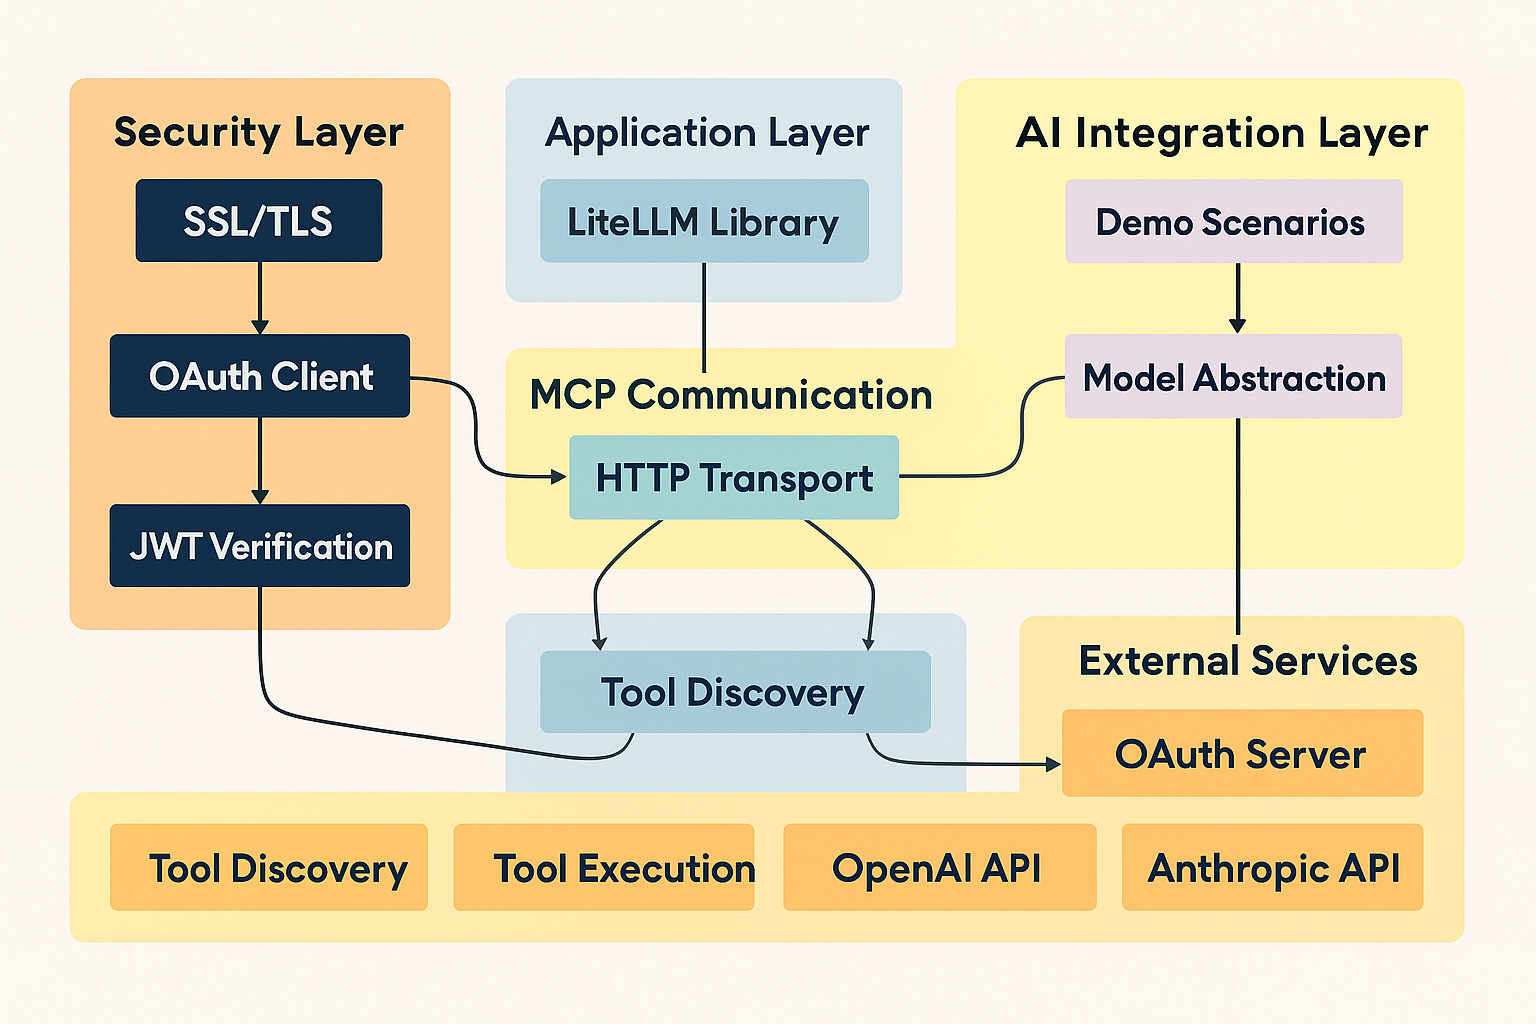
The LiteLLM code example demonstrates sophisticated security and integration features worth examining in detail. The implementation leverages OAuth 2.1 and JWT verification mechanisms inherited from previous implementations, providing robust security throughout. The code handles token management automatically, validates public keys through JWKS, verifies permissions based on scopes, and maintains secure TLS connections with the MCP server.
For MCP tool integration, the code provides a comprehensive solution that streamlines the interaction between different components. It automatically discovers available tools during startup, converts MCP tools into a format compatible with LiteLLM's function calling system, executes tools with proper security validation, and implements structured error handling for all tool-related operations.
The security architecture follows a layered approach that combines multiple protective measures. Authentication is handled through OAuth 2.1 with sophisticated token management, while authorization relies on scope-based access control for MCP tools. All communications are protected by TLS encryption, and the system includes comprehensive error handling with automatic token refresh capabilities. This thoughtful implementation creates a bridge between LiteLLM's universal LLM interface and MCP's secure tool execution framework, delivering both security and flexibility in accessing multiple LLM providers.
### Running LiteLLM example
```bash
% task run-litellm-client
task: [run-litellm-client] poetry run python src/secure_clients/litellm_client.py
🔍 Checking OAuth server availability...
Token URL: https://localhost:8443/token
🚀 Starting LiteLLM MCP Demo
==================================================
✅ OAuth authentication successful
🔗 Connecting to MCP server via HTTP...
MCP URL: https://localhost:8001/mcp/
📋 Found 3 MCP tools
🔧 Converted 3 tools to OpenAI format
🧪 Testing with gpt-4.1-2025-04-14
------------------------------
📝 Scenario: Customer Account Calculation
🙋 User: Customer CUST67890 recently made purchases of $150, $300, $13 and $89. Calculate their total account value and check if they qualify for premium status (>$500).
🤖 Using model: gpt-4.1-2025-04-14
💬 Starting conversation with 3 available tools
✅ JWT signature verification successful
✅ Token has required scopes: ['account:calculate']
📝 Scenario: User Information Lookup
🙋 User: Look up information for customer 'JOHNDOE123' and tell me about
their account status.
🤖 Using model: gpt-4.1-2025-04-14
💬 Starting conversation with 3 available tools
🔧 Model requested 1 tool calls
⚡ Executing get_customer_info
✅ JWT signature verification successful
✅ Token has required scopes: ['customer:read']
🔧 Executing get_customer_info with {'customer_id': 'JOHNDOE123'}
🔍 Debug - Result type: <class 'mcp.types.CallToolResult'>
🔍 Debug - Result content: [TextContent(type='text', text='{\n "customer_id": "JOHNDOE123",\n "name": "Customer JOHNDOE123",\n "status": "active",\n "account_type": "premium",\n "last_activity": "2025-06-20T02:49:41.695726",\n "contact_info": {\n "email": "customerjohndoe123@example.com",\n "phone": "+1-555-0123"\n }\n}', annotations=None)]
🔍 Debug - Extracted text: {
"customer_id": "JOHNDOE123",
"name": "Customer JOHNDOE123",
"status": "active",
"account_t...
✅ Tool get_customer_info executed successfully
🤖 Assistant: Customer JOHNDOE123 has an active account with a premium status.
Their last recorded activity was on June 20, 2025. If you need more information
about their account, such as recent transactions or support history,
just let me know!
Best Practices for Secure Client Implementation
As we’ve seen through these examples, implementing secure clients requires attention to several critical areas:Token Managementis paramount. Never hardcode tokens or secrets in your code. Use environment variables or secure vaults, implement proper token refresh before expiration, and cache tokens appropriately to avoid unnecessary requests.Error Handlingmust be security-aware. Don’t expose internal errors to end users, log security events for monitoring and analysis, implement exponential backoff for rate limits, and handle authentication failures gracefully.Input Validationshould happen at every layer. Validate the client before sending it to the server, check for injection patterns and dangerous content, enforce size limits and data types, and use allowlists rather than denylists.Monitoring and Auditingprovide security visibility. Log all tool executions with context; track failed authentication attempts, monitor for unusual patterns, and generate regular security reports.
Conclusion: Security as a First-Class Citizen

We’ve transformed the client side of MCP from a potential security liability into a robust, enterprise-ready system. Each client implementation we’ve explored — from Claude Desktop to LiteLLM — demonstrates that security doesn’t have to come at the cost of functionality.
By implementing OAuth 2.1 authentication, validating inputs, monitoring executions, and gracefully handling errors, we’ve created robust and secure client implementations. These patterns help your MCP integrations can operate safely in production environments while maintaining the flexibility that makes MCP valuable.
Remember, security is not a feature you add at the end — it’s a fundamental design principle that should guide every decision. As you implement your own MCP clients, use these examples as a foundation, but always consider the unique security requirements of your specific use case.
The combination of a secure MCP server and properly implemented clients creates a system ready for production deployment challenges. Now go forth and build amazing, secure AI integrations!
About the AuthorRick Hightower brings extensive enterprise experience as a former executive and distinguished engineer at a Fortune 100 company, where he specialized in delivering Machine Learning and AI solutions to deliver intelligent customer experience. His expertise spans both the theoretical foundations and practical applications of AI technologies.
As a TensorFlow certified professional and graduate of Stanford University’s comprehensive Machine Learning Specialization, Rick combines academic rigor with real-world implementation experience. His training includes mastery of supervised learning techniques, neural networks, and advanced AI concepts, which he has successfully applied to enterprise-scale solutions.
With a deep understanding of both the business and technical aspects of AI implementation, Rick bridges the gap between theoretical machine learning concepts and practical business applications, helping organizations use AI to create tangible value.
If you like this article, follow Rick on LinkedIn or on Medium.
TweetApache Spark Training
Kafka Tutorial
Akka Consulting
Cassandra Training
AWS Cassandra Database Support
Kafka Support Pricing
Cassandra Database Support Pricing
Non-stop Cassandra
Watchdog
Advantages of using Cloudurable™
Cassandra Consulting
Cloudurable™| Guide to AWS Cassandra Deploy
Cloudurable™| AWS Cassandra Guidelines and Notes
Free guide to deploying Cassandra on AWS
Kafka Training
Kafka Consulting
DynamoDB Training
DynamoDB Consulting
Kinesis Training
Kinesis Consulting
Kafka Tutorial PDF
Kubernetes Security Training
Redis Consulting
Redis Training
ElasticSearch / ELK Consulting
ElasticSearch Training
InfluxDB/TICK Training TICK Consulting